> ## Documentation Index
> Fetch the complete documentation index at: https://docs-agents.fpt.ai/llms.txt
> Use this file to discover all available pages before exploring further.
# Use Custom APIs in an Agent
> Attach a REST API connector to an Agent, set Auto, Ask or Block for each operation, test it and remove it from the Agent.
This page shows how to use a **REST API connector** that already exists in the Workspace inside an Agent. If you don't have one yet, create it first in [Custom API connectors in the Space](/en/custom-api-connectors).
## Entry point
**My agents** → open an Agent → **Build** → **Configuration** panel → **Connectors** section → **+**.
## Attach the Connector to an Agent
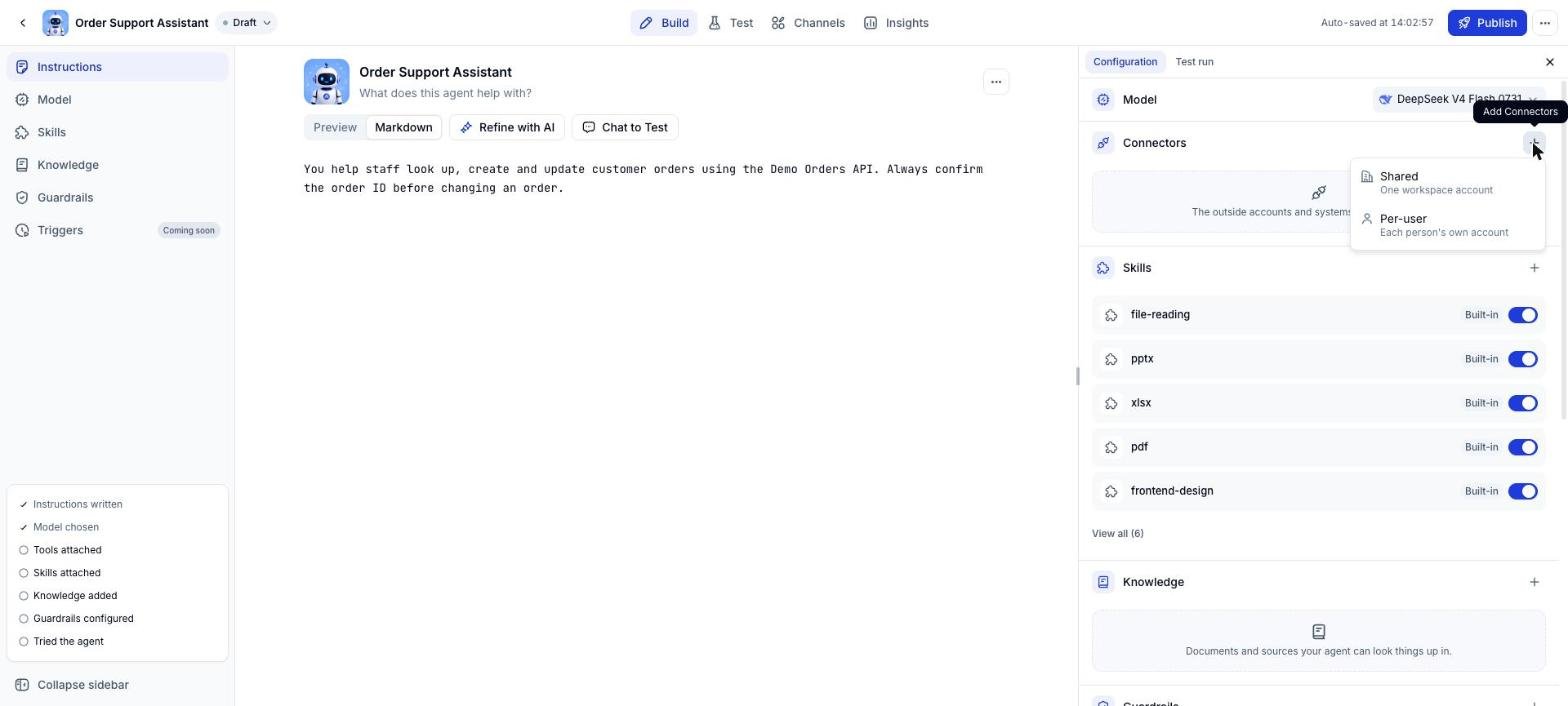
Open the Agent. On the **Build** screen, select the **Configuration** panel and click **+** in the **Connectors** section.
Choose **Shared** (one Workspace account) or **Per-user** (each person's own account).
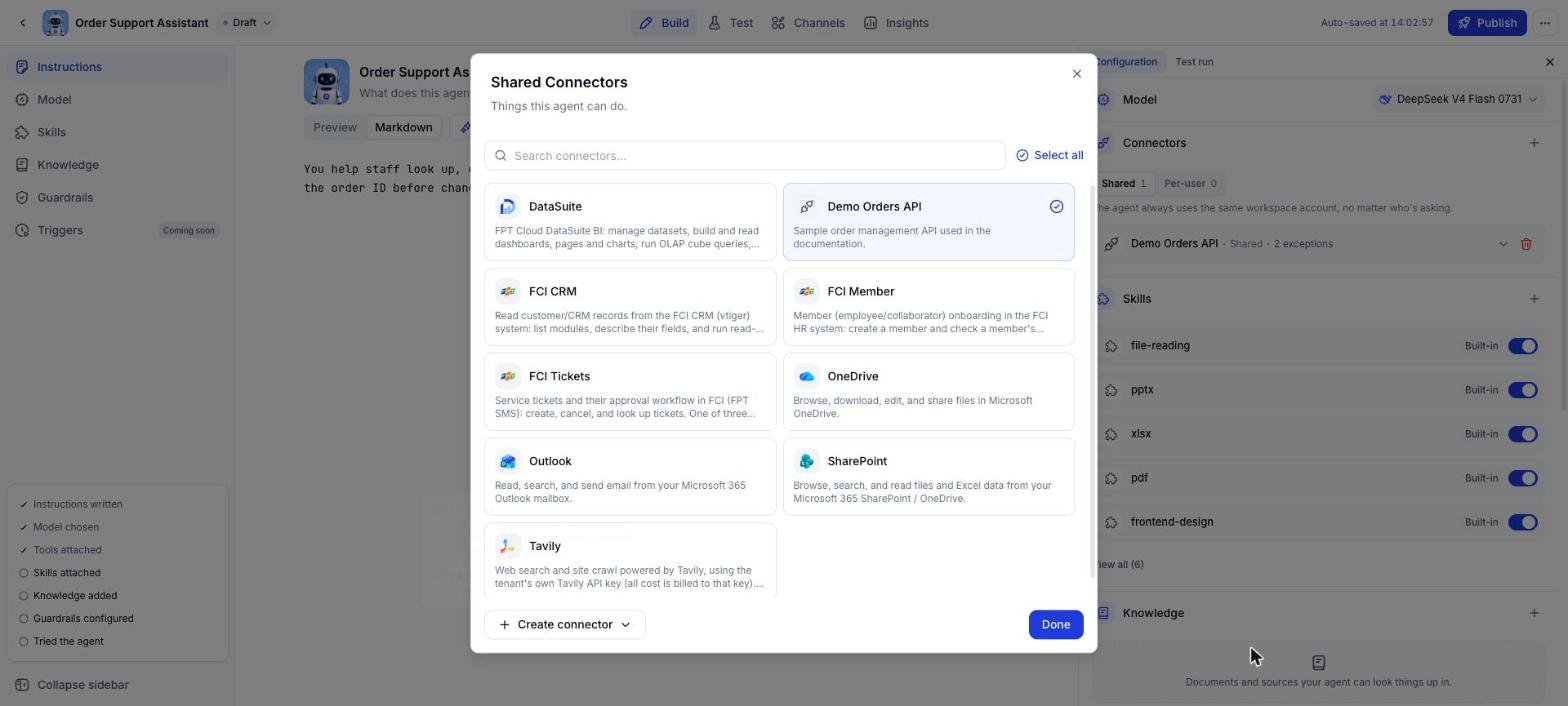
 Custom Connectors are listed together with the built-in ones. Select the Connector and click **Done**. **Create connector** at the bottom opens the same REST API dialog as the Connectors page.
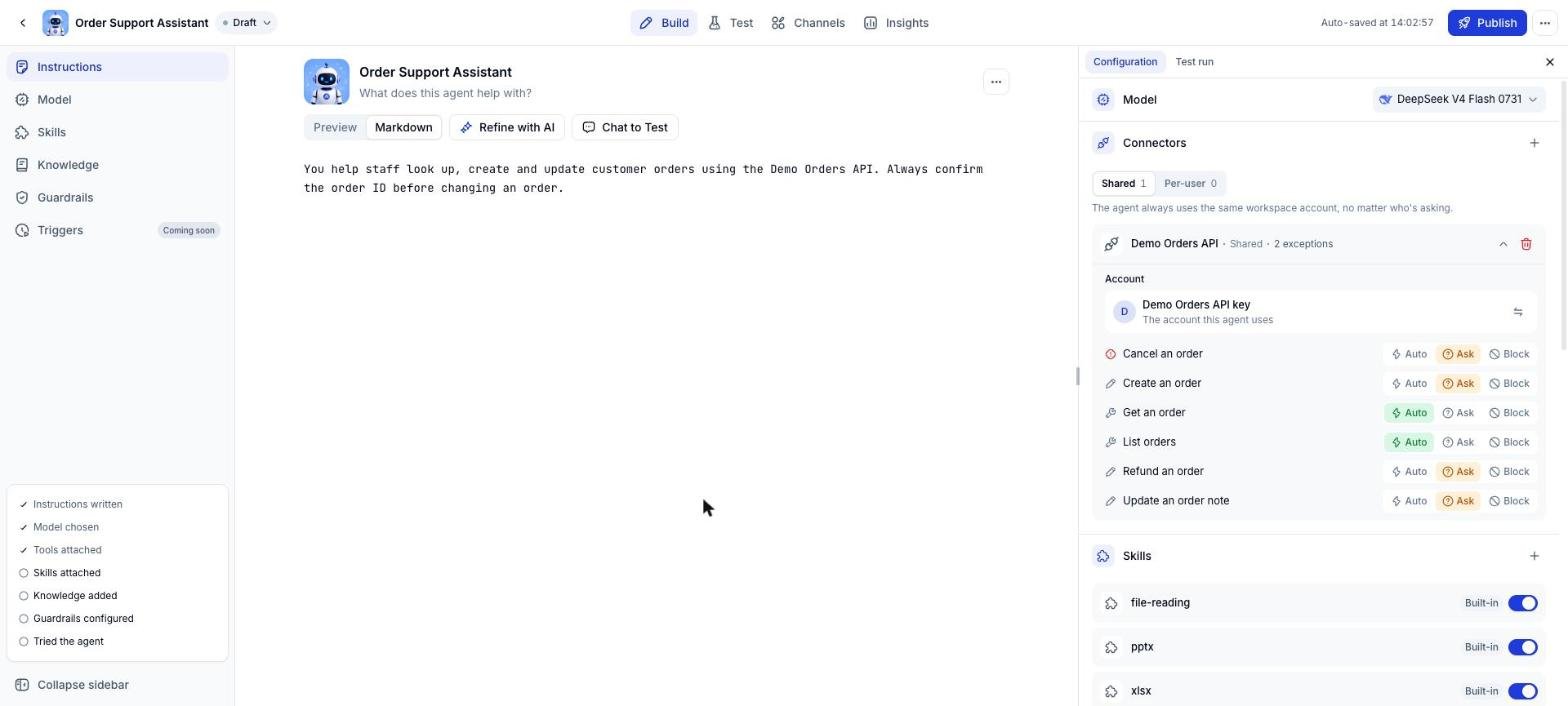
 The Connector appears in the **Connectors** section with its account type and the number of exceptions. Click the row to see the account in use and the permission of each operation.
 | Account type | When the Agent runs | Use it when |
| - | - | - |
| **Shared** | The Agent always uses the same Workspace account, no matter who is asking | Shared business APIs with a key issued by an admin |
| **Per-user** | Each person connects and uses their own account | Each person has their own key or permissions on the API |
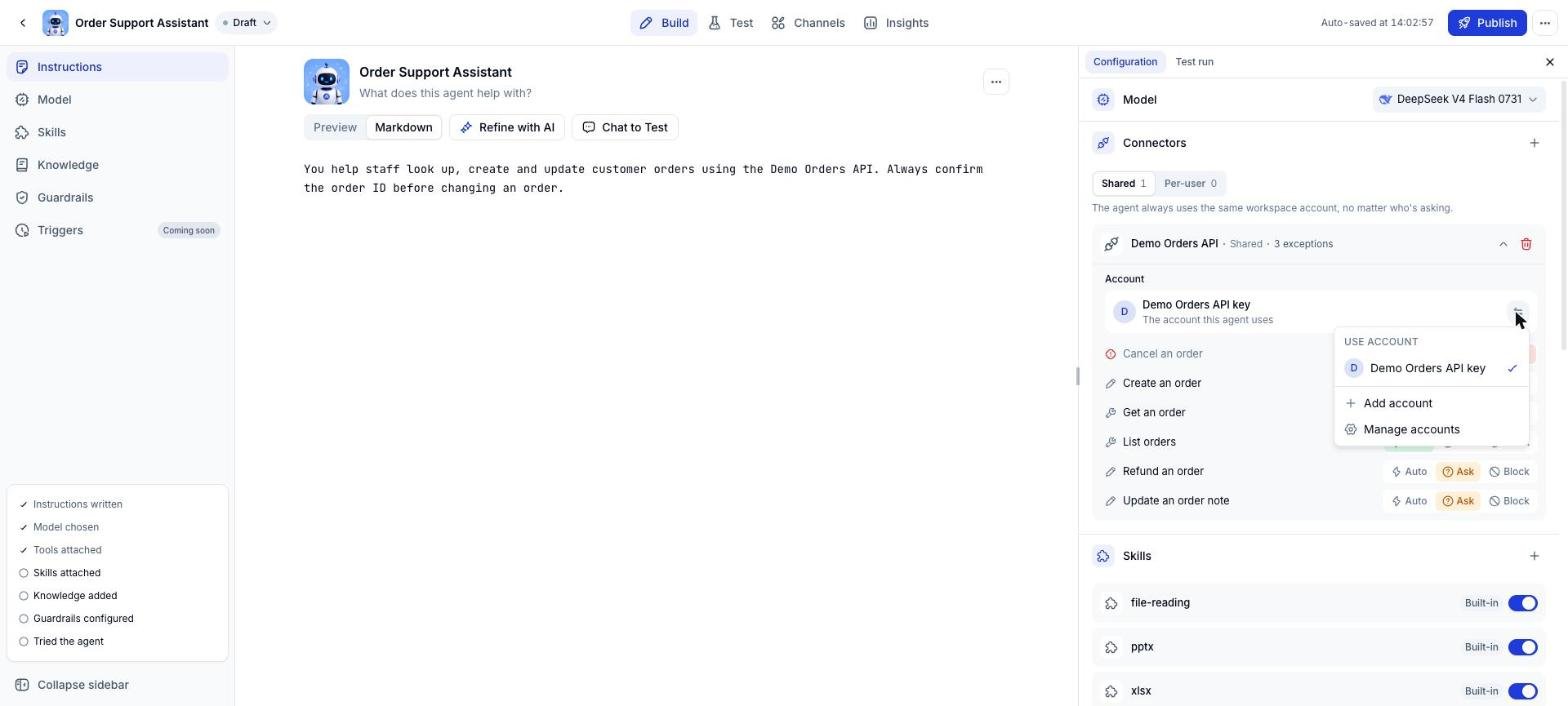
With **Shared**, the **Account** area shows which account the Agent uses. Click the switch icon to pick another account, **Add account** or **Manage accounts**.
| Account type | When the Agent runs | Use it when |
| - | - | - |
| **Shared** | The Agent always uses the same Workspace account, no matter who is asking | Shared business APIs with a key issued by an admin |
| **Per-user** | Each person connects and uses their own account | Each person has their own key or permissions on the API |
With **Shared**, the **Account** area shows which account the Agent uses. Click the switch icon to pick another account, **Add account** or **Manage accounts**.
 With **Per-user**, there is no Account area. If a person hasn't connected their own account yet, the Agent tells them to connect it before it calls an operation.
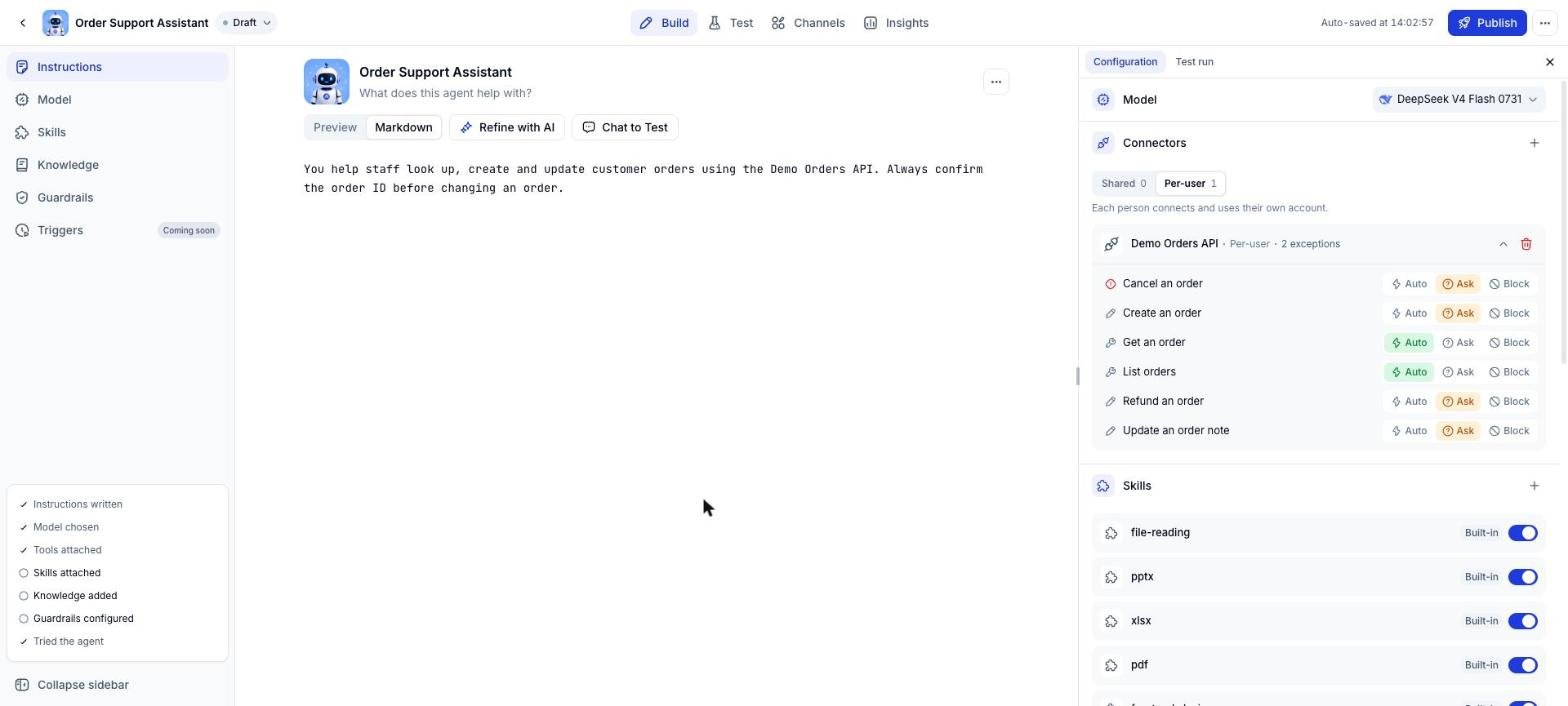 On one Agent, a Connector can be attached with only one account type. A Connector already attached as Shared shows **Already added · Shared** in the Per-user picker. To switch types, remove the Connector and attach it again.
## Set a permission for each operation
Each operation has three permission levels:
| Level | What the Agent does | Default for |
| - | - | - |
| **Auto** | Calls the API right away without asking | **Read-only** operations |
| **Ask** | Stops and asks the user to approve before calling | **Writes data** and **Can destroy data** operations |
| **Block** | Can't call this operation | No default, you set it |
The **exceptions** count next to the Connector name tells you how many operations differ from their default. The example below sets **Cancel an order** to **Block** so the Agent can't cancel orders.
On one Agent, a Connector can be attached with only one account type. A Connector already attached as Shared shows **Already added · Shared** in the Per-user picker. To switch types, remove the Connector and attach it again.
## Set a permission for each operation
Each operation has three permission levels:
| Level | What the Agent does | Default for |
| - | - | - |
| **Auto** | Calls the API right away without asking | **Read-only** operations |
| **Ask** | Stops and asks the user to approve before calling | **Writes data** and **Can destroy data** operations |
| **Block** | Can't call this operation | No default, you set it |
The **exceptions** count next to the Connector name tells you how many operations differ from their default. The example below sets **Cancel an order** to **Block** so the Agent can't cancel orders.
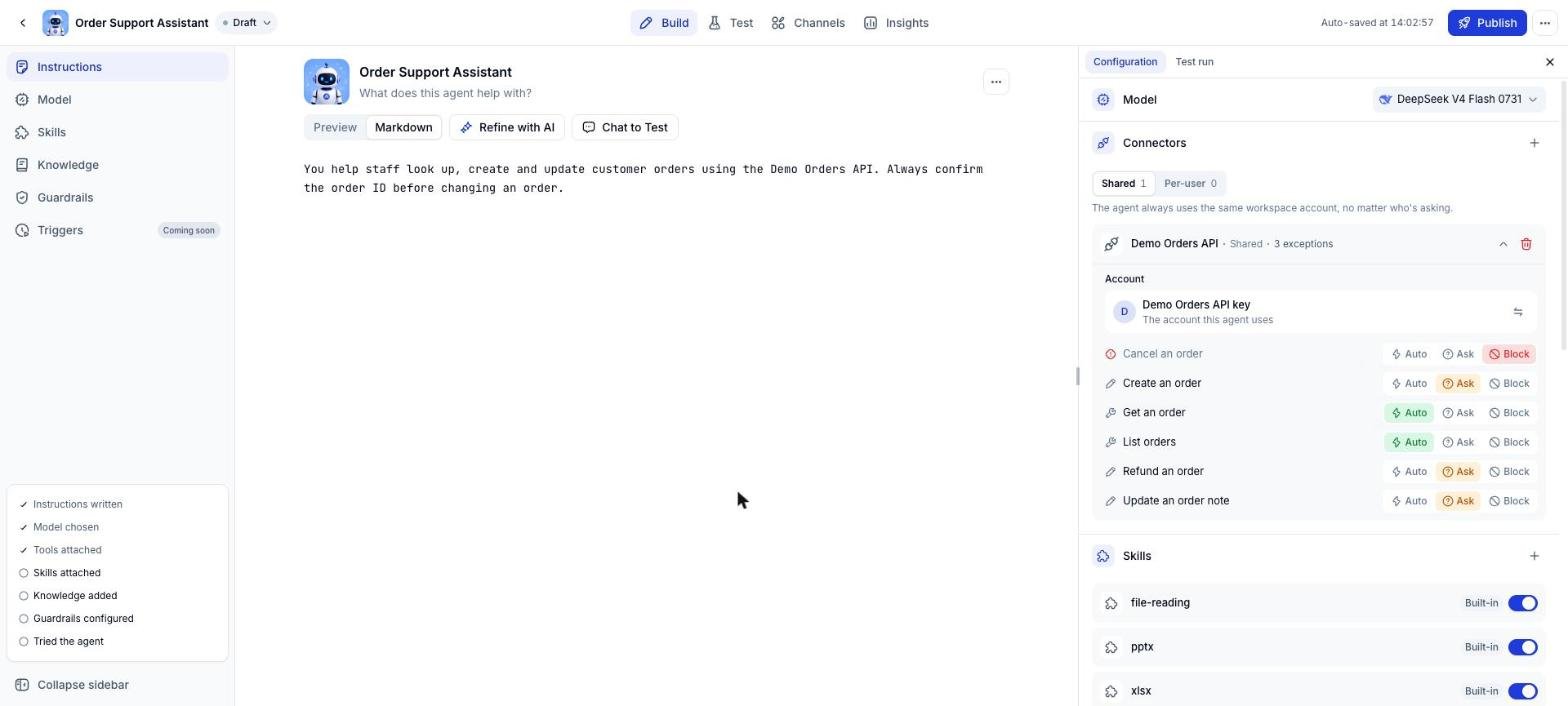 Removing and re-attaching a Connector resets every operation to its default permission. Note your exceptions before you remove it.
## Test the Agent with the Connector
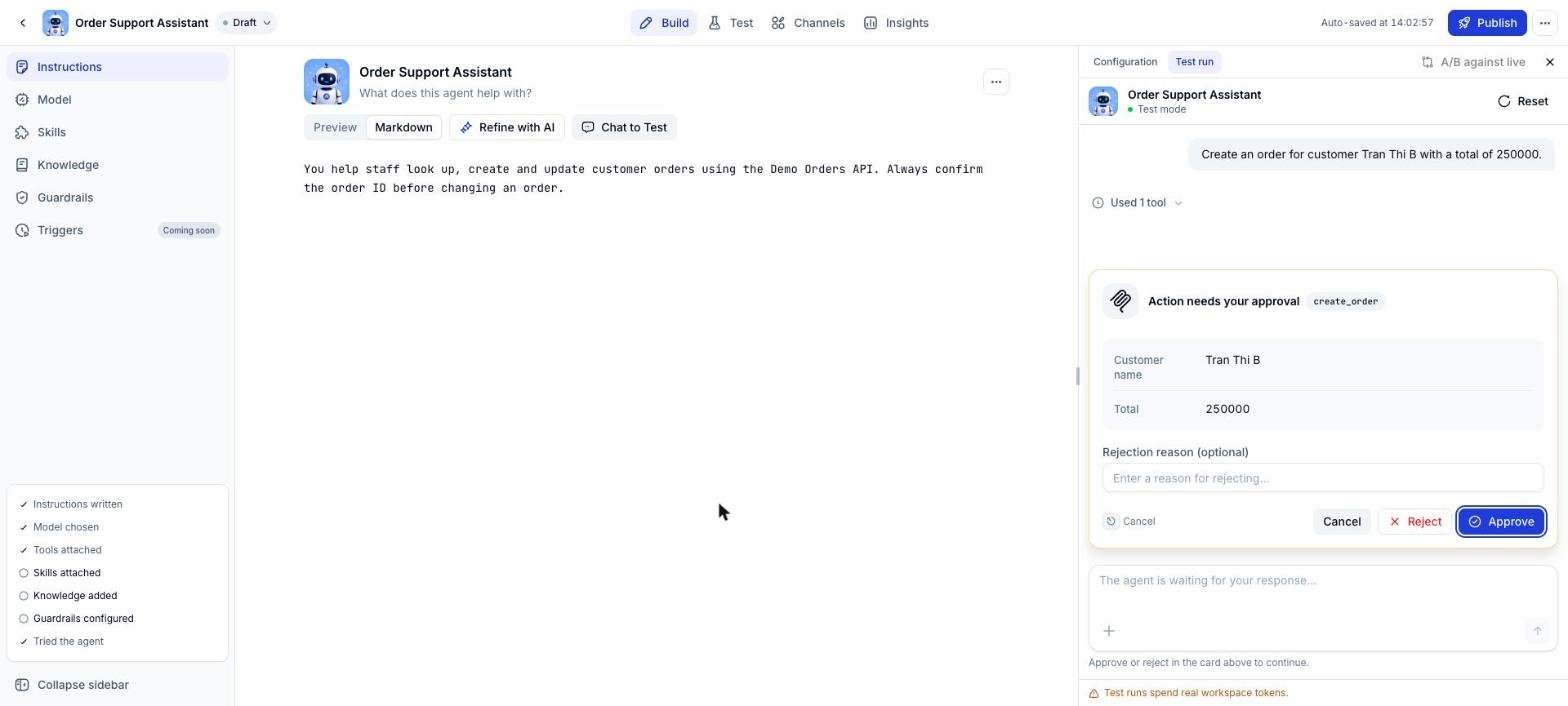
Open the **Test run** tab and send a request that needs the API, for example: Create an order for customer Tran Thi B with a total of 250000.
For an operation set to **Ask**, the **Action needs your approval** card shows the operation and the arguments the Agent wants to send. Click **Approve** to call the API. Click **Reject** to skip the call, optionally with a **Rejection reason** so the Agent can adjust.
Removing and re-attaching a Connector resets every operation to its default permission. Note your exceptions before you remove it.
## Test the Agent with the Connector
Open the **Test run** tab and send a request that needs the API, for example: Create an order for customer Tran Thi B with a total of 250000.
For an operation set to **Ask**, the **Action needs your approval** card shows the operation and the arguments the Agent wants to send. Click **Approve** to call the API. Click **Reject** to skip the call, optionally with a **Rejection reason** so the Agent can adjust.
 After the Agent replies, expand **Used N tools** and then the tool name to see the **Arguments** that were sent and the **Result** the API returned.
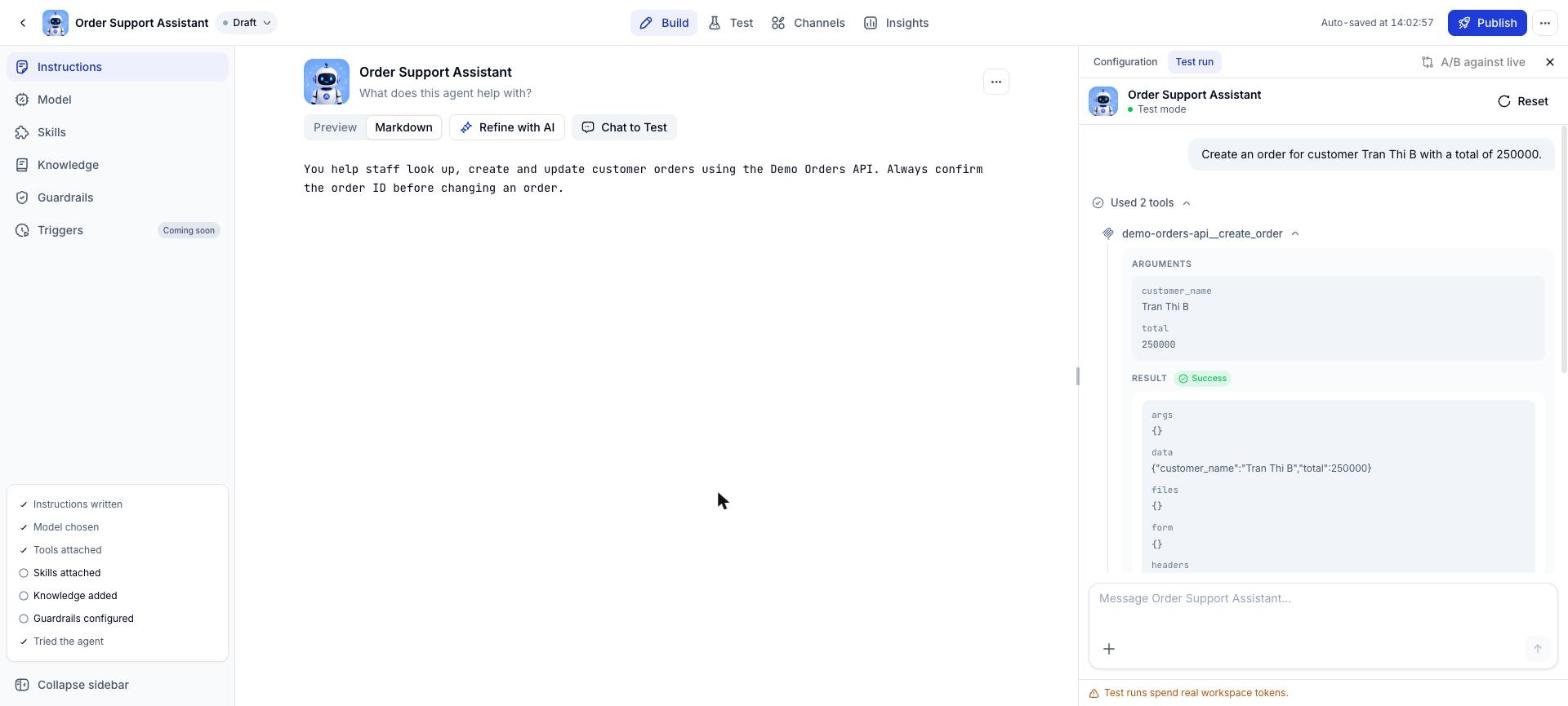 A test run calls the real API and spends real Workspace tokens. When you test operations that write or delete data, point the Connector at a test environment of the API.
Connector changes in an Agent are auto-saved to the draft. End users only see them after you Publish a new version of the Agent.
## Remove the Connector from an Agent
Click the **trash** icon on the Connector row in the **Connectors** section. The Connector is removed right away, with no confirmation dialog. It stays in the Workspace and you can attach it again at any time.
When the Connector is re-imported in the Space, operations removed or renamed in the new document are no longer available in the Agent. Open the Agent's **Connectors** section to check permissions and run a test again.
## Troubleshooting
| What you see | Cause | Fix |
| - | - | - |
| The Agent asks the user to connect an account | The Connector is attached as **Per-user** and the user hasn't connected yet | The user connects their own account before using the Agent |
## See also
Create, edit, re-import and delete Connectors.
How to attach built-in Connectors and set tool permissions.
This documentation is built and hosted on [Mintlify](https://mintlify.com), a developer documentation platform.
A test run calls the real API and spends real Workspace tokens. When you test operations that write or delete data, point the Connector at a test environment of the API.
Connector changes in an Agent are auto-saved to the draft. End users only see them after you Publish a new version of the Agent.
## Remove the Connector from an Agent
Click the **trash** icon on the Connector row in the **Connectors** section. The Connector is removed right away, with no confirmation dialog. It stays in the Workspace and you can attach it again at any time.
When the Connector is re-imported in the Space, operations removed or renamed in the new document are no longer available in the Agent. Open the Agent's **Connectors** section to check permissions and run a test again.
## Troubleshooting
| What you see | Cause | Fix |
| - | - | - |
| The Agent asks the user to connect an account | The Connector is attached as **Per-user** and the user hasn't connected yet | The user connects their own account before using the Agent |
## See also
Create, edit, re-import and delete Connectors.
How to attach built-in Connectors and set tool permissions.
This documentation is built and hosted on [Mintlify](https://mintlify.com), a developer documentation platform.