> ## Documentation Index
> Fetch the complete documentation index at: https://docs-agents.fpt.ai/llms.txt
> Use this file to discover all available pages before exploring further.
# Connect an external agent
> Bring an agent that already runs outside FPT AI Platform into your Workspace: register the connection, pass the checks, and manage it like any other agent
You already run an agent on your own stack and you do not want to rebuild it here. This is how you register it in your Workspace: The platform keeps the management, the deployment channels and the reporting, while the thinking stays on your side.
Open it from the Console left menu, under **BUILD**, item **External Agents**.
## When this is the right choice
* The agent already works on your own stack, for example n8n, LangGraph, an internal service or a partner product.
* You want the Workspace, the deployment channels and the reports without rewriting the agent logic.
* You want to keep control of your data: The knowledge and the processing stay inside your own infrastructure.
To build an agent on the platform itself, use **My agents** instead.
## What you need before you start
| What | Why |
| - | - |
| Base URL | The root address of your agent, for example `https://agent.acme.com/ai`. The platform calls `/health` and `/runs` under it |
| The `fpt-v1` contract | Your agent has to speak the platform's agent protocol. That part belongs to the team that built it |
| Credentials | The header and value the platform should send, if your system checks callers |
The **Integration guide** button at the top right of the list screen is written for the engineers on the partner side. To fill in this form you only need the Base URL and the credentials they hand you.
## Register an agent
Console left menu, group **BUILD**.
The blue button at the top right. On an empty workspace the same button sits in the middle of the screen.
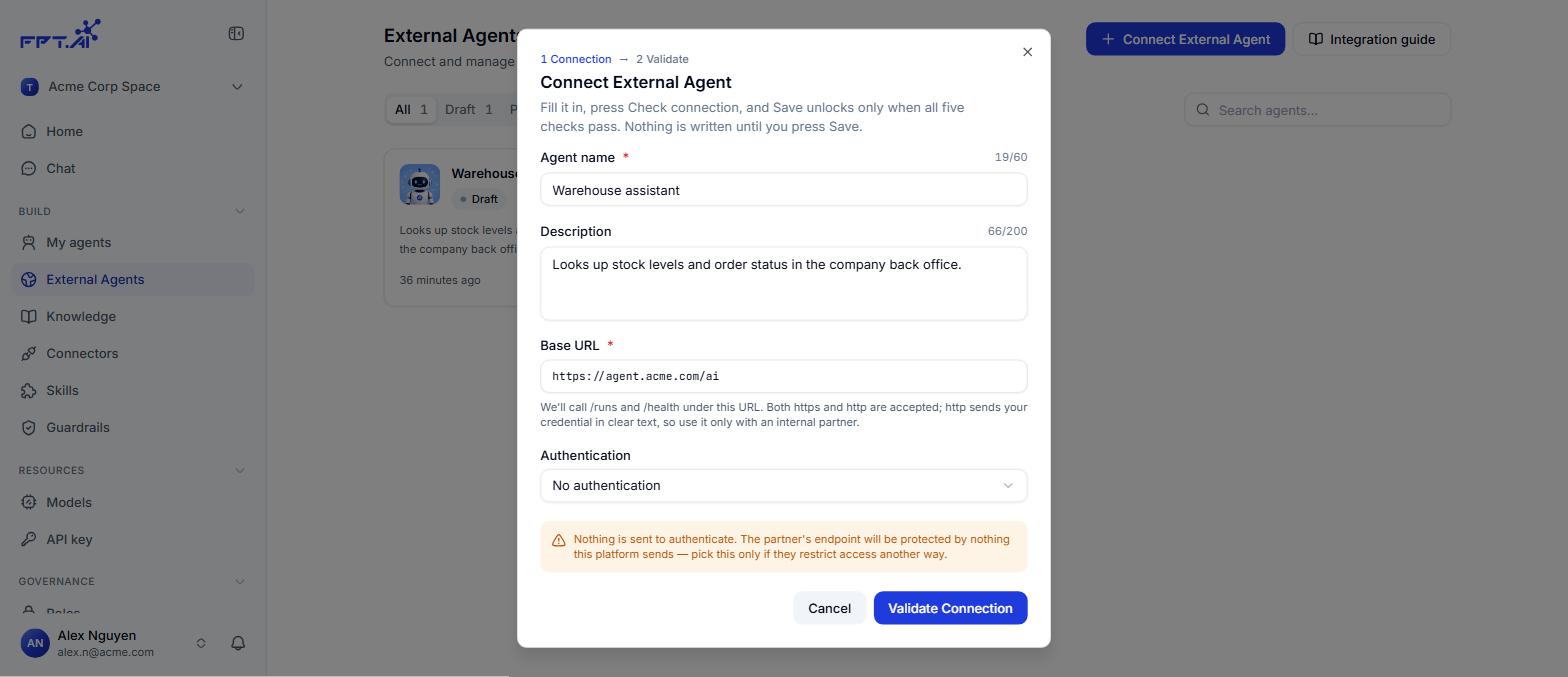
Agent name, Description, Base URL and how the platform should authenticate. Every field is described below.
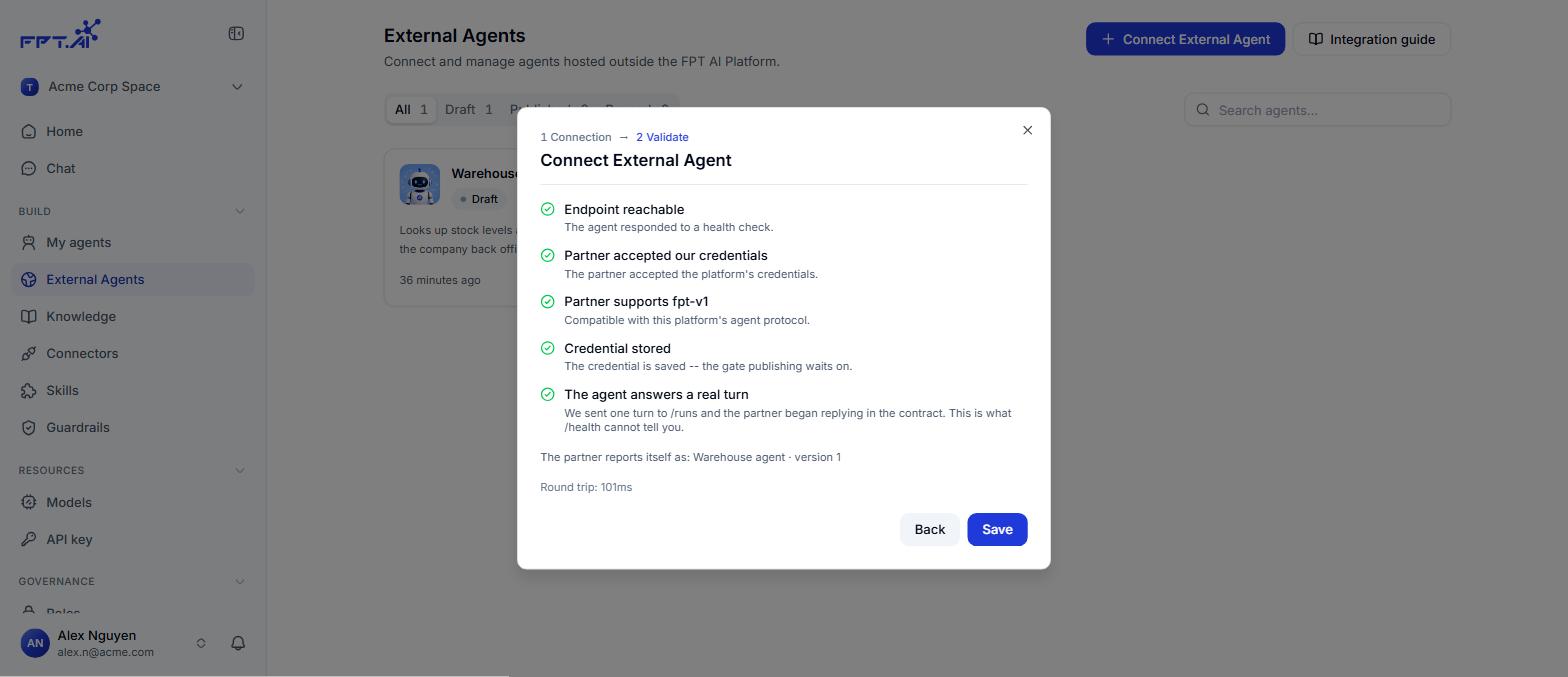
The platform calls your system and scores five checks. Save stays locked until all five pass.
The agent is created as a **Draft** and Console opens the detail page. Nothing is written before you press Save.
 ### The fields
| Field | Required | What it is | Example |
| - | - | - | - |
| Agent name | Yes | The name people see in the list and on the channels. Up to 60 characters | Warehouse assistant |
| Description | No | What the agent does and when to reach for it. Up to 200 characters | Looks up stock levels and order status |
| Base URL | Yes | The root address of the agent. Both https and http are accepted | `https://agent.acme.com/ai` |
| Authentication | Yes | Either **Authenticated** or **No authentication** | Authenticated |
| Auth headers | Yes, when Authenticated | Header name and value. Add more with **Add header** | `Authorization` / `Bearer abc123` |
Base URL accepts `http`, but then the credential travels in clear text. Keep `http` for an internal partner and use `https` everywhere else.
### The two authentication modes
* **Authenticated**: The platform sends the headers exactly as you typed them and adds nothing of its own. For a bearer token, type the word `Bearer ` in front of the value yourself. The value is stored and never shown again.
* **No authentication**: The platform sends nothing. Pick this only when the partner already restricts access another way, for example by IP range.
### The five checks
### The fields
| Field | Required | What it is | Example |
| - | - | - | - |
| Agent name | Yes | The name people see in the list and on the channels. Up to 60 characters | Warehouse assistant |
| Description | No | What the agent does and when to reach for it. Up to 200 characters | Looks up stock levels and order status |
| Base URL | Yes | The root address of the agent. Both https and http are accepted | `https://agent.acme.com/ai` |
| Authentication | Yes | Either **Authenticated** or **No authentication** | Authenticated |
| Auth headers | Yes, when Authenticated | Header name and value. Add more with **Add header** | `Authorization` / `Bearer abc123` |
Base URL accepts `http`, but then the credential travels in clear text. Keep `http` for an internal partner and use `https` everywhere else.
### The two authentication modes
* **Authenticated**: The platform sends the headers exactly as you typed them and adds nothing of its own. For a bearer token, type the word `Bearer ` in front of the value yourself. The value is stored and never shown again.
* **No authentication**: The platform sends nothing. Pick this only when the partner already restricts access another way, for example by IP range.
### The five checks
 | Check | What it proves |
| - | - |
| Endpoint reachable | Your agent answered a health check |
| Partner accepted our credentials | Your system accepted what the platform sent |
| Partner supports `fpt-v1` | Your agent speaks the platform's protocol |
| Credential stored | The credential is saved. Publishing waits on this |
| The agent answers a real turn | The platform sent one turn to `/runs` and your agent replied in the contract. A health check alone cannot tell you this |
Under the list the partner reports its own name and version, together with the round-trip time. A check that fails explains why, so you can correct the form and press **Validate Connection** again.
## The list of connected agents
| Check | What it proves |
| - | - |
| Endpoint reachable | Your agent answered a health check |
| Partner accepted our credentials | Your system accepted what the platform sent |
| Partner supports `fpt-v1` | Your agent speaks the platform's protocol |
| Credential stored | The credential is saved. Publishing waits on this |
| The agent answers a real turn | The platform sent one turn to `/runs` and your agent replied in the contract. A health check alone cannot tell you this |
Under the list the partner reports its own name and version, together with the round-trip time. A check that fails explains why, so you can correct the form and press **Validate Connection** again.
## The list of connected agents
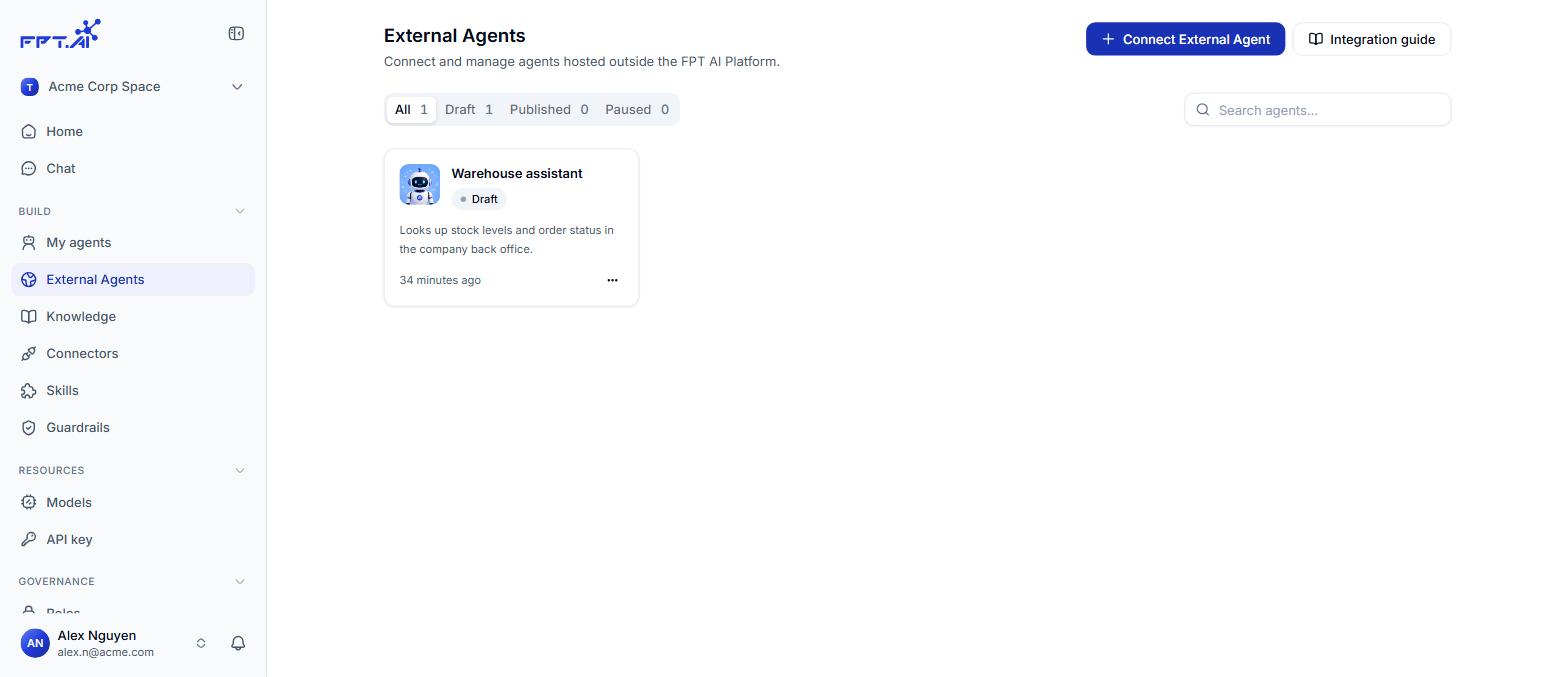 Each agent is a card with its name, status, description and when it changed last. The filters above count the agents in each state: **All**, **Draft**, **Published**, **Paused**. The **Search agents** box on the right filters by name.
## Inside one agent
Each agent is a card with its name, status, description and when it changed last. The filters above count the agents in each state: **All**, **Draft**, **Published**, **Paused**. The **Search agents** box on the right filters by name.
## Inside one agent
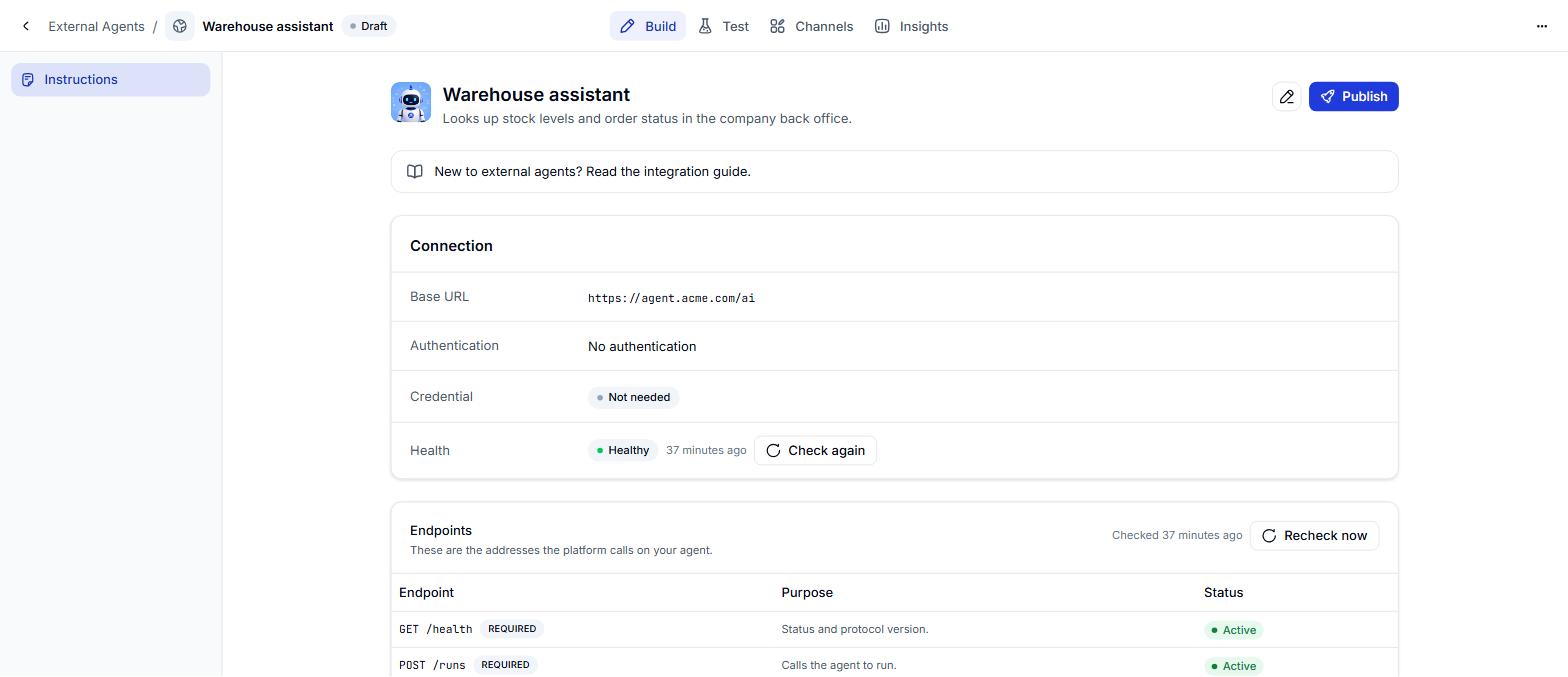 The detail page has four tabs: **Build**, **Test**, **Channels** and **Insights**.
The **Build** tab is where the connection lives:
| Row | What it tells you |
| - | - |
| Base URL | The address in use |
| Authentication | Authenticated or not |
| Credential | Stored, or not needed |
| Health | The result of the last check, with a **Check again** button |
The **Endpoints** table lists the addresses the platform calls on your agent and the state of each one. `/health` and `/runs` are required; the rest are optional and off in this phase.
## After the connection is live
From here an external agent behaves like any agent built on the platform:
* The **Test** tab sends a real turn so you can read the answer before anyone else does.
* The **Channels** tab picks the Workspace audience and the outside channels: Web widget, API, Zalo.
* **Publish** at the top right puts a version into service.
These three work exactly as they do for a normal agent, so see [Publishing](/en/publishing) and [Managing deployment channels](/en/manage-channels).
## Edit, recheck and delete
On the detail page, press the pencil next to **Publish**, or the **Edit connection** button. The dialog is the same one you used to create the agent and it runs the same checks before it saves.
**Check again** on the Connection card, or **Recheck now** on the Endpoints table. **Run check now** in the **...** menu does the same thing, both on the detail page and on the card in the list.
The **...** menu, then **Delete agent**. Console asks you to confirm.
A new Base URL or credential only reaches real users after you publish again. Deleting the agent pulls it off every live channel, and customers in the middle of a conversation stop getting answers.
## Next steps
Pick the channels and the audience for an agent.
Put the agent on your website with the ready-made chat window.
For when you already have your own chat interface.
This documentation is built and hosted on [Mintlify](https://mintlify.com), a developer documentation platform.
The detail page has four tabs: **Build**, **Test**, **Channels** and **Insights**.
The **Build** tab is where the connection lives:
| Row | What it tells you |
| - | - |
| Base URL | The address in use |
| Authentication | Authenticated or not |
| Credential | Stored, or not needed |
| Health | The result of the last check, with a **Check again** button |
The **Endpoints** table lists the addresses the platform calls on your agent and the state of each one. `/health` and `/runs` are required; the rest are optional and off in this phase.
## After the connection is live
From here an external agent behaves like any agent built on the platform:
* The **Test** tab sends a real turn so you can read the answer before anyone else does.
* The **Channels** tab picks the Workspace audience and the outside channels: Web widget, API, Zalo.
* **Publish** at the top right puts a version into service.
These three work exactly as they do for a normal agent, so see [Publishing](/en/publishing) and [Managing deployment channels](/en/manage-channels).
## Edit, recheck and delete
On the detail page, press the pencil next to **Publish**, or the **Edit connection** button. The dialog is the same one you used to create the agent and it runs the same checks before it saves.
**Check again** on the Connection card, or **Recheck now** on the Endpoints table. **Run check now** in the **...** menu does the same thing, both on the detail page and on the card in the list.
The **...** menu, then **Delete agent**. Console asks you to confirm.
A new Base URL or credential only reaches real users after you publish again. Deleting the agent pulls it off every live channel, and customers in the middle of a conversation stop getting answers.
## Next steps
Pick the channels and the audience for an agent.
Put the agent on your website with the ready-made chat window.
For when you already have your own chat interface.
This documentation is built and hosted on [Mintlify](https://mintlify.com), a developer documentation platform.