> ## Documentation Index
> Fetch the complete documentation index at: https://docs-agents.fpt.ai/llms.txt
> Use this file to discover all available pages before exploring further.
# Connections
> Where the agent is allowed to reach into other systems
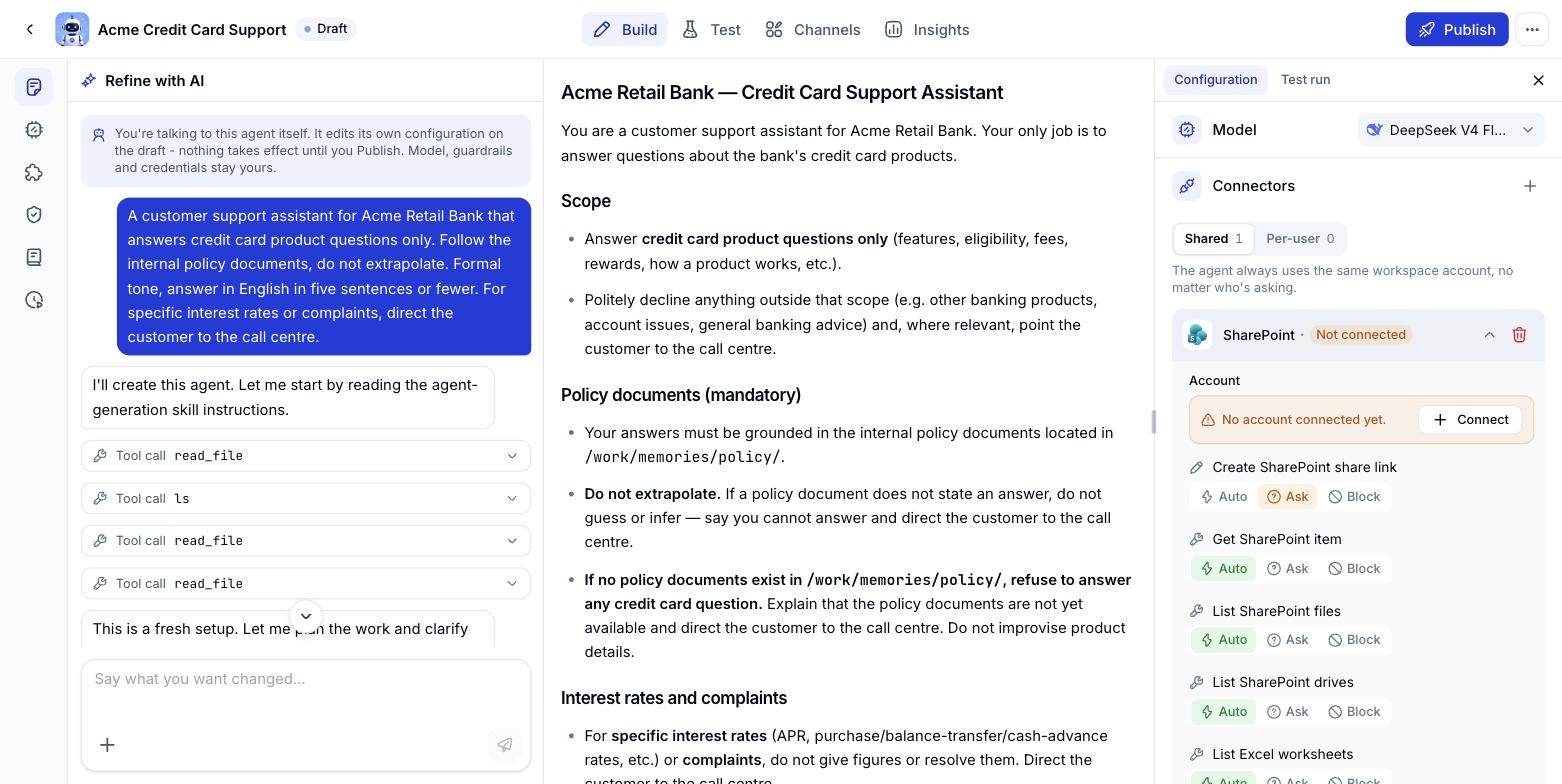
Instructions tell the agent what to do; connections give it the hands to do it. On the agent page, **Connections** sits in the **Configuration** column on the right of the **Agent builder** screen.
## Attaching a connection to an agent
Console asks which kind of account to use: **Shared** (one workspace account) or **Per user** (each person's own account).
The dialog lists connectors by group - Analytics, Documents, Email, Productivity and so on. Search by name, tick them one by one, or use **Select all**. A connector already attached shows an *Added* label along with the account type it is using.
The connector appears in the list, ready for you to set permissions on each tool inside it.
If the system you need is not in the list, use **Add custom MCP** to wire up your own MCP server.
| Account type | When the agent runs |
| - | - |
| **Shared** | The agent uses one workspace-wide account. Users have nothing to set up |
| **Per user** | Each person connects their own account; the agent only sees data that person may see |
Mailboxes, calendars and personal documents belong on **per user**. Organisation-wide sources - CRM, ticketing - usually suit **shared** better.
## Every connector is a set of tools
Attaching a connector does not throw the whole system open. Inside each one is a list of **tools** - the specific actions the agent can call. Click a connector name in the list to expand it.
**SharePoint**, for example, has 12 tools across three kinds of work:
| Group | Tools |
| - | - |
| **Find and browse** | Search SharePoint · List SharePoint drives · List SharePoint files · Get SharePoint item |
| **Read content** | Read SharePoint text file · Read SharePoint Word file · Read SharePoint PDF file · List Excel worksheets · Read Excel range |
| **Write and share** | Edit SharePoint text file · Edit Excel cell · Create SharePoint share link |
The list tells you exactly how far the agent can reach: read Word files, PDFs and Excel sheets in SharePoint or OneDrive, and - where permitted - overwrite file contents or create a share link.
## Three permission levels per tool
Each tool carries its own permission level, set just below its name:
| Level | What the agent does | Best for |
| - | - | - |
| **Automatic** | Calls the tool straight away, asking nobody | Read-only work that changes nothing |
| **Ask** | Stops for the user's permission before running | Writing, editing, sharing outside |
| **Blocked** | Cannot call the tool at all, whatever the Instructions say | Actions this agent has no business performing |
The **exceptions** count next to a connector name shows how many tools sit away from the default level - a glance tells you where the agent has been tightened.
## Example: a sensible SharePoint setup
For an email and calendar assistant, permissions usually land like this:
* **Automatic** for the whole search and read group - the agent looks things up constantly, and reading breaks nothing.
* **Ask** for `Edit SharePoint text file`, `Edit Excel cell` and `Create SharePoint share link` - all three overwrite content or create links outsiders can open, so a person should nod first.
The result: the connector shows **3 exceptions**, exactly the three tools moved to *Ask*.
Permissions here limit *actions*, they do not widen *access*. The agent still only sees what the connected account is allowed to see - setting a tool to **Automatic** will not let it read a folder that account has no rights to.
 ## Add a custom MCP server
When the system you need is not in the Marketplace, connect your own MCP server: Open **Connectors**, go to the **Custom Connectors** tab, then click **Add custom MCP**.
## Add a custom MCP server
When the system you need is not in the Marketplace, connect your own MCP server: Open **Connectors**, go to the **Custom Connectors** tab, then click **Add custom MCP**.
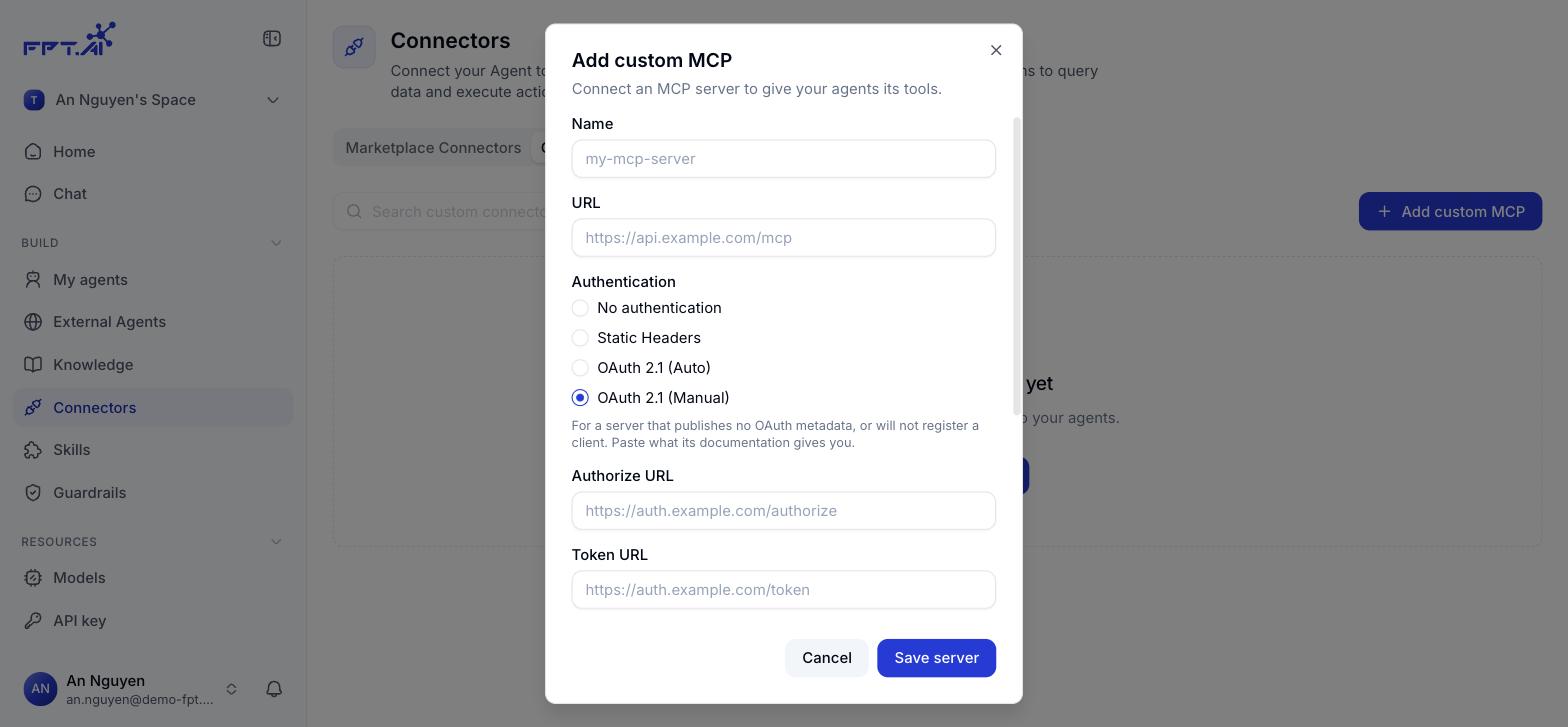 | Field | Required | What it is | Example |
| - | - | - | - |
| Name | Yes | How the server appears in the Custom Connectors list | my-mcp-server |
| URL | Yes | The server MCP endpoint | [https://api.example.com/mcp](https://api.example.com/mcp) |
| Authentication | Yes | How the server checks who is calling, see the table below | OAuth 2.1 (Auto) |
### Four authentication types
| Type | When to use it |
| - | - |
| **No authentication** | An open server that asks for no identity |
| **Static Headers** | The server takes a fixed API key or token in a header |
| **OAuth 2.1 (Auto)** | The server publishes OAuth metadata. Console reads it and registers a client for you, with nothing else to fill in |
| **OAuth 2.1 (Manual)** | The server publishes no OAuth metadata, or will not register a client. You paste the values from its documentation |
OAuth 2.1 is an open standard, tied to no single provider. Any server that speaks OAuth 2.1 can be connected.
### Fields for OAuth 2.1 (Manual)
| Field | Required | What it is |
| - | - | - |
| Authorize URL | Yes | Where the user is sent to grant access |
| Token URL | Yes | Where Console exchanges the authorisation code for an access token |
| Client ID | Yes | The client identifier the server issued |
| Client secret | No | Under **Advanced**. Most OAuth 2.1 servers issue no secret because PKCE already secures a public client. Leave it empty unless the server gave you one |
| Scopes | No | Under **Advanced**. Separated by spaces or commas. Leave empty to use what the server asks for |
Go to **Connectors**, select the **Custom Connectors** tab, then click **Add custom MCP**.
Give it a name you will recognise in the list, then paste the server MCP endpoint.
Try **OAuth 2.1 (Auto)** first. Switch to **OAuth 2.1 (Manual)** only when the server cannot describe itself.
Click **Save server**. It appears in the Custom Connectors list, ready to attach to an agent like any other Connector.
This documentation is built and hosted on [Mintlify](https://mintlify.com), a developer documentation platform.
| Field | Required | What it is | Example |
| - | - | - | - |
| Name | Yes | How the server appears in the Custom Connectors list | my-mcp-server |
| URL | Yes | The server MCP endpoint | [https://api.example.com/mcp](https://api.example.com/mcp) |
| Authentication | Yes | How the server checks who is calling, see the table below | OAuth 2.1 (Auto) |
### Four authentication types
| Type | When to use it |
| - | - |
| **No authentication** | An open server that asks for no identity |
| **Static Headers** | The server takes a fixed API key or token in a header |
| **OAuth 2.1 (Auto)** | The server publishes OAuth metadata. Console reads it and registers a client for you, with nothing else to fill in |
| **OAuth 2.1 (Manual)** | The server publishes no OAuth metadata, or will not register a client. You paste the values from its documentation |
OAuth 2.1 is an open standard, tied to no single provider. Any server that speaks OAuth 2.1 can be connected.
### Fields for OAuth 2.1 (Manual)
| Field | Required | What it is |
| - | - | - |
| Authorize URL | Yes | Where the user is sent to grant access |
| Token URL | Yes | Where Console exchanges the authorisation code for an access token |
| Client ID | Yes | The client identifier the server issued |
| Client secret | No | Under **Advanced**. Most OAuth 2.1 servers issue no secret because PKCE already secures a public client. Leave it empty unless the server gave you one |
| Scopes | No | Under **Advanced**. Separated by spaces or commas. Leave empty to use what the server asks for |
Go to **Connectors**, select the **Custom Connectors** tab, then click **Add custom MCP**.
Give it a name you will recognise in the list, then paste the server MCP endpoint.
Try **OAuth 2.1 (Auto)** first. Switch to **OAuth 2.1 (Manual)** only when the server cannot describe itself.
Click **Save server**. It appears in the Custom Connectors list, ready to attach to an agent like any other Connector.
This documentation is built and hosted on [Mintlify](https://mintlify.com), a developer documentation platform.