> ## Documentation Index
> Fetch the complete documentation index at: https://docs-agents.fpt.ai/llms.txt
> Use this file to discover all available pages before exploring further.
# Custom API connectors in the Space
> Create, view, edit and delete REST API connectors on the Workspace Connectors page, from a Swagger/OpenAPI document or by declaring them by hand.
A **REST API connector** turns each operation of a REST API into a tool an Agent can call. You create and manage the Connector on the Workspace **Connectors** page, then attach it to individual Agents and set a permission for each operation on the Agent details page.
## Entry points
| Entry point | Path | Use it to |
| - | - | - |
| Connectors page | Left sidebar → **Connectors** → **Custom Connectors** tab → **Add connector** → **REST API** | Create, view, edit and delete Connectors |
| Empty state | **Custom Connectors** tab with no Connectors yet → **Add connector** button in the middle | Create your first Connector |
| Agent details | **My agents** → open an Agent → **Build** → **Configuration** panel → **Connectors** section → **+** | Attach a Connector, set permissions, remove it from the Agent |
| Agent connector picker | In the connector picker → **Create connector** → **REST API** | Create a Connector without leaving the Agent |
## Before you start
* **API document**: An OpenAPI 3.x or Swagger 2.0 file in JSON or YAML, up to 2 MB. Without a document, you need the base URL and the list of endpoints to declare by hand.
* **Public base URL**: Addresses that point to the local machine or private IP ranges (for example `localhost` or `169.254.169.254`) are rejected. Use `https` where possible.
* **Credentials**: An API key or token, or the API's OAuth 2.1 details.
* **Limit**: A Connector keeps up to 200 operations. If the document has more, only the first 200 are imported.
## Create a Connector
### Option 1: Import a Swagger/OpenAPI document
Click **Connectors** in the left sidebar and select the **Custom Connectors** tab.
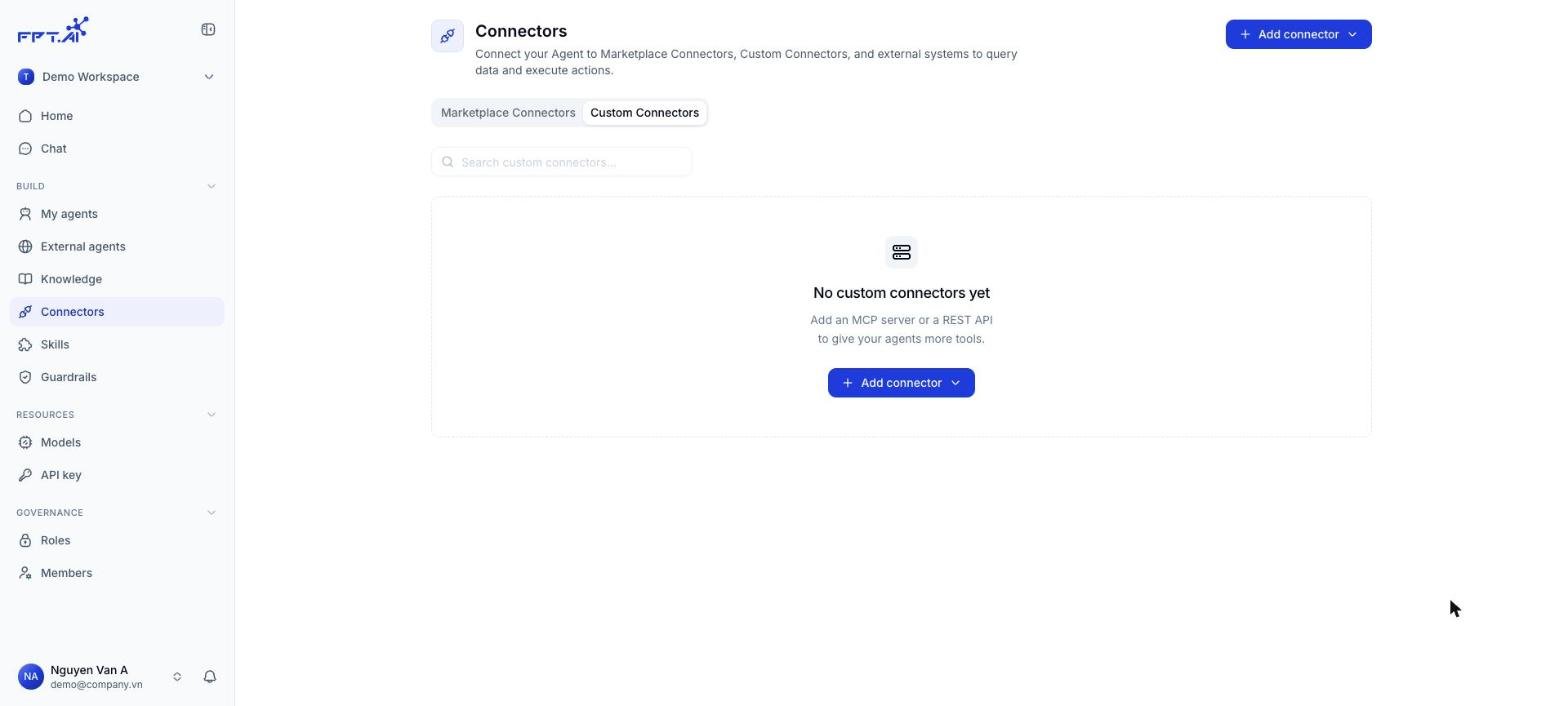 The menu offers **REST API** (import Swagger/OpenAPI or declare by hand) and **MCP server** (connect an MCP server by URL). Choose **REST API**.
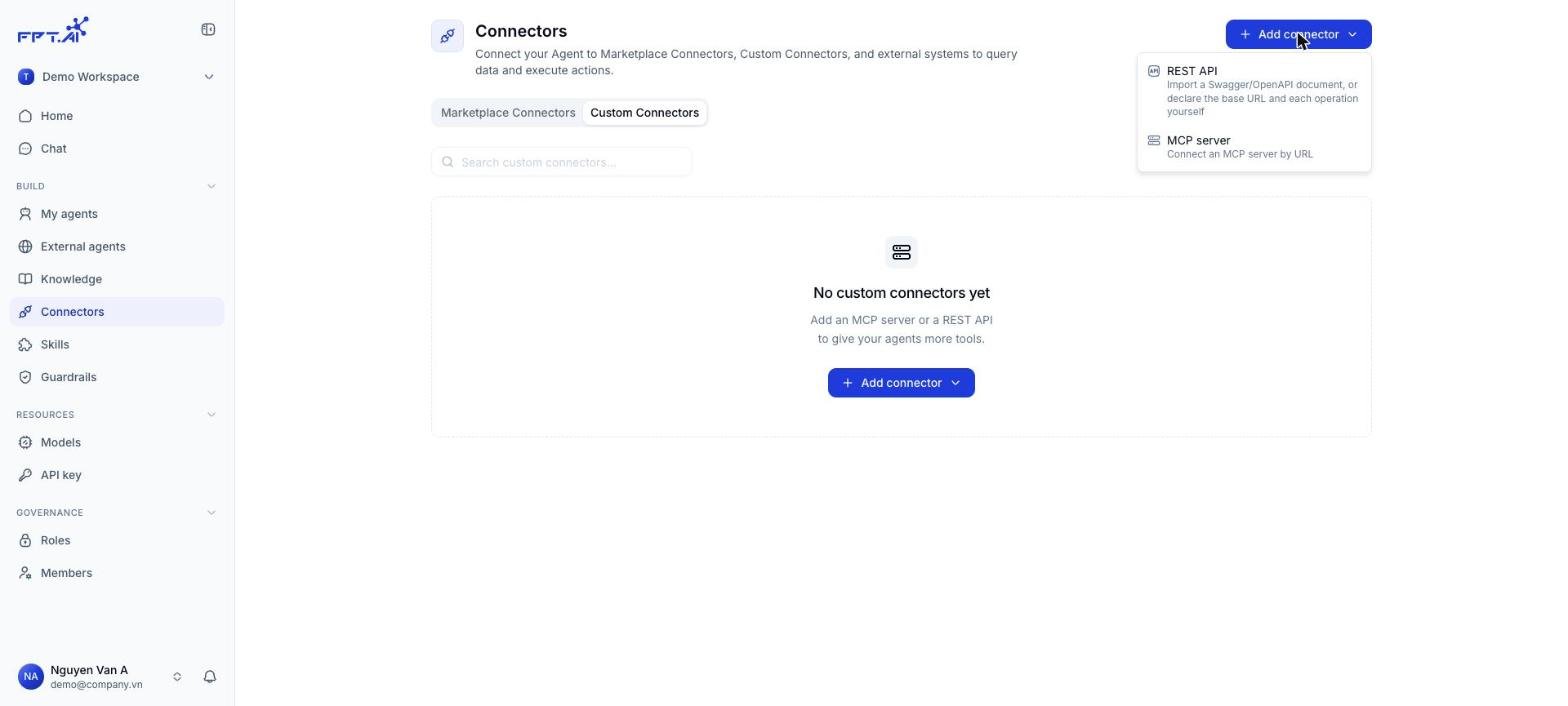 On the **Import Swagger/OpenAPI** tab, drop a file into the box or click **Choose file**. You can also paste the content under **Or paste the document**. Click **Continue**.
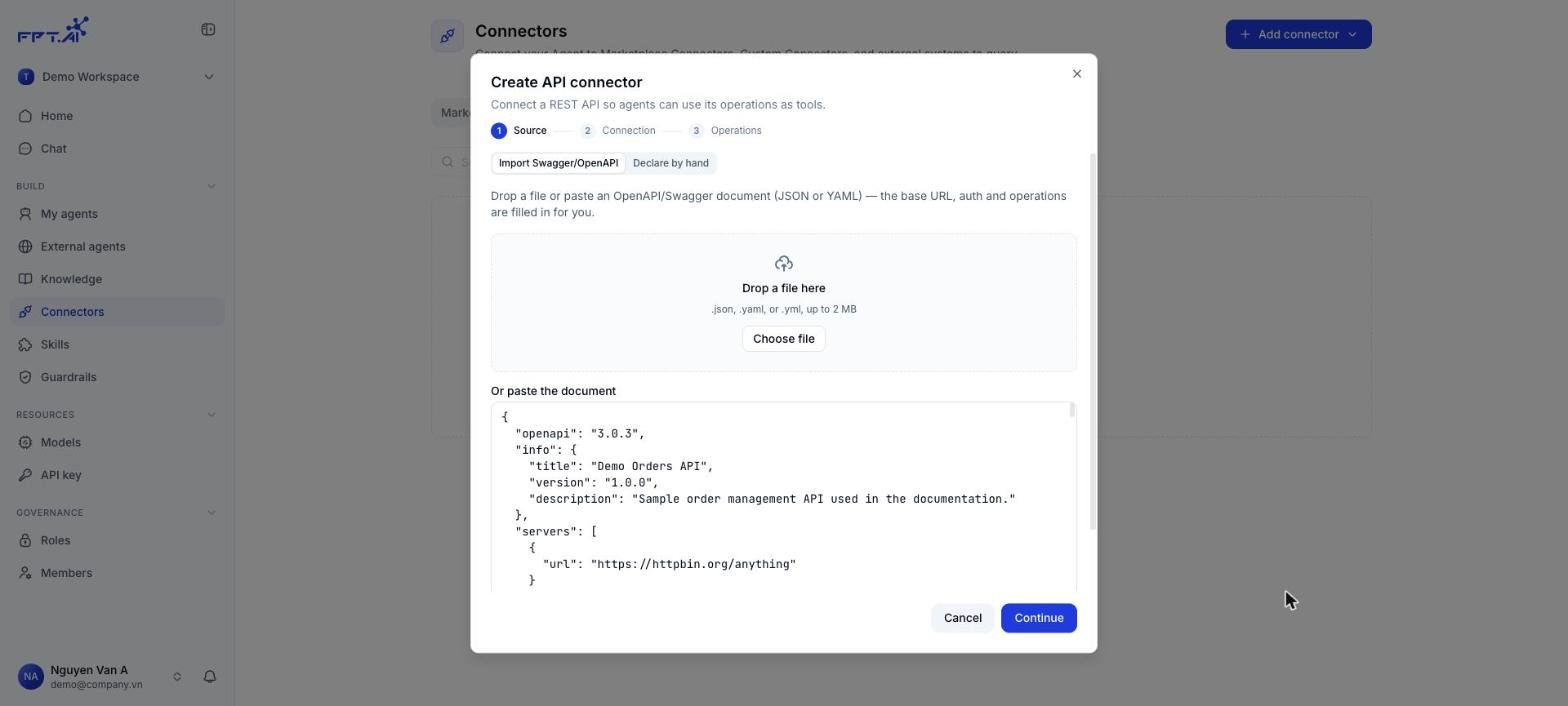 The name, **Base URL** and **Authentication** type are filled in from the document and tagged **From the document**. Review them, enter the key **Value** if the API needs one, then click **Continue**. Each field is described in the Connection step field table below.
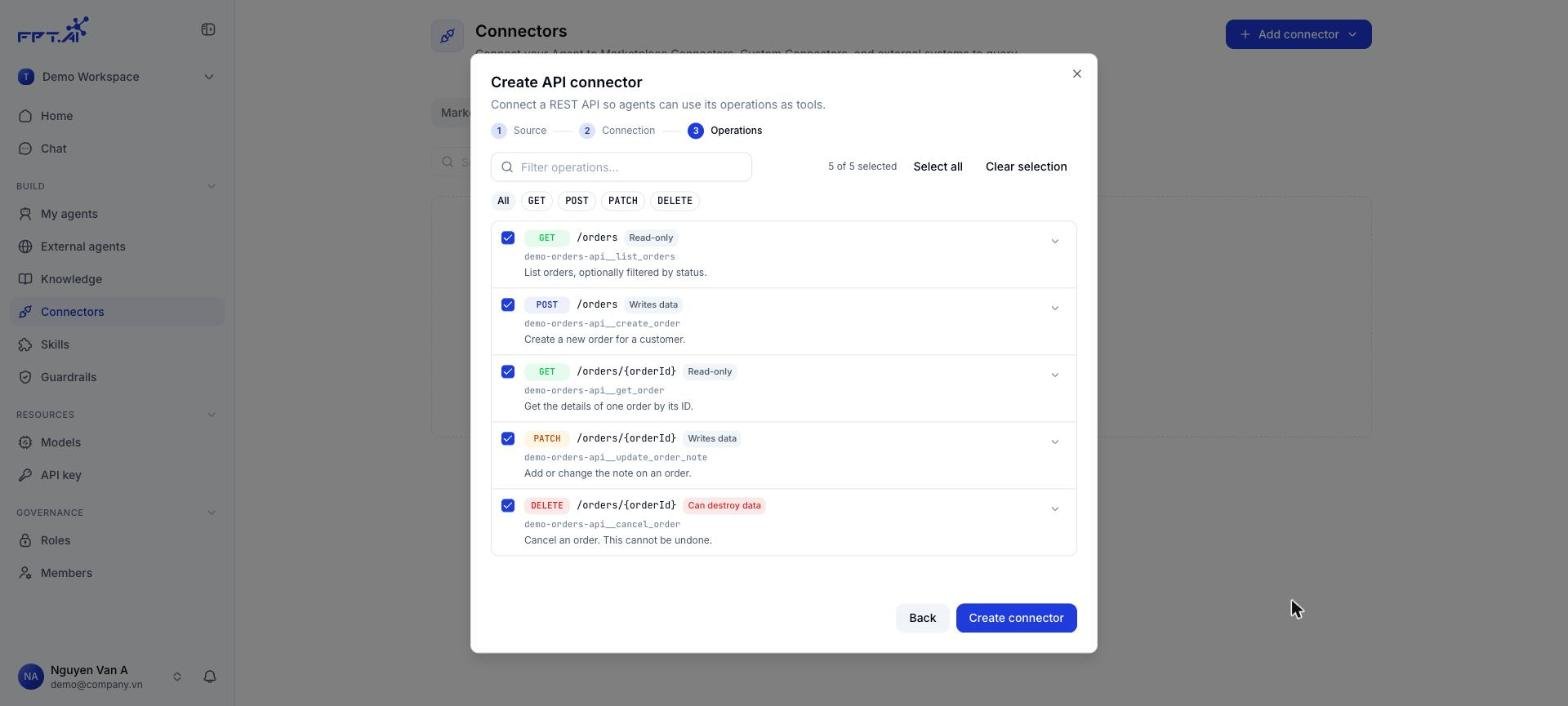
 Each operation shows its method, path, risk label, the tool name the Agent will see (for example `demo-orders-api__list_orders`) and its description. Clear the operations you don't need, filter by method, or expand an operation to edit its description and parameters. Click **Create connector**.
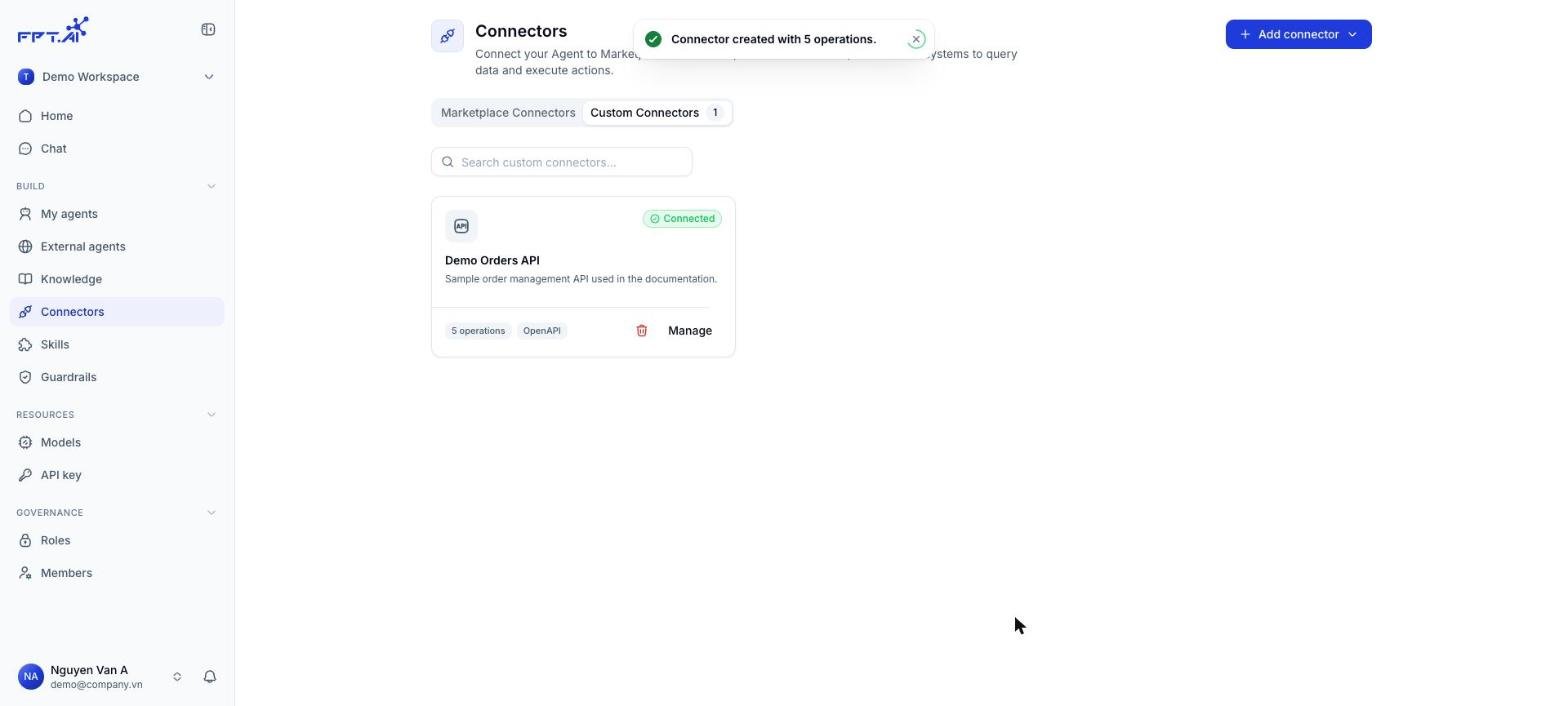
 The message **Connector created with N operations.** appears and the new Connector card shows the **Connected** status.
 The Agent reads each operation's description to decide when to call the API. Write descriptions that say what the operation does and when to use it, even if the source document already has a `summary`.
### Option 2: Declare by hand
Use this when the API has no OpenAPI document, or you only want to expose a few endpoints to the Agent.
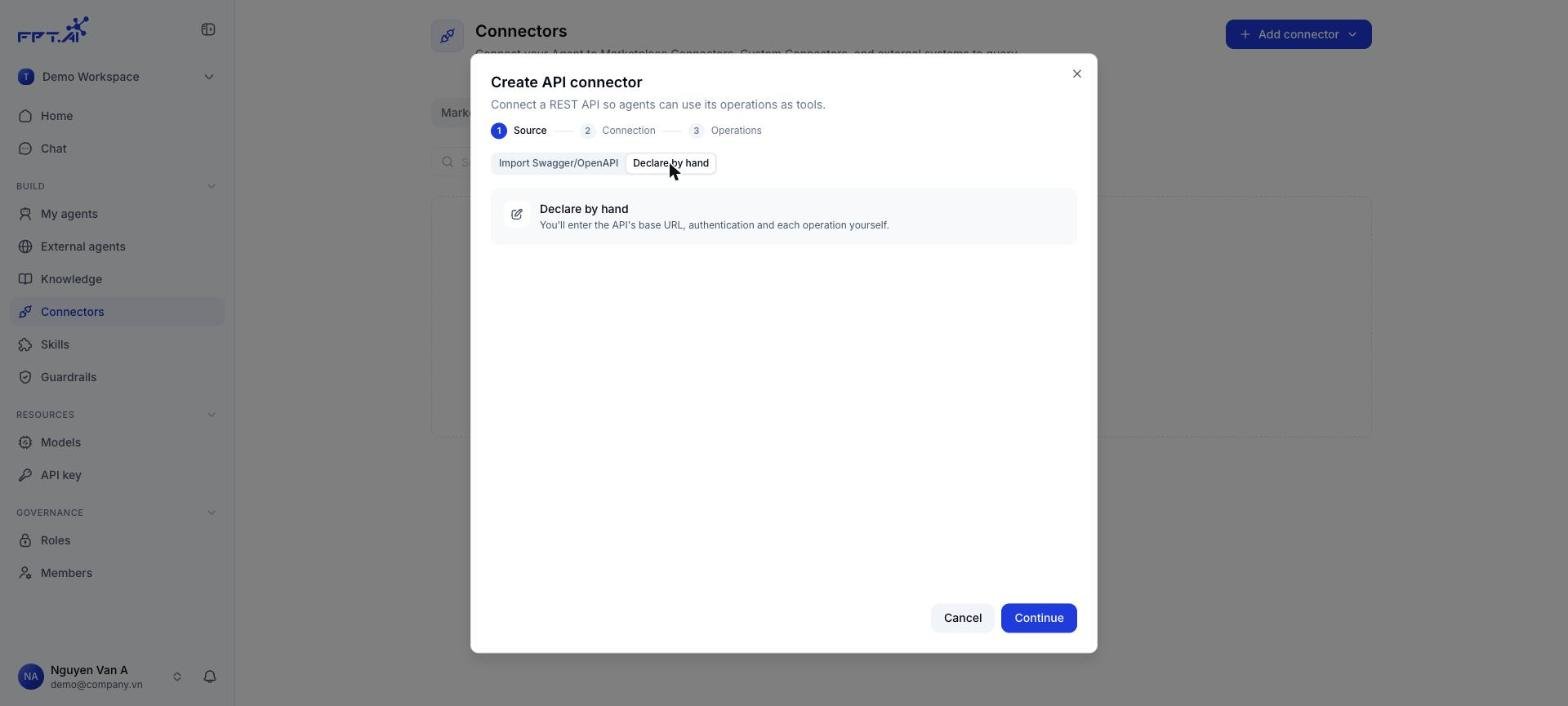
In the **Create API connector** dialog, select **Declare by hand** and click **Continue**.
The Agent reads each operation's description to decide when to call the API. Write descriptions that say what the operation does and when to use it, even if the source document already has a `summary`.
### Option 2: Declare by hand
Use this when the API has no OpenAPI document, or you only want to expose a few endpoints to the Agent.
In the **Create API connector** dialog, select **Declare by hand** and click **Continue**.
 Enter the **Name** and **Base URL** and choose the **Authentication** type, as in option 1.
Fill in **Method**, **Path**, **Name**, **Risk**, **Description**, the parameters and **What it returns**. Click **Add operation** to declare more, then click **Create connector**.
Enter the **Name** and **Base URL** and choose the **Authentication** type, as in option 1.
Fill in **Method**, **Path**, **Name**, **Risk**, **Description**, the parameters and **What it returns**. Click **Add operation** to declare more, then click **Create connector**.
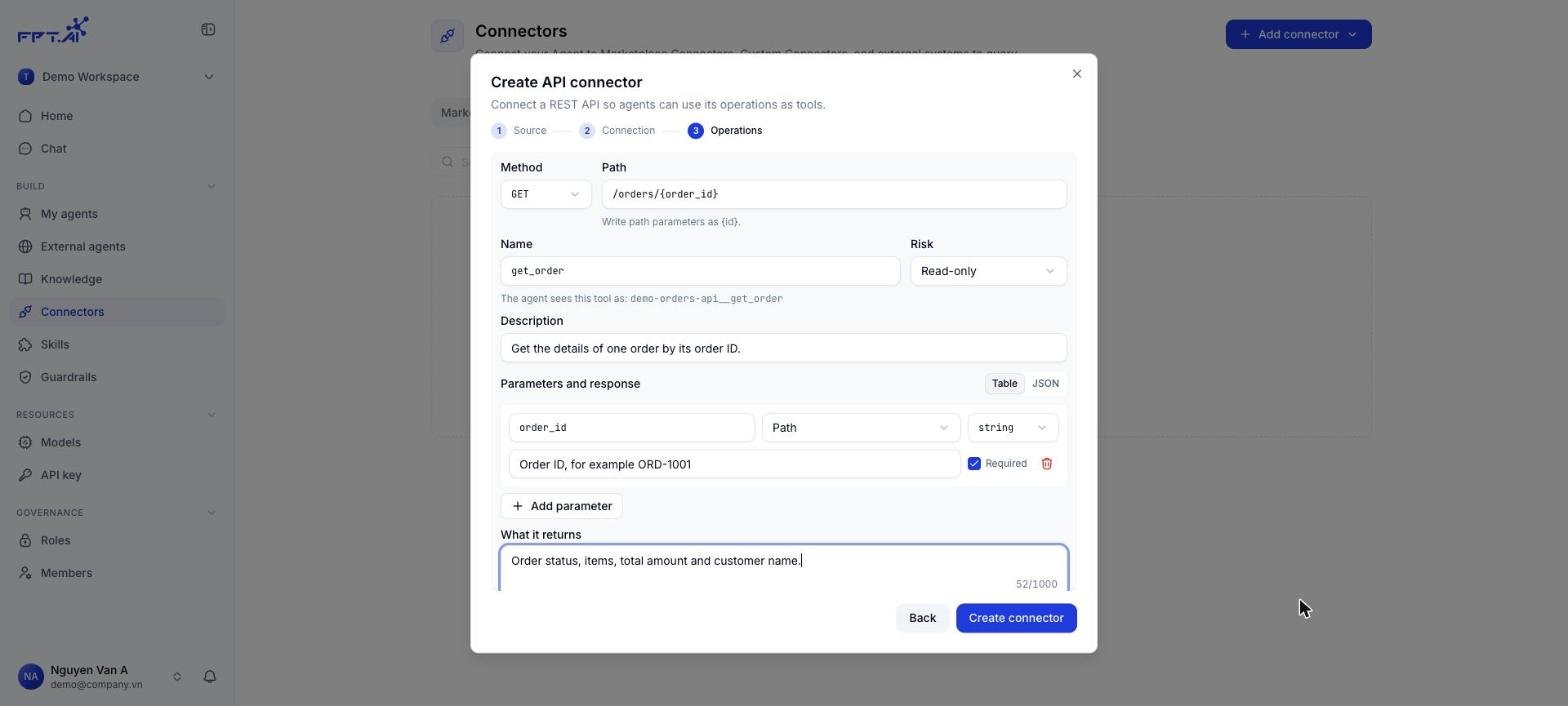 Write path parameters as `{order_id}` in the **Path** field. The Console adds a matching parameter in the **Path** location for you.
### Connection step fields
| Field | Required | What it does | Example |
| - | - | - | - |
| **Name** | Yes | Display name of the Connector. Must be unique. It is also the prefix of every tool name | `Demo Orders API` |
| **Base URL** | Yes | Root address. Every operation path is appended to this URL | `https://api.example.com/v1` |
| **Authentication** | Yes | **No authentication**, **API key / Token**, **OAuth 2.1 (Auto)** or **OAuth 2.1 (Manual)** | API key / Token |
| **Sent in** | With API key | Send the key in a **Header** or the **Query** string | Header |
| **Header name** | With API key | Name of the header or query parameter that carries the key | `X-API-Key`, `Authorization` |
| **Value** | With API key | The key or token. Stored encrypted and never shown again | `sk-...` |
| **Test the connection on save** | No | Calls a GET operation with no parameters to confirm the key works | On |
| **Advanced → Description** | No | Short description of the API, shown on the Connector card | Order management API |
| **Advanced → Operation used for the test** | No | The GET operation used for the connection test. Defaults to **Pick automatically** | `list_orders` |
For OAuth 2.1:
| Type | What you enter | Notes |
| - | - | - |
| **OAuth 2.1 (Auto)** | Nothing else | The Console finds the OAuth endpoints from the base URL (RFC 9728, RFC 8414) and registers a client (RFC 7591) |
| **OAuth 2.1 (Manual)** | **Authorize URL**, **Token URL**, **Client ID**. Optional: **Client secret**, **Scopes** (separated by spaces or commas) | For APIs that publish no OAuth metadata or don't allow client registration |
With either OAuth type, a window opens after you save so you can authorize.
### Operations step fields
| Field | Required | What it does | Example |
| - | - | - | - |
| **Method** | Yes | `GET`, `POST`, `PUT`, `PATCH` or `DELETE` | `GET` |
| **Path** | Yes | Path appended to the Base URL. Write path parameters as `{id}` | `/orders/{order_id}` |
| **Name** | Yes | Tool name. The Agent sees it as `connector-name__name` | `get_order` |
| **Risk** | Yes | **Read-only**, **Writes data** or **Can destroy data**. Sets the default permission when the Connector is attached to an Agent | Read-only |
| **Description** | Recommended | The Agent uses it to decide when to call the operation | Get the details of one order by its ID. |
| **Parameters** | No | Each parameter has a name, a location (**Path**, **Query**, **Header**, **Body field (JSON)**, **Whole body (JSON)**, **Form field**), a type, a description and a **Required** checkbox. Edit as a **Table** or as **JSON** | `order_id`, Path, string |
| **What it returns** | No | Describes the data the API returns, up to 1000 characters | Order status, total and customer name. |
When you import a document, the risk is suggested from the method: `GET` is **Read-only**, `POST`/`PUT`/`PATCH` is **Writes data** and `DELETE` is **Can destroy data**. You can change it when you expand the operation.
## View your Connectors
The **Custom Connectors** tab shows how many Connectors you have and one card per Connector:
* The Connector **name** and **description**.
* The **status**, for example **Connected**.
* The **number of operations** and where it came from (**OpenAPI** when imported from a document).
* A **trash** icon to delete it and a **Manage** button to edit it.
Use **Search custom connectors...** to filter by name when the list grows.
## Edit a Connector
Click **Manage** on the card to open the **Edit API connector** dialog. It has three tabs: **Source**, **Connection** and **Operations**. Click **Save changes** when you're done. The message **Connector updated.** appears.
### Change the connection details
On the **Connection** tab you can change the name, the Base URL and the authentication type. A saved key shows as **•••• saved**. Click **Replace key** to enter a new one.
Write path parameters as `{order_id}` in the **Path** field. The Console adds a matching parameter in the **Path** location for you.
### Connection step fields
| Field | Required | What it does | Example |
| - | - | - | - |
| **Name** | Yes | Display name of the Connector. Must be unique. It is also the prefix of every tool name | `Demo Orders API` |
| **Base URL** | Yes | Root address. Every operation path is appended to this URL | `https://api.example.com/v1` |
| **Authentication** | Yes | **No authentication**, **API key / Token**, **OAuth 2.1 (Auto)** or **OAuth 2.1 (Manual)** | API key / Token |
| **Sent in** | With API key | Send the key in a **Header** or the **Query** string | Header |
| **Header name** | With API key | Name of the header or query parameter that carries the key | `X-API-Key`, `Authorization` |
| **Value** | With API key | The key or token. Stored encrypted and never shown again | `sk-...` |
| **Test the connection on save** | No | Calls a GET operation with no parameters to confirm the key works | On |
| **Advanced → Description** | No | Short description of the API, shown on the Connector card | Order management API |
| **Advanced → Operation used for the test** | No | The GET operation used for the connection test. Defaults to **Pick automatically** | `list_orders` |
For OAuth 2.1:
| Type | What you enter | Notes |
| - | - | - |
| **OAuth 2.1 (Auto)** | Nothing else | The Console finds the OAuth endpoints from the base URL (RFC 9728, RFC 8414) and registers a client (RFC 7591) |
| **OAuth 2.1 (Manual)** | **Authorize URL**, **Token URL**, **Client ID**. Optional: **Client secret**, **Scopes** (separated by spaces or commas) | For APIs that publish no OAuth metadata or don't allow client registration |
With either OAuth type, a window opens after you save so you can authorize.
### Operations step fields
| Field | Required | What it does | Example |
| - | - | - | - |
| **Method** | Yes | `GET`, `POST`, `PUT`, `PATCH` or `DELETE` | `GET` |
| **Path** | Yes | Path appended to the Base URL. Write path parameters as `{id}` | `/orders/{order_id}` |
| **Name** | Yes | Tool name. The Agent sees it as `connector-name__name` | `get_order` |
| **Risk** | Yes | **Read-only**, **Writes data** or **Can destroy data**. Sets the default permission when the Connector is attached to an Agent | Read-only |
| **Description** | Recommended | The Agent uses it to decide when to call the operation | Get the details of one order by its ID. |
| **Parameters** | No | Each parameter has a name, a location (**Path**, **Query**, **Header**, **Body field (JSON)**, **Whole body (JSON)**, **Form field**), a type, a description and a **Required** checkbox. Edit as a **Table** or as **JSON** | `order_id`, Path, string |
| **What it returns** | No | Describes the data the API returns, up to 1000 characters | Order status, total and customer name. |
When you import a document, the risk is suggested from the method: `GET` is **Read-only**, `POST`/`PUT`/`PATCH` is **Writes data** and `DELETE` is **Can destroy data**. You can change it when you expand the operation.
## View your Connectors
The **Custom Connectors** tab shows how many Connectors you have and one card per Connector:
* The Connector **name** and **description**.
* The **status**, for example **Connected**.
* The **number of operations** and where it came from (**OpenAPI** when imported from a document).
* A **trash** icon to delete it and a **Manage** button to edit it.
Use **Search custom connectors...** to filter by name when the list grows.
## Edit a Connector
Click **Manage** on the card to open the **Edit API connector** dialog. It has three tabs: **Source**, **Connection** and **Operations**. Click **Save changes** when you're done. The message **Connector updated.** appears.
### Change the connection details
On the **Connection** tab you can change the name, the Base URL and the authentication type. A saved key shows as **•••• saved**. Click **Replace key** to enter a new one.
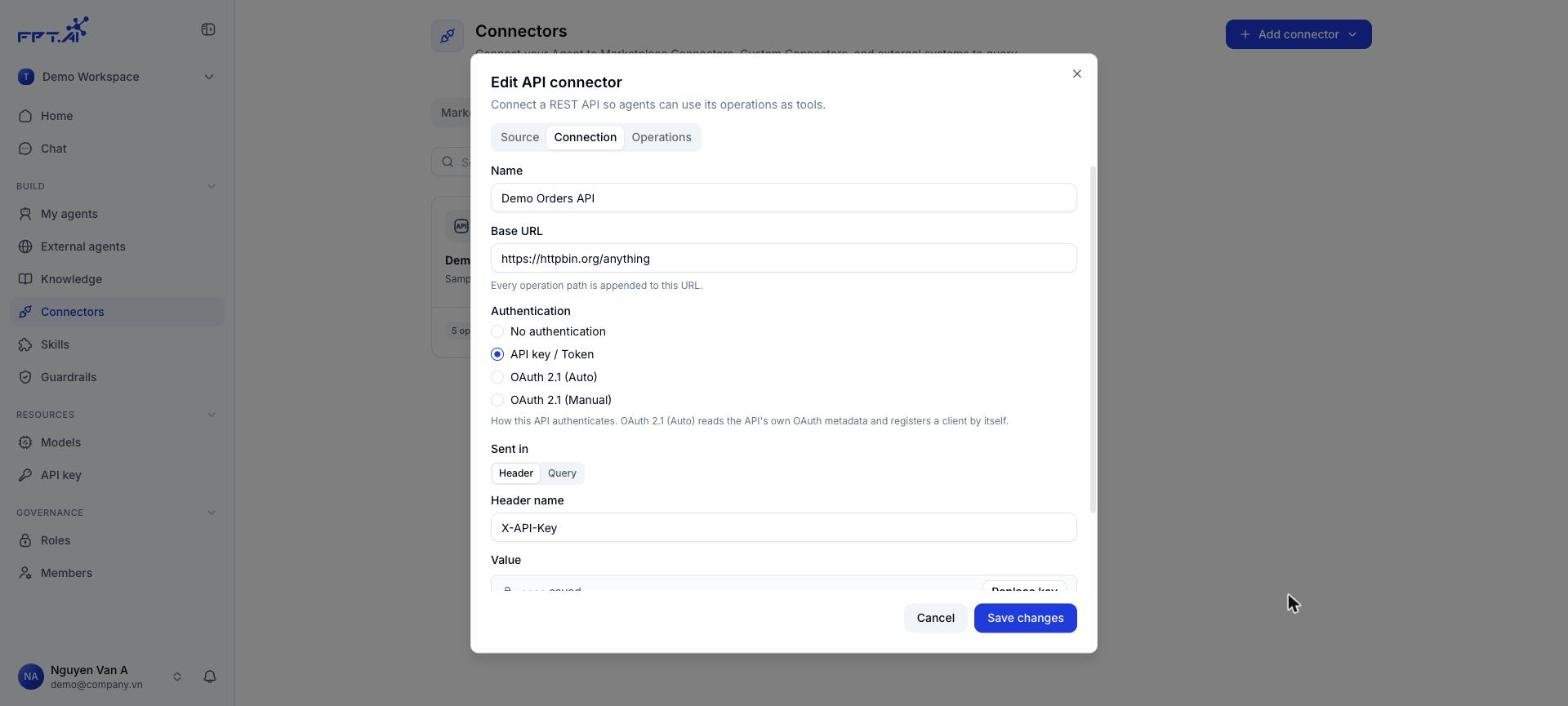 If you change the Base URL or the authentication type, the Console warns that every existing connection will be disconnected and must be reconnected.
 ### Re-import the document when the API changes
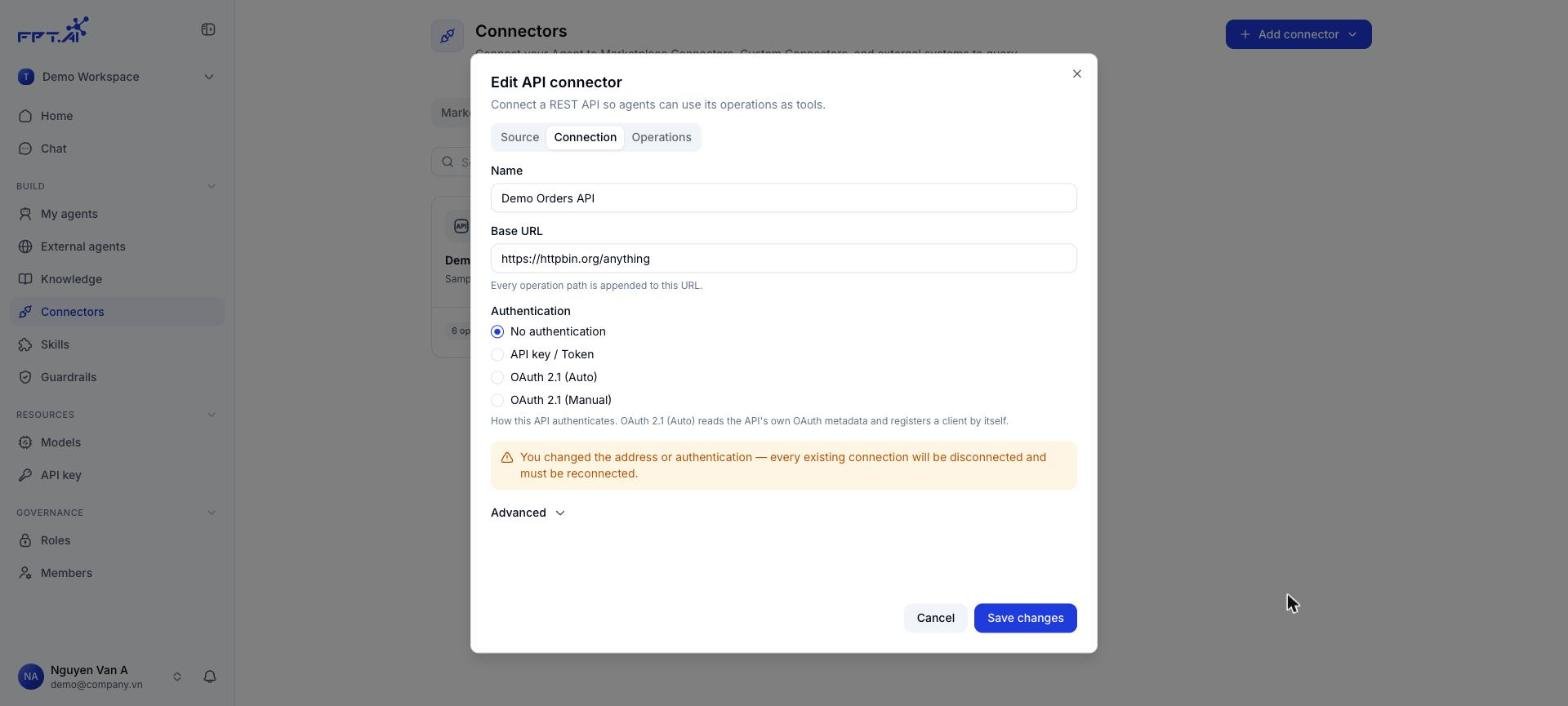
On the **Source** tab, drop the new file or paste the new content.
### Re-import the document when the API changes
On the **Source** tab, drop the new file or paste the new content.
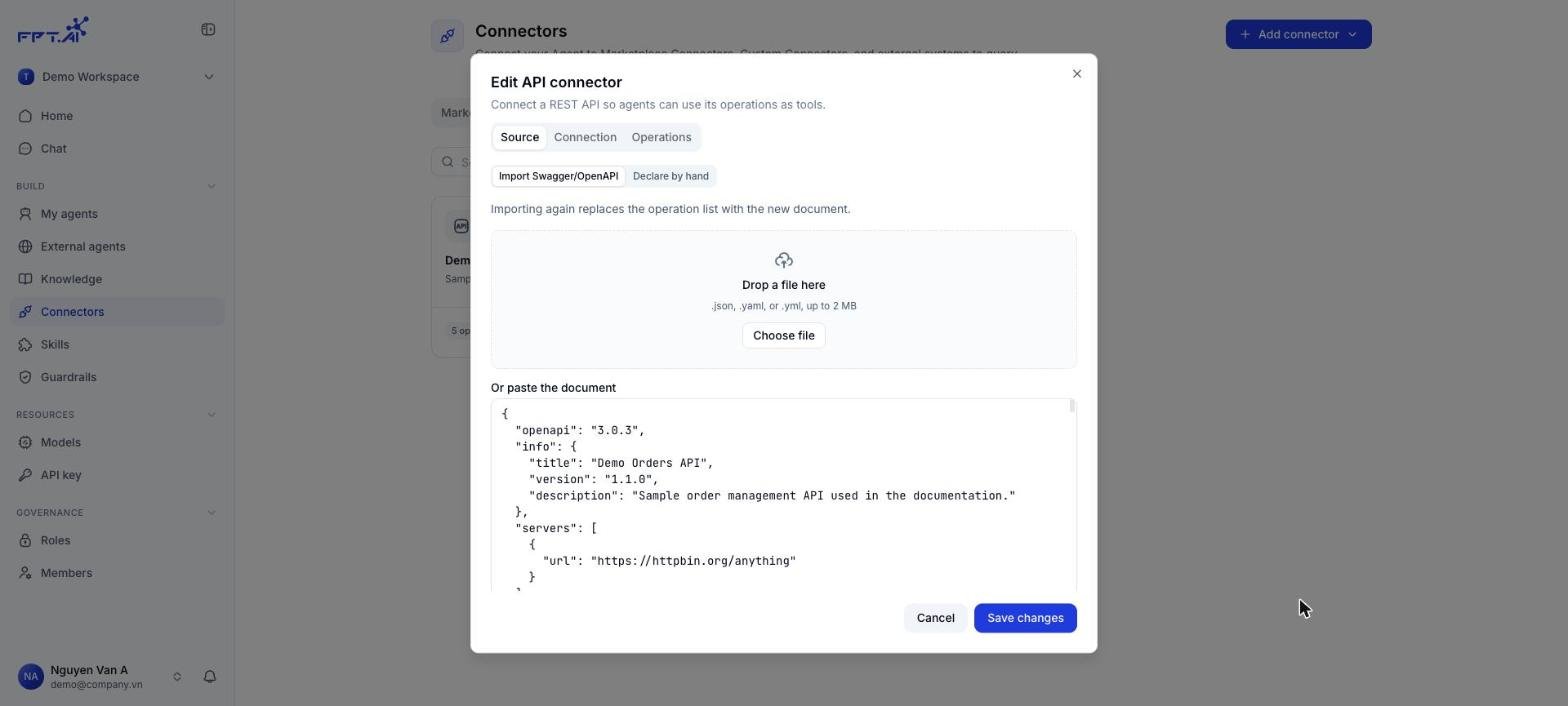 Open the **Operations** tab to see the list after the import and select the operations you want.
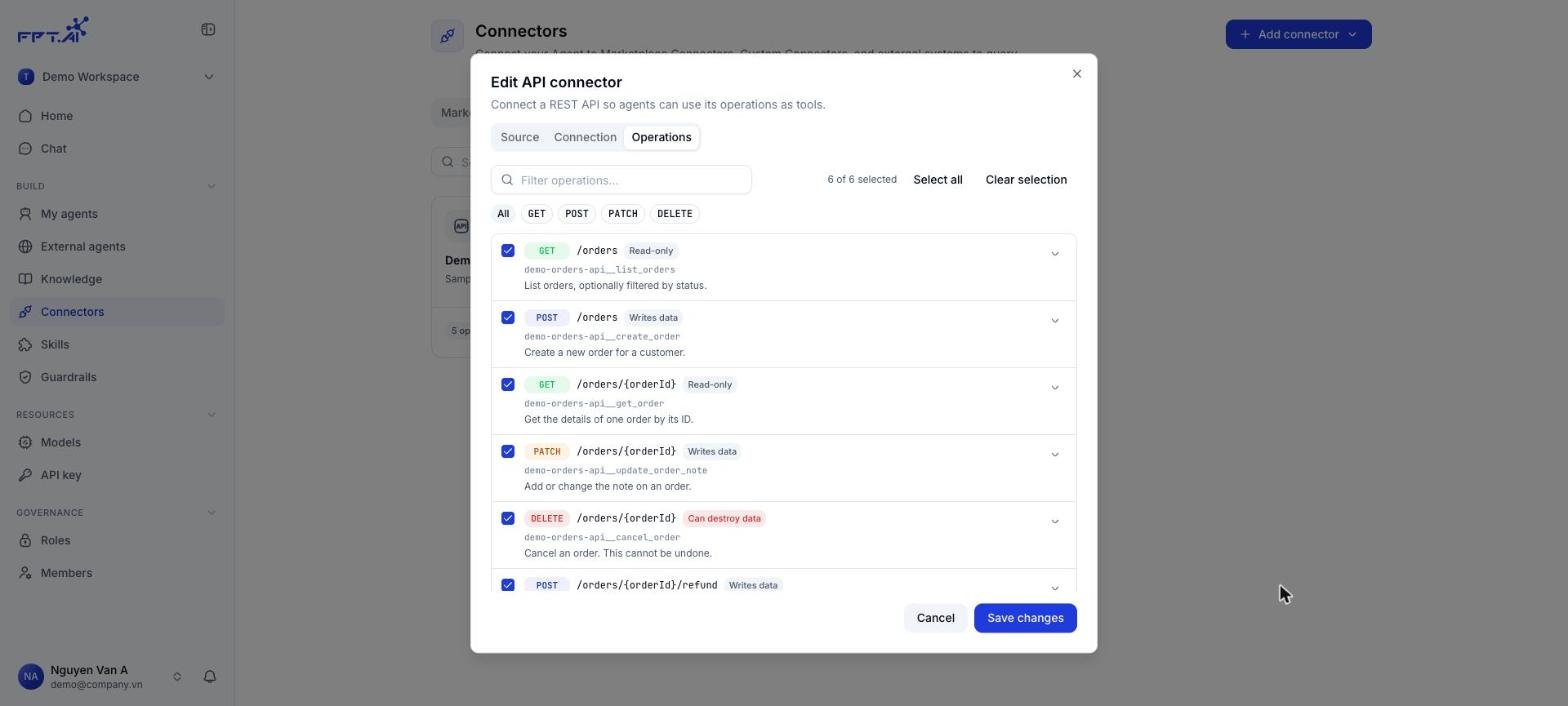 Click **Save changes**. The operation count on the Connector card updates.
Importing again **replaces the whole operation list** with the new document. Operations that were removed or renamed in the new document are no longer available to Agents that use this Connector. After saving, open those Agents to check each operation's permission and run a test again.
If you click **Cancel** with unsaved changes, the Console asks **Discard changes?**. Choose **Discard** to leave or **Keep editing** to go back.
## Delete a Connector
A confirmation dialog opens.
Click **Save changes**. The operation count on the Connector card updates.
Importing again **replaces the whole operation list** with the new document. Operations that were removed or renamed in the new document are no longer available to Agents that use this Connector. After saving, open those Agents to check each operation's permission and run a test again.
If you click **Cancel** with unsaved changes, the Console asks **Discard changes?**. Choose **Discard** to leave or **Keep editing** to go back.
## Delete a Connector
A confirmation dialog opens.
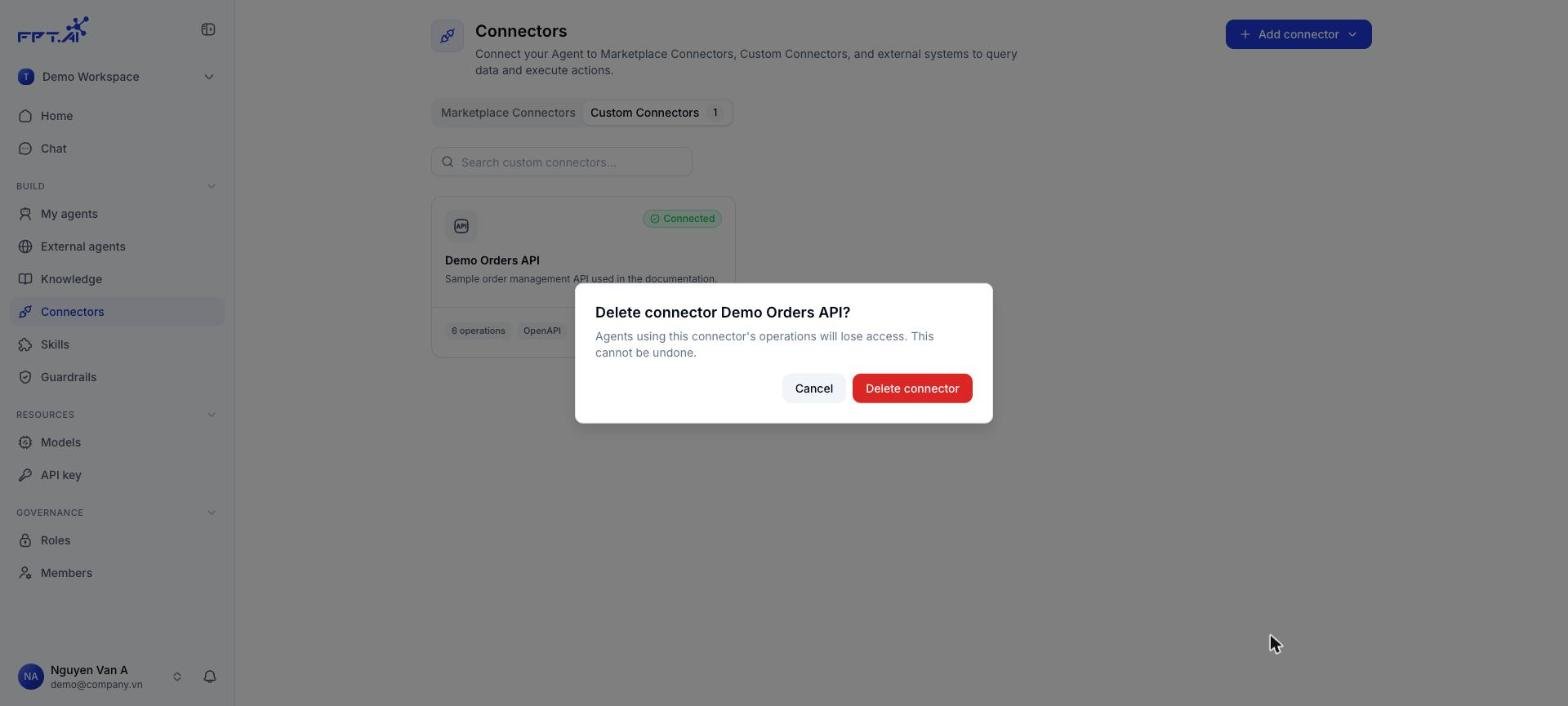 The message **Connector deleted.** appears. The Connector is removed from every Agent that used it.
Deleting a Connector **cannot be undone**. Agents that use its operations lose access immediately. The dialog doesn't list which Agents are affected, so check before you delete.
Connectors have no paused state. To stop one temporarily for an Agent, remove it from that Agent or set its operations to **Block**.
Once the Connector is created, attach it to an Agent as described in [Use Custom APIs in an Agent](/en/agent-custom-api-connectors).
## Troubleshooting
| What you see | Cause | Fix |
| - | - | - |
| A message that a connector with this name already exists | The name is already used by another Connector | Change the name on the Connection step |
| A message that the base URL must be a public address when you click Create connector | The Base URL points to the local machine or a private IP | Use the API's public address |
| Only 200 operations are imported | The document has more than 200 operations | Split the document into several Connectors by business area |
| The document can't be read | Invalid JSON/YAML, or not an OpenAPI/Swagger document | Check the document with an OpenAPI validator and import it again |
| Tool names look odd, for example `api-n-h-ng-demo__...` | The Connector name has accented characters, which are replaced with `-` | Use a plain ASCII name such as `Orders API` |
## See also
Attach the Connector to an Agent, set permissions and test it.
This documentation is built and hosted on [Mintlify](https://mintlify.com), a developer documentation platform.
The message **Connector deleted.** appears. The Connector is removed from every Agent that used it.
Deleting a Connector **cannot be undone**. Agents that use its operations lose access immediately. The dialog doesn't list which Agents are affected, so check before you delete.
Connectors have no paused state. To stop one temporarily for an Agent, remove it from that Agent or set its operations to **Block**.
Once the Connector is created, attach it to an Agent as described in [Use Custom APIs in an Agent](/en/agent-custom-api-connectors).
## Troubleshooting
| What you see | Cause | Fix |
| - | - | - |
| A message that a connector with this name already exists | The name is already used by another Connector | Change the name on the Connection step |
| A message that the base URL must be a public address when you click Create connector | The Base URL points to the local machine or a private IP | Use the API's public address |
| Only 200 operations are imported | The document has more than 200 operations | Split the document into several Connectors by business area |
| The document can't be read | Invalid JSON/YAML, or not an OpenAPI/Swagger document | Check the document with an OpenAPI validator and import it again |
| Tool names look odd, for example `api-n-h-ng-demo__...` | The Connector name has accented characters, which are replaced with `-` | Use a plain ASCII name such as `Orders API` |
## See also
Attach the Connector to an Agent, set permissions and test it.
This documentation is built and hosted on [Mintlify](https://mintlify.com), a developer documentation platform.