> ## Documentation Index
> Fetch the complete documentation index at: https://docs-agents.fpt.ai/llms.txt
> Use this file to discover all available pages before exploring further.

# Live Chat channel

> Put the agent on your website: configure it on Console, paste the embed snippet, share a link, customise the look, or build your own interface with the Visitor API

Live Chat is the **Website** channel: the platform supplies the chat interface, you configure it on Console and paste a snippet into your pages. Your customers then talk to the agent directly through that chat window.

<Info icon="globe">
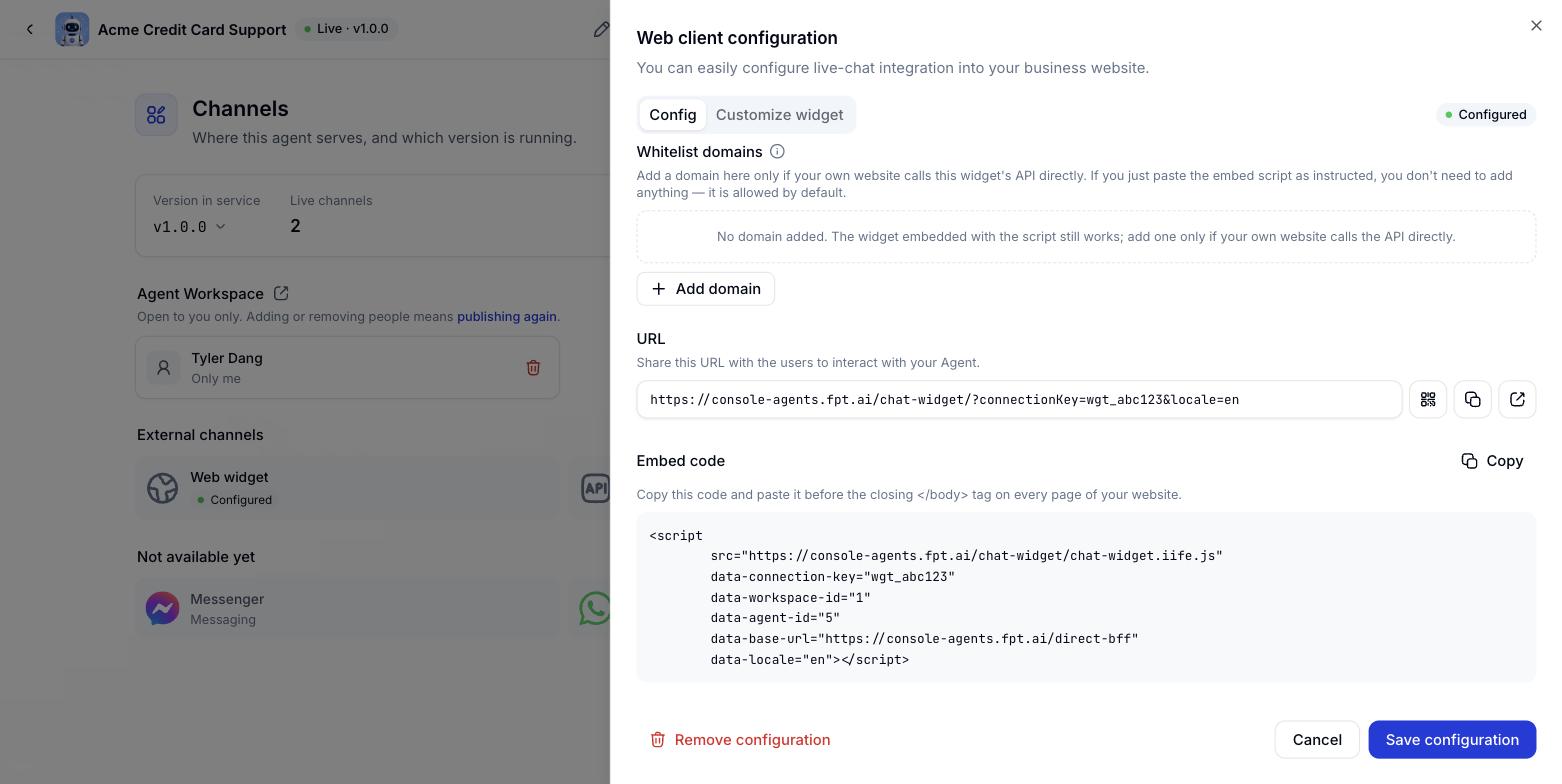
  The configuration panel opens from the agent's **Channels** tab - click the **Web widget** tile. The panel is titled "Web client configuration".
</Info>

## Configuring the channel on Console

<Steps>
  <Step title="Sign in to the FPT AI Agent Platform">
    Open Console and sign in with your account.
  </Step>

  <Step title="Pick the agent to configure">
    This is the agent that will answer customers on your website.
  </Step>

  <Step title="Open the Channels tab">
    **Channels** is on the agent's navigation bar.
  </Step>

  <Step title="Click the Web widget tile">
    The "Web client configuration" panel opens on the right.
  </Step>

  <Step title="Fill in both tabs">
    The **Config** tab and the **Customize widget** tab. Details in the two sections below.
  </Step>

  <Step title="Click Save configuration">
    The channel is created and starts serving straight away. The Web widget tile switches to **Configured**.
  </Step>
</Steps>

<Warning>
  The first save is what creates the channel. Until then it does not exist, so the share link, the QR code and the embed snippet only appear after you save once.
</Warning>

<Note>
  **Config** and **Customize widget** share one draft and one save button: a single save overwrites the whole channel configuration. Finish both tabs before you save, rather than saving each one separately.
</Note>

## The Config tab

<img src="https://mintcdn.com/fpt-62e894b4/OEIa1zuMs6GjYr6X/images/en_lc_config.jpg?fit=max&auto=format&n=OEIa1zuMs6GjYr6X&q=85&s=5b20be2aeaaaebc8637288a87d5e3a81" alt="Web widget Config tab" width="1562" height="784" data-path="images/en_lc_config.jpg" />

### Whitelist domains

The list of website domains allowed to use this channel. Up to 20 entries, each up to 253 characters. Each entry is a single domain such as `https://shop.example.com`, with no path after it. Use `*` to allow every domain.

<Note>
  Leave this empty if you are just pasting the embed snippet as described below. You only need to list domains when your technical team builds its own chat interface, which is covered on the [API integration](/en/api-integration) page.
</Note>

**Adding a domain**

<Steps>
  <Step title="Click + Add domain">
    A new input row appears in the list.
  </Step>

  <Step title="Enter the domain">
    For example `https://shop.company.com`. Do not add a path.
  </Step>

  <Step title="Click Save configuration">
    The change takes effect as soon as you save.
  </Step>
</Steps>

**Editing a domain**: click it in the list, change it and click **Save configuration**.

**Removing a domain**: click the delete icon at the end of the row, then click **Save configuration**. Sites on that domain can no longer create sessions.

### Share link, QR code and embed snippet

These three only exist after the first save. Once saved, come back to the Config tab to copy them.

## Embedding the widget in your website

Copy the snippet from the Config tab and paste it before the closing `</body>` tag on every page where you want the chat window.

```html theme={null}
<script
  src="https://console-agents.fpt.ai/chat-widget/chat-widget.iife.js"
  data-connection-key="wgt_abc123"
  data-workspace-id="1"
  data-agent-id="5"
  data-base-url="https://console-agents.fpt.ai/direct-bff"
  data-locale="vi"
  data-brand-color="#0B57D0"
  data-brand-text="#FFFFFF"></script>
```

The snippet creates the chat button in the corner by itself. No other HTML, no CSS, and the widget pulls in no third-party libraries.

## Sharing by link and QR code

When you would rather not embed anything - emailing a link, printing a QR code on a flyer, putting one on a counter - the Config tab gives you a link that opens the chat window full screen:

```text theme={null}
https://console-agents.fpt.ai/chat-widget/?connectionKey=wgt_abc123&locale=vi
```

The QR code beside it encodes exactly that link. The chat page adapts to the device, so it works on desktop and phone alike.

## The Customize widget tab

This tab has five sub-tabs and a preview panel on the right with three states: **Minimized**, **Welcome** and **Chat**. Changes appear in the preview immediately, and take effect immediately for snippets already pasted, because the widget re-reads the configuration every time a customer opens the page.

<Note>
  Fields you do not change are not written down, so when the platform updates its default palette your channel picks it up.
</Note>

### Theme - colours

<img src="https://mintcdn.com/fpt-62e894b4/OEIa1zuMs6GjYr6X/images/en_lc_theme.jpg?fit=max&auto=format&n=OEIa1zuMs6GjYr6X&q=85&s=afff272558459c609875b002b8786f39" alt="Widget colour customisation" width="1562" height="784" data-path="images/en_lc_theme.jpg" />

All values are `#rrggbb`. Badly formatted values are rejected on save.

| Field | Description | Default |
| - | - | - |
| `theme.background` | The chat window background | `#FFFFFF` |
| `theme.brand` | Brand colour: chat window header and chat button background | `#203BDC` |
| `theme.brand_text` | Text and icon colour on the brand background | `#FFFFFF` |
| `theme.customer_bubble` | Customer message bubble background | `#203BDC` |
| `theme.customer_text` | Text colour in customer bubbles | `#FFFFFF` |
| `theme.bot_bubble` | Agent message bubble background | `#F1F5F9` |
| `theme.bot_text` | Text colour in agent bubbles | `#020817` |
| `theme.primary` | General accent colour | `#203BDC` |
| `theme.header_style` | How the header is filled: `solid` or `gradient` | `solid` |

Click **Reset default** to put every colour back.

<Tip>
  Take the exact brand hex values from your company's identity guidelines, and check the contrast between text and background so the text stays readable.
</Tip>

### General

<img src="https://mintcdn.com/fpt-62e894b4/OEIa1zuMs6GjYr6X/images/en_lc_general.jpg?fit=max&auto=format&n=OEIa1zuMs6GjYr6X&q=85&s=423502b27dd9451a9035403fee9ecefa" alt="General widget settings" width="1562" height="784" data-path="images/en_lc_general.jpg" />

| Field | Description |
| - | - |
| `name` | The name shown at the top of the chat window and on the chat page |
| `avatar_url` | The picture. Upload PNG or JPEG, at least 256 x 256 px, at most 2 MB. Leave it empty and the system uses the agent name's initial |
| `theme.position` | Which corner the chat button sits in: `left` or `right` |
| `locale_default` | Default language: `vi`, `en`, `ja`, `id`, `zh` |
| `launcher.greeting` | The greeting shown in the bubble beside the chat button while the window is closed. Up to 200 characters; leave it empty and no bubble appears. Different from `welcome.title`, which is the heading inside the welcome screen |
| `turnstile_sitekey` | A Cloudflare Turnstile key to block bots at session creation. Empty means off |

<Warning>
  Setting `turnstile_sitekey` to an empty string rather than leaving it unset turns on a bot gate that no customer can get through.
</Warning>

<Note>
  The Website channel no longer has an idle-window option. Conversations on the widget use a fixed 24 hours - go quiet for longer than that and the customer’s next message opens a new conversation. The idle window is still configurable for the API channel, see [API integration](/en/api-integration).
</Note>

### Starter - suggested questions

<img src="https://mintcdn.com/fpt-62e894b4/OEIa1zuMs6GjYr6X/images/en_lc_starter.jpg?fit=max&auto=format&n=OEIa1zuMs6GjYr6X&q=85&s=f7ec59de04450033a33fd9671e1d41c0" alt="Suggested questions" width="1562" height="784" data-path="images/en_lc_starter.jpg" />

Suggested questions appear as buttons before the customer sends a first message. Up to 6 questions, each up to 120 characters.

<Steps>
  <Step title="Click + Add question">
    A new input row appears.
  </Step>

  <Step title="Type the question">
    Word it the way customers actually ask, for example "Check my order".
  </Step>

  <Step title="Edit or remove">
    Click a question to edit it, or the delete icon at the end of the row to remove it.
  </Step>
</Steps>

With none set, the section reads "No suggested questions yet".

### Welcome screen

<img src="https://mintcdn.com/fpt-62e894b4/OEIa1zuMs6GjYr6X/images/en_lc_welcome.jpg?fit=max&auto=format&n=OEIa1zuMs6GjYr6X&q=85&s=d8d01b233304342d79e18d4ea20c0dc4" alt="Welcome screen" width="1562" height="784" data-path="images/en_lc_welcome.jpg" />

| Field | Type | Description |
| - | - | - |
| `welcome.title` | string | The welcome screen heading |
| `welcome.subtitle` | string | A short line under the heading |
| `welcome.button_text` | string | The label on the start-chat button |
| `welcome.placeholder` | string | Placeholder in the customer name field |
| `welcome.hide_greeting` | boolean | On to skip the welcome screen and go straight into the chat |
| `welcome.guest_mode` | boolean | On by default. Turn it off to ask for a name before chatting; that name is stored and the agent greets them by it |

Click **Reset default** to put the text fields back to their starting copy.

### Chat window

<img src="https://mintcdn.com/fpt-62e894b4/OEIa1zuMs6GjYr6X/images/en_lc_chat.jpg?fit=max&auto=format&n=OEIa1zuMs6GjYr6X&q=85&s=d8169b74d8b9350d3367137012865de4" alt="Chat window settings" width="1562" height="784" data-path="images/en_lc_chat.jpg" />

| Field | Type | Description |
| - | - | - |
| `chat.placeholder` | string | Placeholder in the message box. Leave it empty and the widget uses the platform's translated copy |
| `chat.disclaimer` | string | The AI-generated content notice beside the message box |
| `chat.powered_by` | string | The chat window footer line. Defaults to "Powered by FPT.AI"; set it empty to hide it entirely |
| `chat.show_logo_header` | boolean | Show the avatar at the top of the chat window. On by default |
| `chat.show_citations` | boolean | Show source citation cards under answers. On by default |
| `chat.allow_attachments` | boolean | Let customers send attachments. On by default |

<Warning>
  Do not remove the AI disclaimer. It is what tells people they are talking to an agent rather than a member of staff, and it keeps you on the right side of AI transparency rules.
</Warning>

## Editing and deleting the configuration

<Steps>
  <Step title="Edit the configuration">
    Reopen the Web widget tile from the Channels tab, change what you need and click **Save configuration**. Changes take effect immediately everywhere the snippet is embedded - no need to re-embed.
  </Step>

  <Step title="Discard changes">
    Click **Cancel** to close the panel without saving.
  </Step>

  <Step title="Stop serving temporarily">
    Open the **Publish** dialog on the Agent builder tab, untick **Web widget** and publish. The widget configuration is kept.
  </Step>

  <Step title="Delete the channel">
    Deleting the channel configuration removes it from Console and stops it serving immediately.
  </Step>
</Steps>

<Warning>
  Deleting the channel makes the widget on your pages show a "channel no longer available" screen. Every customer and conversation already created is kept and nothing is deleted. The old connection key cannot be reused: a new Website channel gets a new connection key and you have to paste the snippet again.
</Warning>

## Next steps

<CardGroup cols={3}>
  <Card title="Mobile SDK" icon="mobile-screen" href="/en/mobile-sdk">
    Bring this same chat window into your Android and iOS apps.
  </Card>

  <Card title="API integration" icon="code" href="/en/api-integration">
    For when you already have your own customer-facing chat interface.
  </Card>

  <Card title="Technical appendix" icon="table-list" href="/en/technical-appendix">
    Error codes, system limits and the pre-production checklist.
  </Card>
</CardGroup>


This documentation is built and hosted on [Mintlify](https://mintlify.com), a developer documentation platform.