> ## Documentation Index
> Fetch the complete documentation index at: https://docs-agents.fpt.ai/llms.txt
> Use this file to discover all available pages before exploring further.
# Organisation management
> View basic information, structure and administrators in FPT AI Console
Organisation settings is where you see the whole picture of the organisation using FPT AI Console: its name, how many departments and people it holds, how those units are arranged, and who administers each one. It is largely a reference screen - organisation data comes from your identity system and is not edited here.
Besides the reference screens, the **GOVERNANCE** group in the left menu holds two screens you work in directly: Roles and Members.
Every screenshot on this page uses demo data. Organisation names, department names, people's names and email addresses are all made up.
## Opening Organisation settings
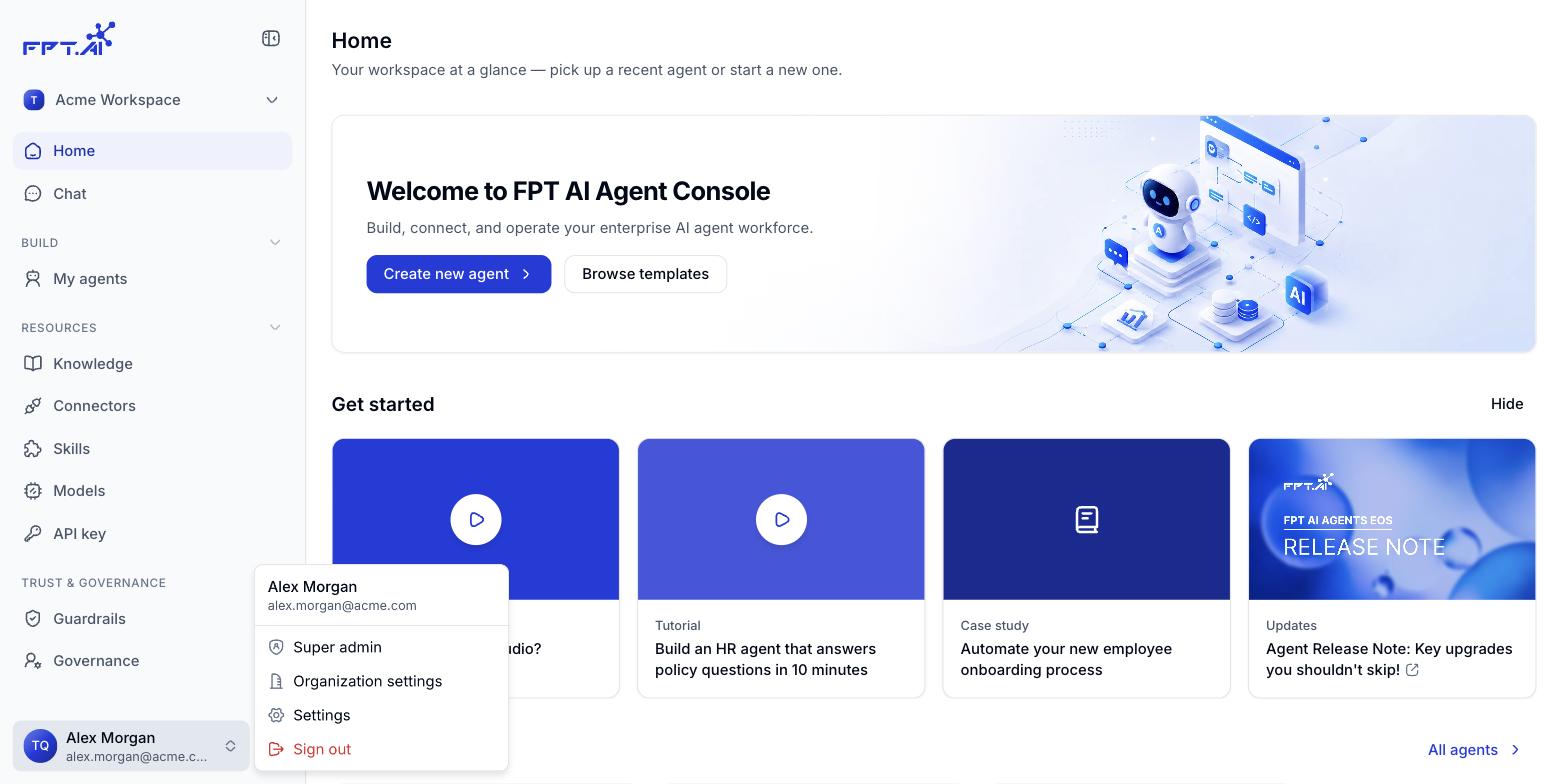
It sits in the bottom left corner, next to the name and email of the signed-in account.
Pick Organization settings from the menu. The menu also shows your role in the organisation, such as Super admin.
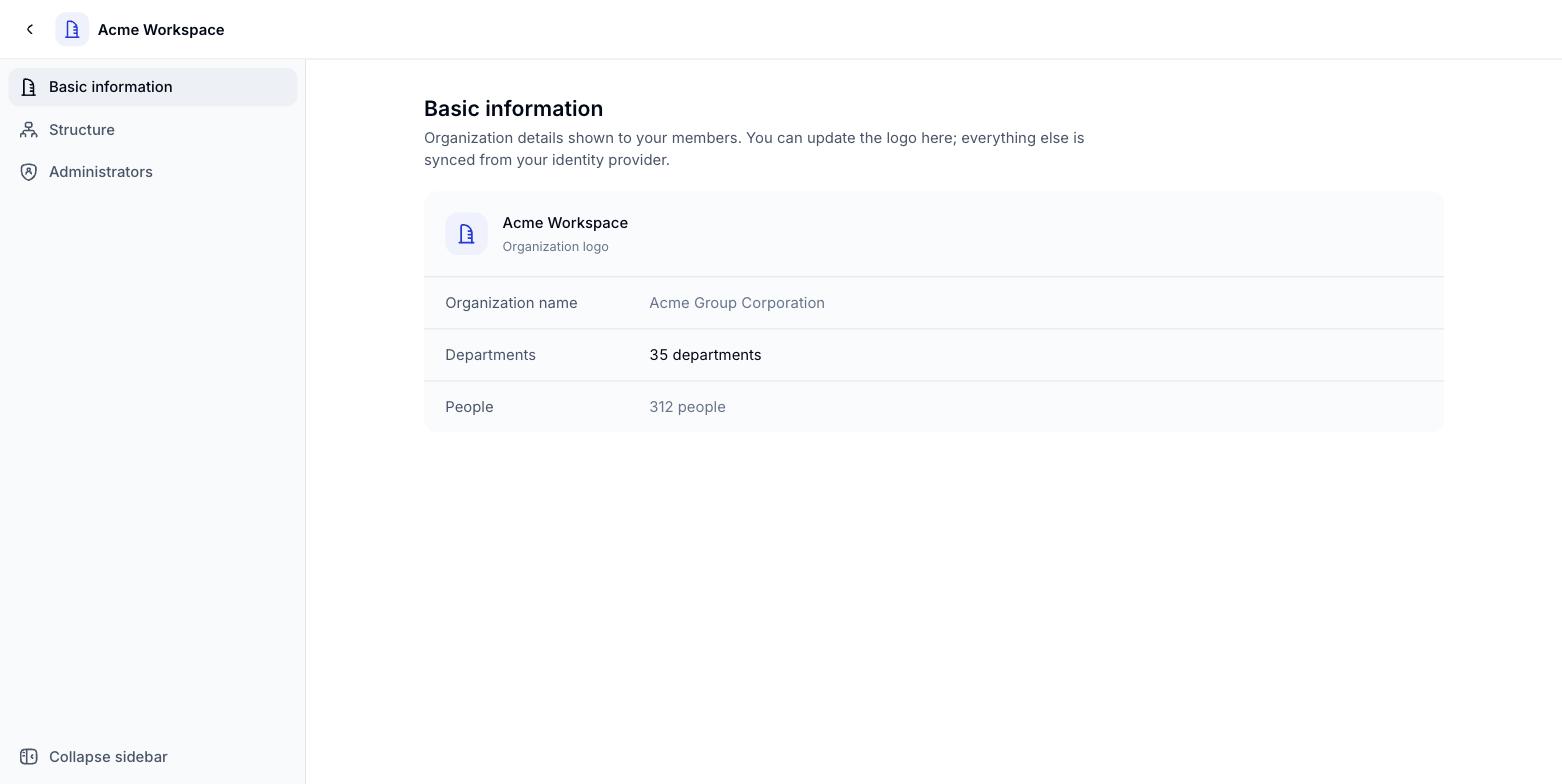
 The Organisation settings screen has three sections in the left column: Basic information, Structure and Administrators.
## Basic information
| Field | What it means | Editable |
| - | - | - |
| Logo | The organisation's picture | Yes |
| Organization name | Its full name | No |
| Departments | Total departments in the organisation | No |
| People | Total people in the organisation | No |
The logo is the only thing you can change on this screen. Everything else syncs from your organisation's identity system.
The Organisation settings screen has three sections in the left column: Basic information, Structure and Administrators.
## Basic information
| Field | What it means | Editable |
| - | - | - |
| Logo | The organisation's picture | Yes |
| Organization name | Its full name | No |
| Departments | Total departments in the organisation | No |
| People | Total people in the organisation | No |
The logo is the only thing you can change on this screen. Everything else syncs from your organisation's identity system.
 ## Structure
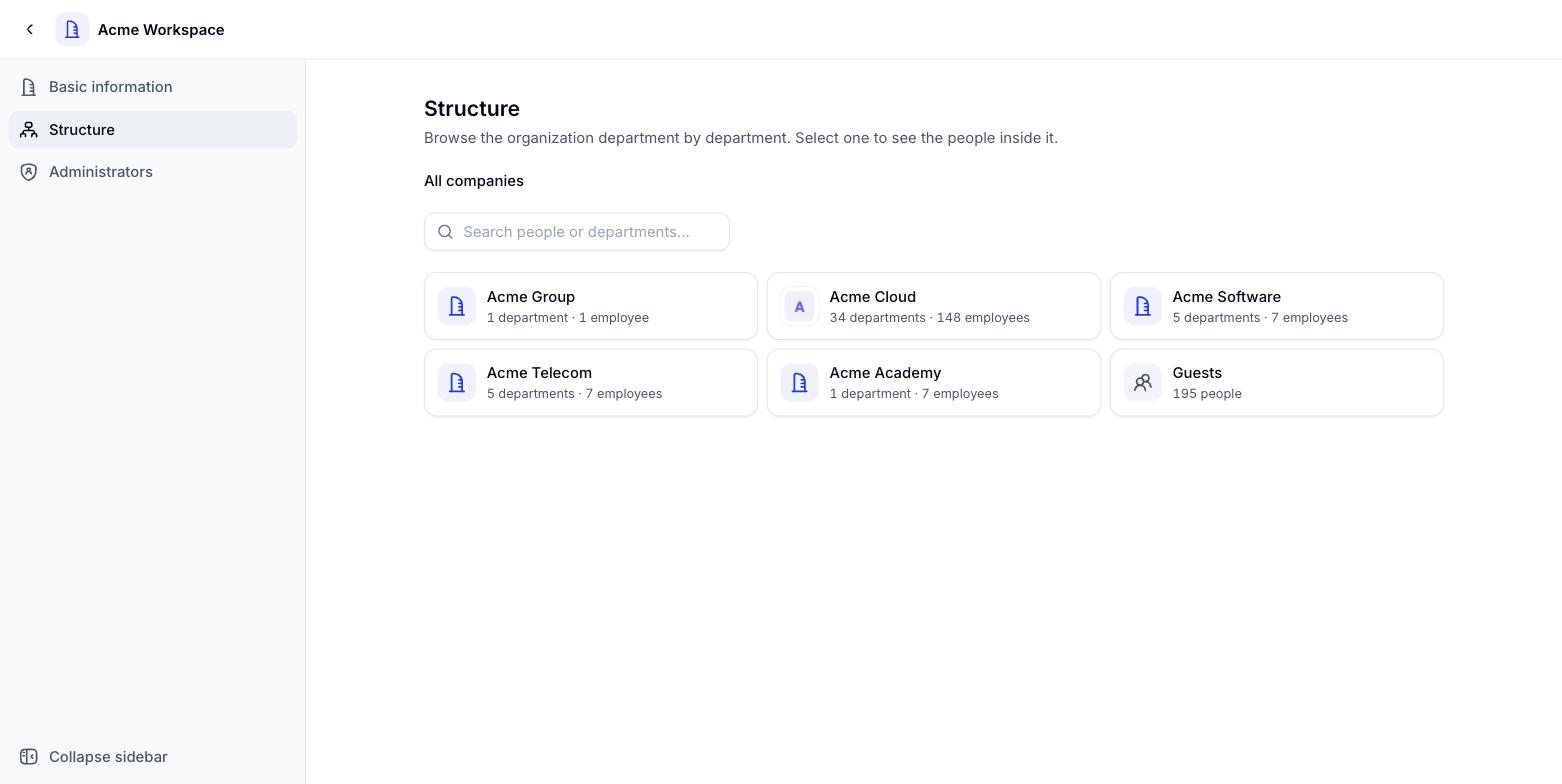
Structure browses the organisation department by department. It opens on All companies: one card per company, each showing how many departments and employees it holds.
Pick Structure in the left column. The All companies list appears.
Click a card to see what sits inside it.
The breadcrumb above the company card jumps back to any level you came through.
## Structure
Structure browses the organisation department by department. It opens on All companies: one card per company, each showing how many departments and employees it holds.
Pick Structure in the left column. The All companies list appears.
Click a card to see what sits inside it.
The breadcrumb above the company card jumps back to any level you came through.
 ### Inside a company
Opening a company card shows three blocks.
* **Search**: One box that looks up both people and departments inside this company.
* **Company admins**: The people who approve publishes into this company and every department below it, scoped to the resource types they are granted. Add one with **Add administrator**.
* **Departments inside**: One card per department with its headcount. Click a card to see the people in it.
### Inside a company
Opening a company card shows three blocks.
* **Search**: One box that looks up both people and departments inside this company.
* **Company admins**: The people who approve publishes into this company and every department below it, scoped to the resource types they are granted. Add one with **Add administrator**.
* **Departments inside**: One card per department with its headcount. Click a card to see the people in it.
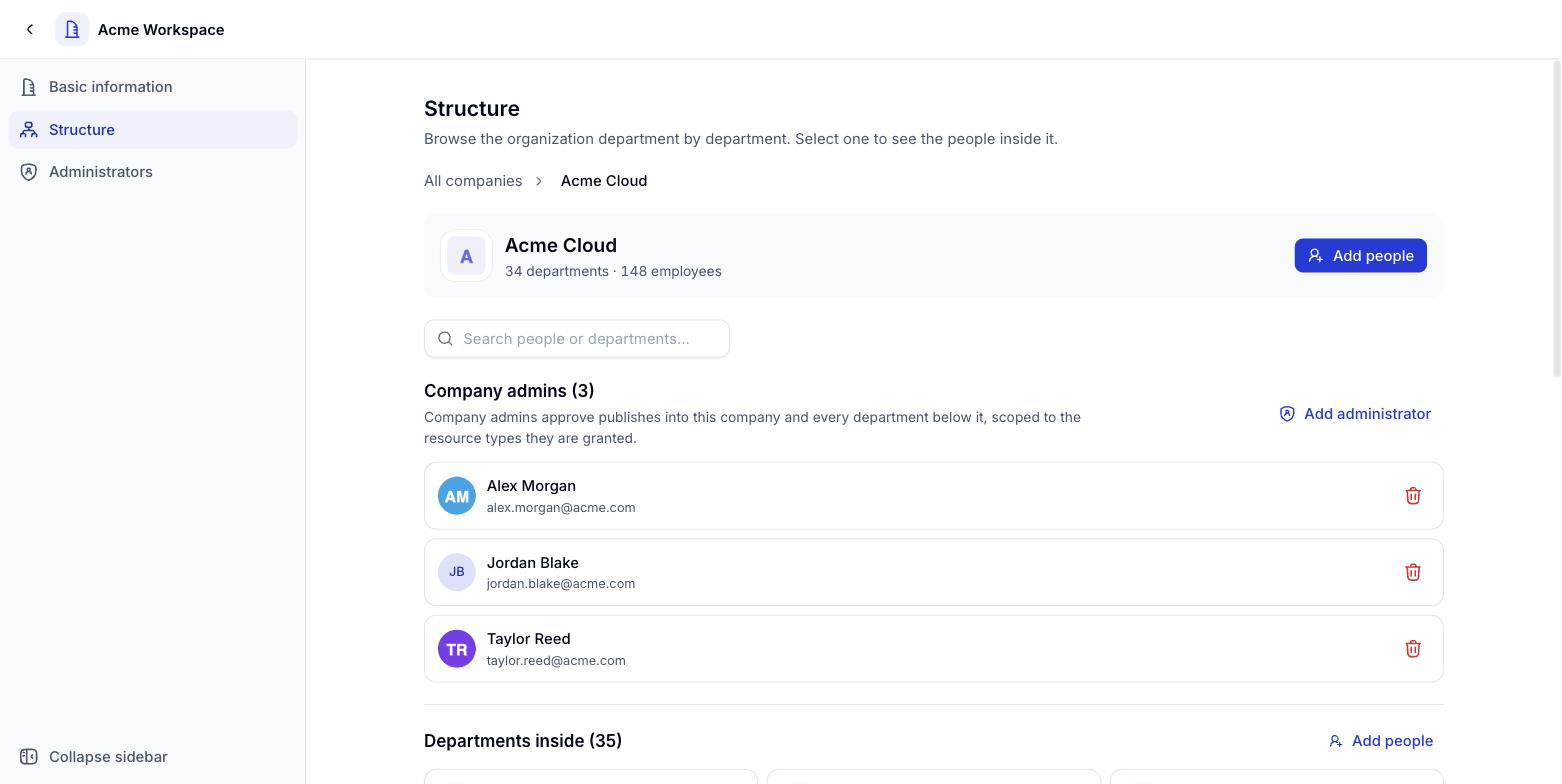 **Add people** in the top right adds someone to the company or department you are currently looking at.
## Administrators
The Administrators section lists who administers the company and each department, together with who granted the access and when.
## Roles
A role decides what each person can do in the workspace. Open it from the left menu of the Console, group **GOVERNANCE**, item **Roles**.
A newly created organisation already has three default roles, so an administrator can invite people and assign permissions right away instead of building roles from scratch.
**Add people** in the top right adds someone to the company or department you are currently looking at.
## Administrators
The Administrators section lists who administers the company and each department, together with who granted the access and when.
## Roles
A role decides what each person can do in the workspace. Open it from the left menu of the Console, group **GOVERNANCE**, item **Roles**.
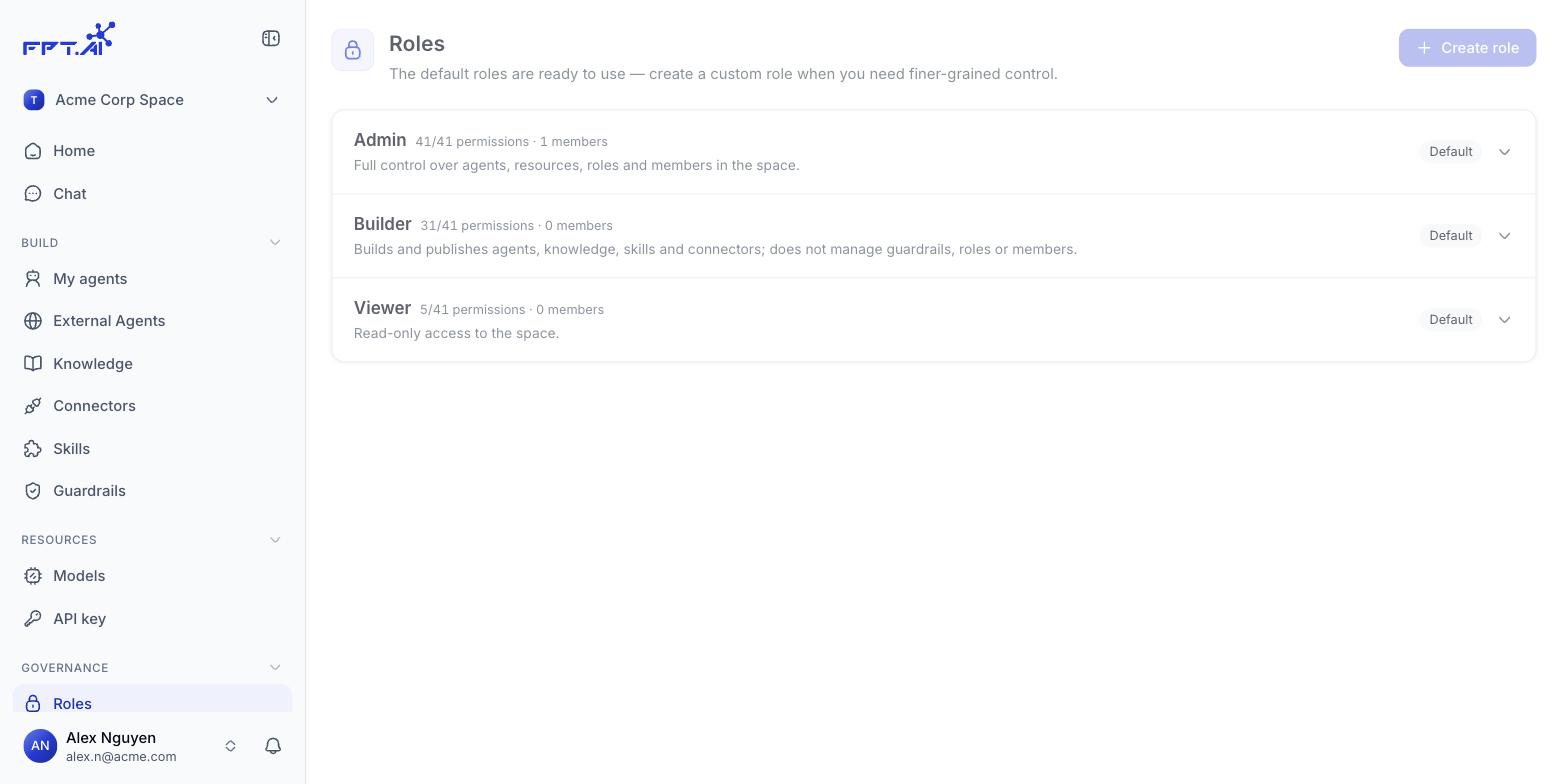
A newly created organisation already has three default roles, so an administrator can invite people and assign permissions right away instead of building roles from scratch.
 | Role | Permissions | Best for |
| - | - | - |
| Admin | 41/41 | Full control over Agents, resources, roles and members in the space |
| Builder | 31/41 | Builds and publishes Agents, Knowledge, Skills and Connectors. Does not manage Guardrails, roles or members |
| Viewer | 5/41 | Read-only access to the space |
These three roles carry the **Default** label. Click the arrow at the end of a row to see its permissions in detail.
### Permission detail of a role
| Role | Permissions | Best for |
| - | - | - |
| Admin | 41/41 | Full control over Agents, resources, roles and members in the space |
| Builder | 31/41 | Builds and publishes Agents, Knowledge, Skills and Connectors. Does not manage Guardrails, roles or members |
| Viewer | 5/41 | Read-only access to the space |
These three roles carry the **Default** label. Click the arrow at the end of a row to see its permissions in detail.
### Permission detail of a role
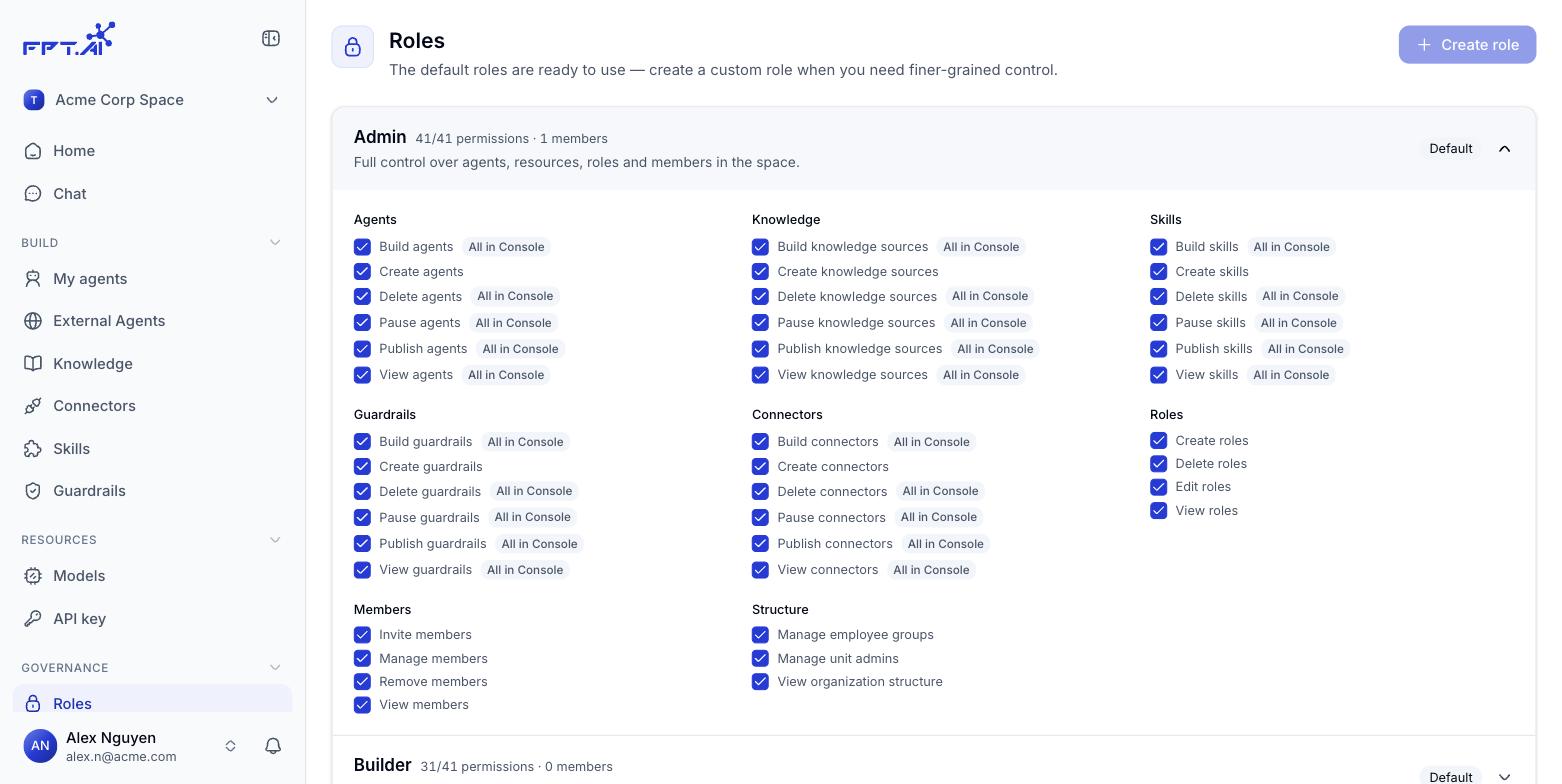 Permissions are arranged in eight groups: Agents, Knowledge, Skills, Guardrails, Connectors, Roles, Members and Structure. Most groups contain Build, Create, Delete, Pause, Publish and View permissions, while Roles and Members have a permission set of their own.
The **All in Console** label next to a permission means it applies to every object in the Console, not only to what that person created.
If the three built-in roles are not granular enough, use the **Create role** button at the top right of the screen.
## Members
Open it from the left menu, group **GOVERNANCE**, item **Members**. This is where you see who is in the organisation, which role they hold and who invited them.
Permissions are arranged in eight groups: Agents, Knowledge, Skills, Guardrails, Connectors, Roles, Members and Structure. Most groups contain Build, Create, Delete, Pause, Publish and View permissions, while Roles and Members have a permission set of their own.
The **All in Console** label next to a permission means it applies to every object in the Console, not only to what that person created.
If the three built-in roles are not granular enough, use the **Create role** button at the top right of the screen.
## Members
Open it from the left menu, group **GOVERNANCE**, item **Members**. This is where you see who is in the organisation, which role they hold and who invited them.
 | Column | Meaning |
| - | - |
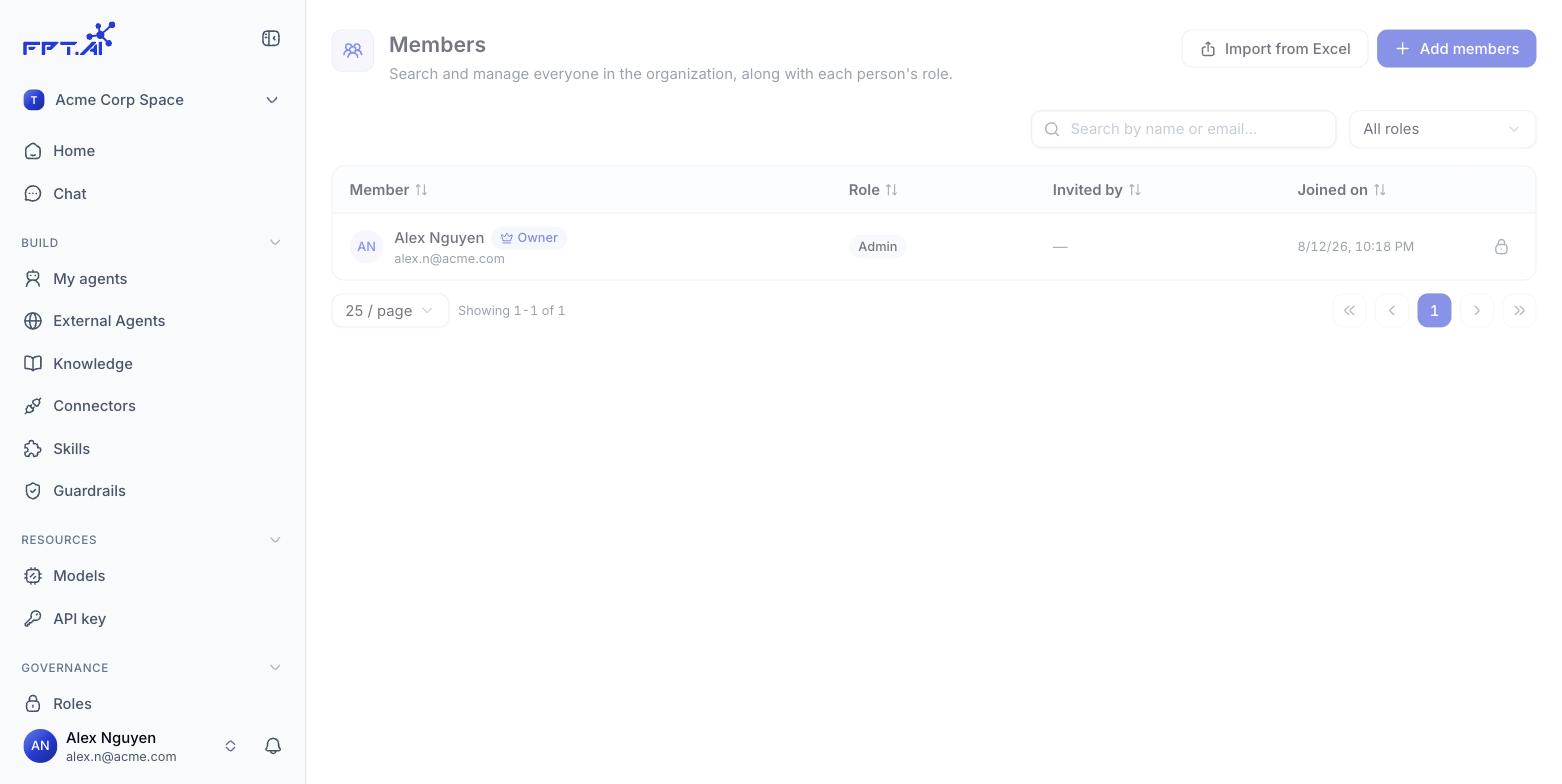
| Member | Full name and email. The owner has an **Owner** label next to the name |
| Role | The role currently assigned to that person |
| Invited by | Who invited this person into the organisation. A dash means they did not come through an invitation |
| Joined on | When that person joined the organisation |
The search box filters by name or email, the **All roles** filter narrows the list by role, and every column with an arrow can be sorted. At the bottom of the table are the rows-per-page selector and the pagination bar.
The owner row only shows a lock icon: The owner cannot be given a different role or removed from the space.
### Invite a new member
The blue button at the top right of the Members screen.
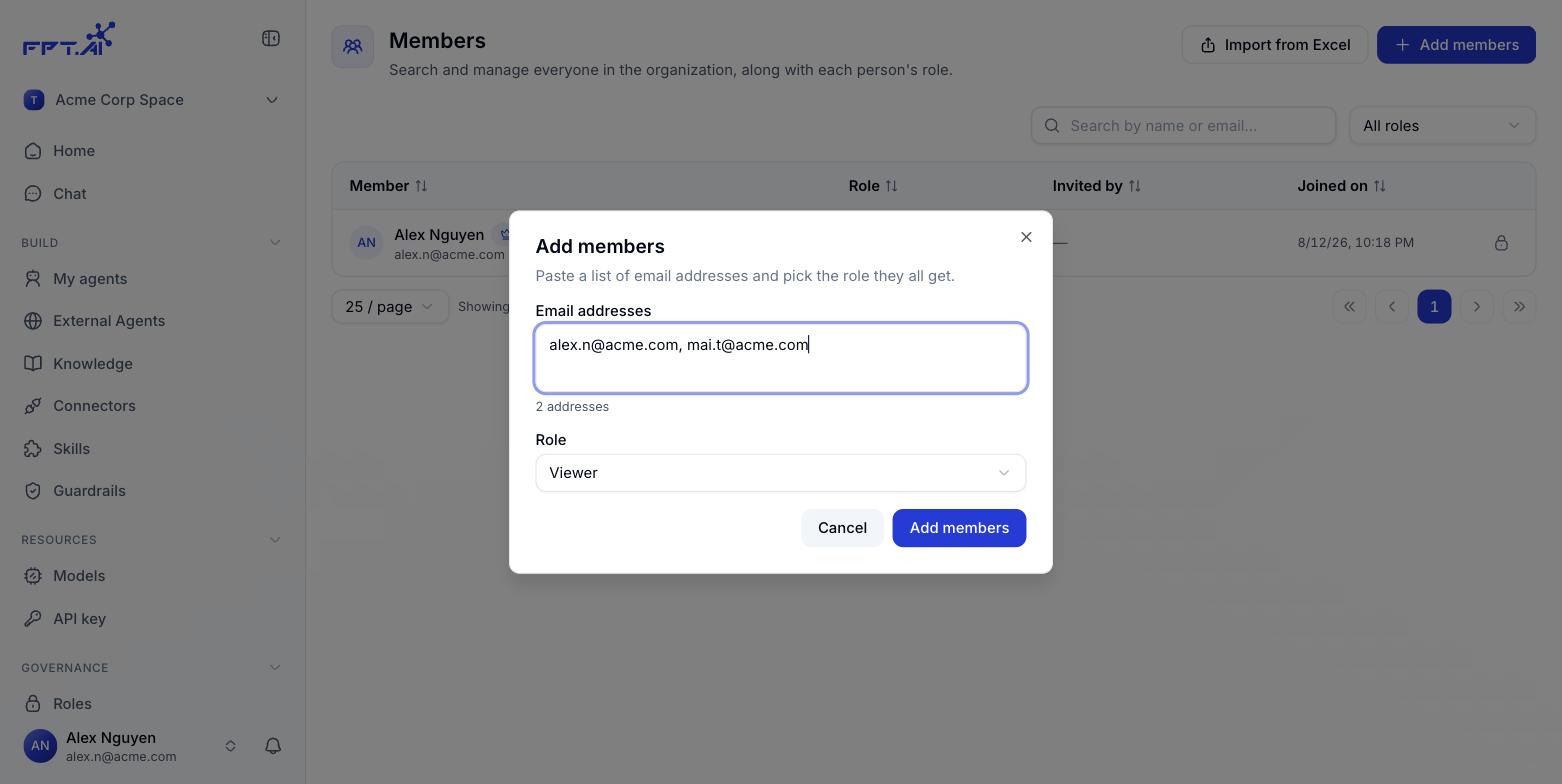
Several addresses at once are fine, separated by line breaks, commas or spaces. The Console counts the valid addresses and shows the number right below the input box.
This role applies to every address in the list. The default is Viewer.
An invitation is sent to each address. Click **Cancel** to close the dialog without sending.
| Column | Meaning |
| - | - |
| Member | Full name and email. The owner has an **Owner** label next to the name |
| Role | The role currently assigned to that person |
| Invited by | Who invited this person into the organisation. A dash means they did not come through an invitation |
| Joined on | When that person joined the organisation |
The search box filters by name or email, the **All roles** filter narrows the list by role, and every column with an arrow can be sorted. At the bottom of the table are the rows-per-page selector and the pagination bar.
The owner row only shows a lock icon: The owner cannot be given a different role or removed from the space.
### Invite a new member
The blue button at the top right of the Members screen.
Several addresses at once are fine, separated by line breaks, commas or spaces. The Console counts the valid addresses and shows the number right below the input box.
This role applies to every address in the list. The default is Viewer.
An invitation is sent to each address. Click **Cancel** to close the dialog without sending.
 To invite a long list, use the **Import from Excel** button next to it instead of pasting each address by hand.
### Track invitations
An invited person can decline an invitation instead of leaving it open. The declined status appears as its own column in the invitation list, so an administrator sees at once who has joined, who has not replied and who has declined.
## Notes
* Organisation data is read-only here. To correct a name, a department or someone's details, change it in the identity system that feeds FPT AI Console.
* Headcounts include everyone synced into the unit, including the Guests group.
This documentation is built and hosted on [Mintlify](https://mintlify.com), a developer documentation platform.
To invite a long list, use the **Import from Excel** button next to it instead of pasting each address by hand.
### Track invitations
An invited person can decline an invitation instead of leaving it open. The declined status appears as its own column in the invitation list, so an administrator sees at once who has joined, who has not replied and who has declined.
## Notes
* Organisation data is read-only here. To correct a name, a department or someone's details, change it in the identity system that feeds FPT AI Console.
* Headcounts include everyone synced into the unit, including the Guests group.
This documentation is built and hosted on [Mintlify](https://mintlify.com), a developer documentation platform.