> ## Documentation Index
> Fetch the complete documentation index at: https://docs-agents.fpt.ai/llms.txt
> Use this file to discover all available pages before exploring further.
# Publishing
> Cut a live version of the agent, choose where it serves, and record what changed
Once the agent is ready, publish it to create a live version. You can publish as often as you like; each publish creates a new version, and you choose which version serves on each deployment channel.
Before it is published, the agent only runs in your own test screen. Publishing is what puts it in front of real users, through Agent Workspace or through external channels.
## Opening the publish dialog
In the top right corner, click **Publish**.
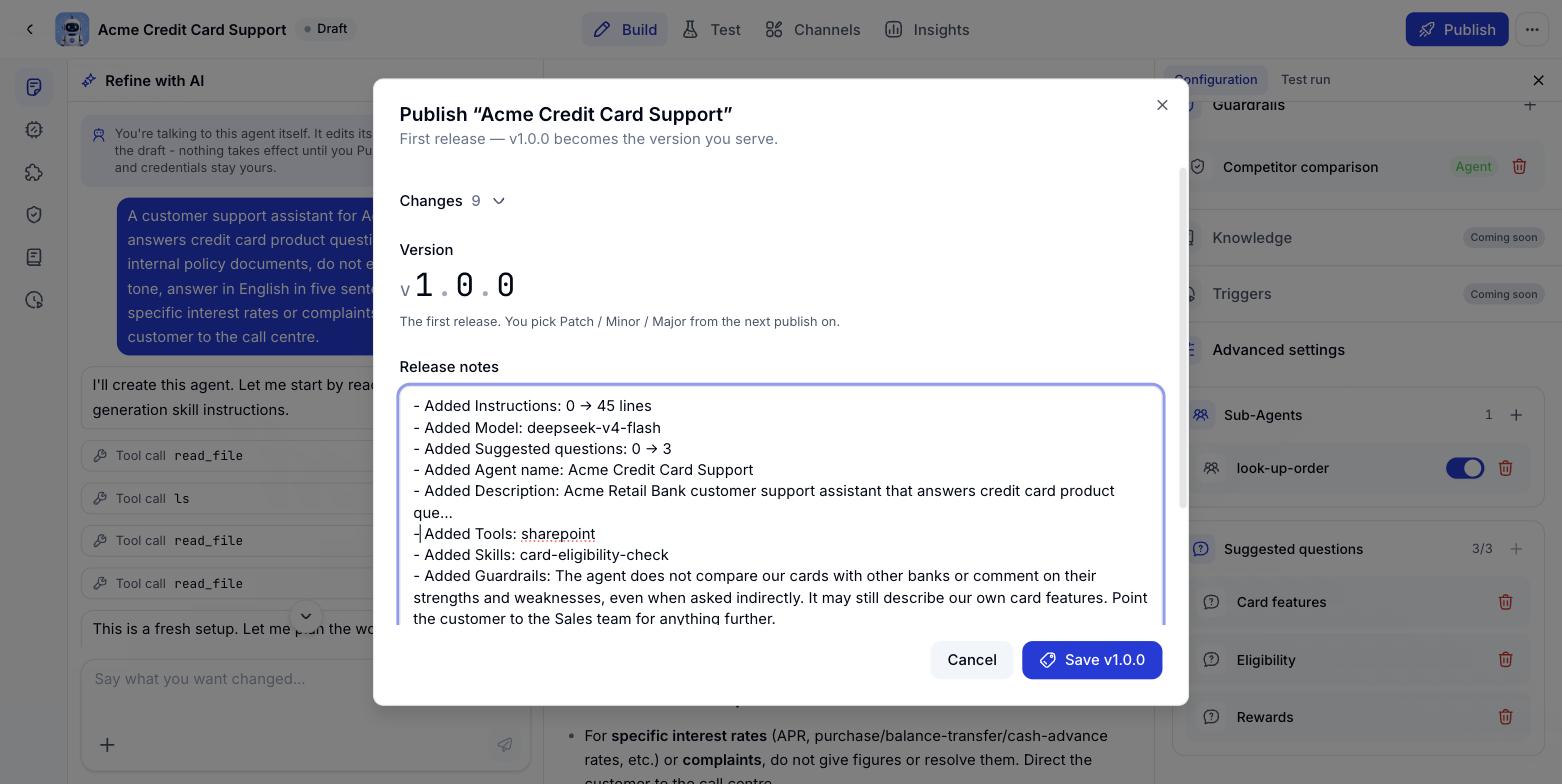
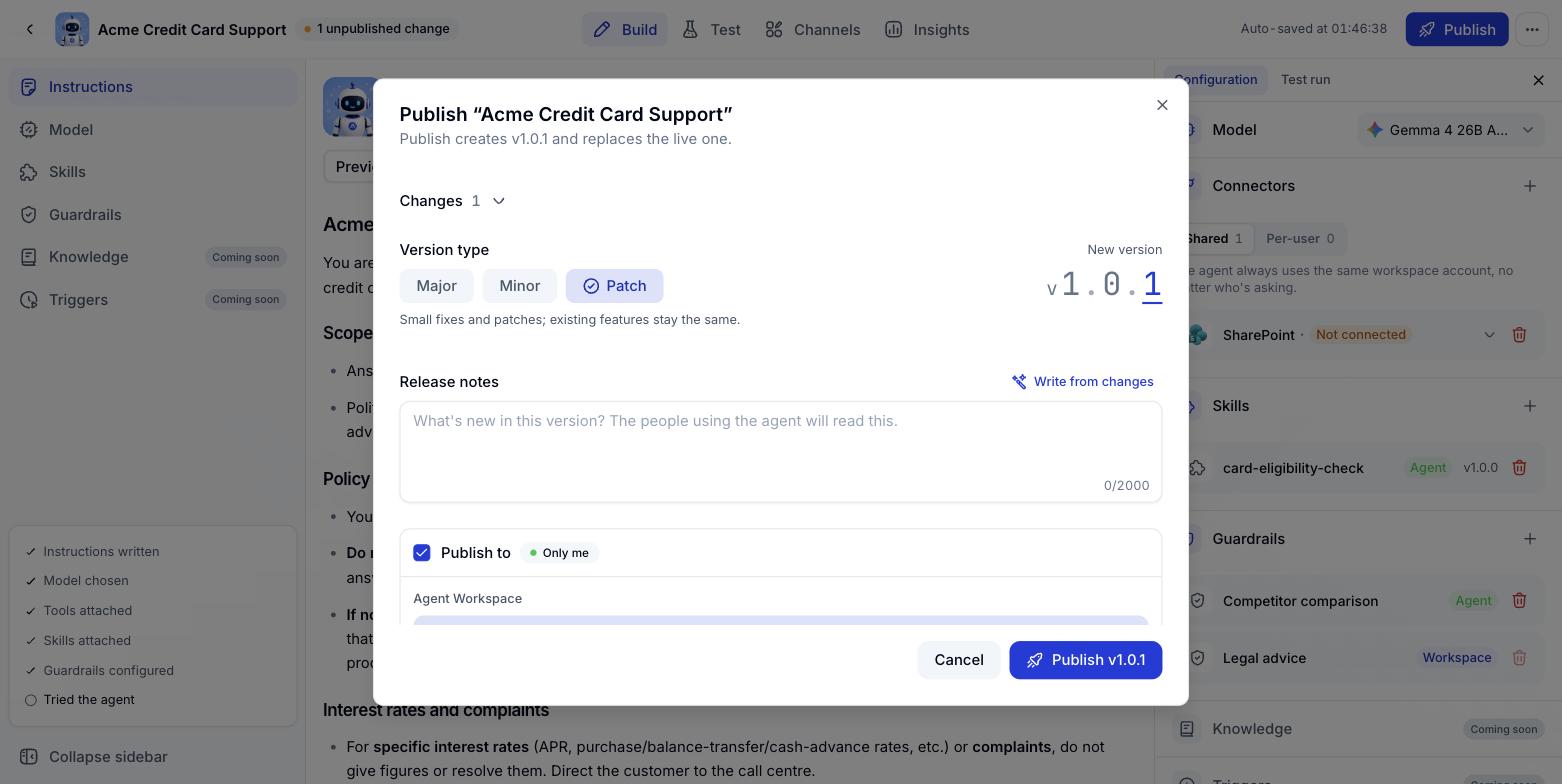
The dialog shows the number of changes, the version number and where the agent will serve.
The agent is packaged into a fixed version. That version never changes again, even as you carry on editing the agent.
 ## What is in the dialog
### Changes
**Changes** lists everything that has moved since the previous version: Instructions, Model, Skills, Connections, Guardrails, sub-agents and so on. Click a heading to expand it for detail. The number beside it tells you how many changes are being packaged into this version.
### Version number
The first publish is always **v1.0.0**. From the second onwards, you pick the increment:
| Increment | When to use it | Example |
| - | - | - |
| **Patch** | Small fixes, wording tweaks, no change in behaviour | v1.0.0 to v1.0.1 |
| **Minor** | A new skill, a new connection, extra guidance | v1.0.1 to v1.1.0 |
| **Major** | A significant change to the role or the way the agent works | v1.1.0 to v2.0.0 |
### Release notes
The notes box takes up to 2,000 characters. This is what the agent's users read, so keep it short and answer "what is new in this version".
Click **Write from changes** and the system drafts the notes from the change list for you. You can still edit them before publishing.
### Publish to
Tick **Publish to** to expand the section where you choose where the agent serves. When an agent has never been published, the badge beside it reads **Not published**.
## What is in the dialog
### Changes
**Changes** lists everything that has moved since the previous version: Instructions, Model, Skills, Connections, Guardrails, sub-agents and so on. Click a heading to expand it for detail. The number beside it tells you how many changes are being packaged into this version.
### Version number
The first publish is always **v1.0.0**. From the second onwards, you pick the increment:
| Increment | When to use it | Example |
| - | - | - |
| **Patch** | Small fixes, wording tweaks, no change in behaviour | v1.0.0 to v1.0.1 |
| **Minor** | A new skill, a new connection, extra guidance | v1.0.1 to v1.1.0 |
| **Major** | A significant change to the role or the way the agent works | v1.1.0 to v2.0.0 |
### Release notes
The notes box takes up to 2,000 characters. This is what the agent's users read, so keep it short and answer "what is new in this version".
Click **Write from changes** and the system drafts the notes from the change list for you. You can still edit them before publishing.
### Publish to
Tick **Publish to** to expand the section where you choose where the agent serves. When an agent has never been published, the badge beside it reads **Not published**.
 ## Publishing to Agent Workspace
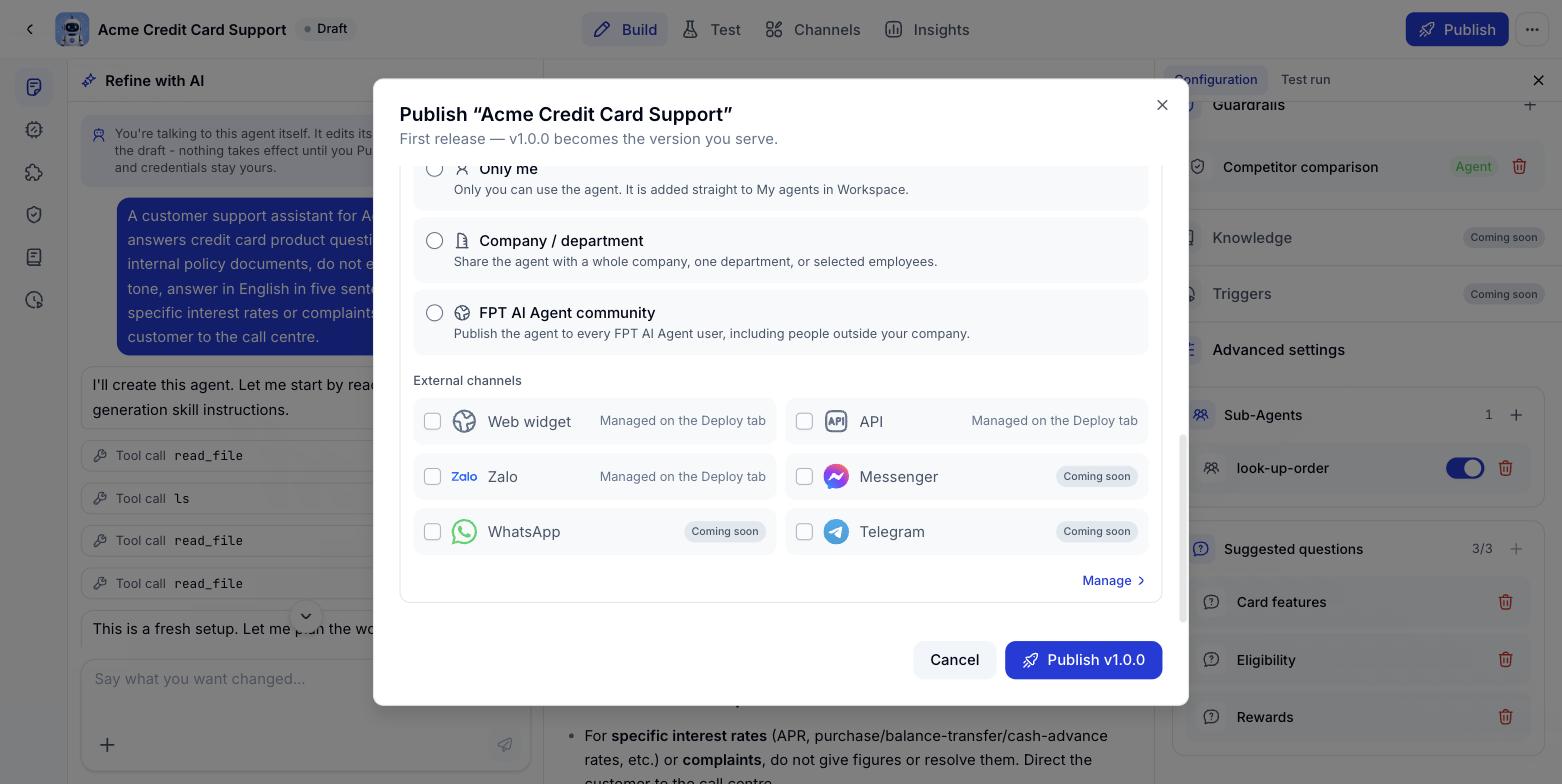
Agent Workspace is where internal users chat with the agent. Pick one of three scopes.
### Only me
Only you can use the agent. It goes straight into **My agents** in the Workspace.
Use this while the agent is still being finished, or when it serves work that is only yours.
### Company / department
Share the agent with a whole company, a department, or a selected group of people.
Choosing this scope opens an organisation tree:
Type a company, department or person into **Search companies, departments or people**.
Tick at company level to share with the whole company. Tick at department level to share with that department only. The number beside each row is how many people it covers.
Click the arrow on a department to list its people and tick them one by one.
## Publishing to Agent Workspace
Agent Workspace is where internal users chat with the agent. Pick one of three scopes.
### Only me
Only you can use the agent. It goes straight into **My agents** in the Workspace.
Use this while the agent is still being finished, or when it serves work that is only yours.
### Company / department
Share the agent with a whole company, a department, or a selected group of people.
Choosing this scope opens an organisation tree:
Type a company, department or person into **Search companies, departments or people**.
Tick at company level to share with the whole company. Tick at department level to share with that department only. The number beside each row is how many people it covers.
Click the arrow on a department to list its people and tick them one by one.
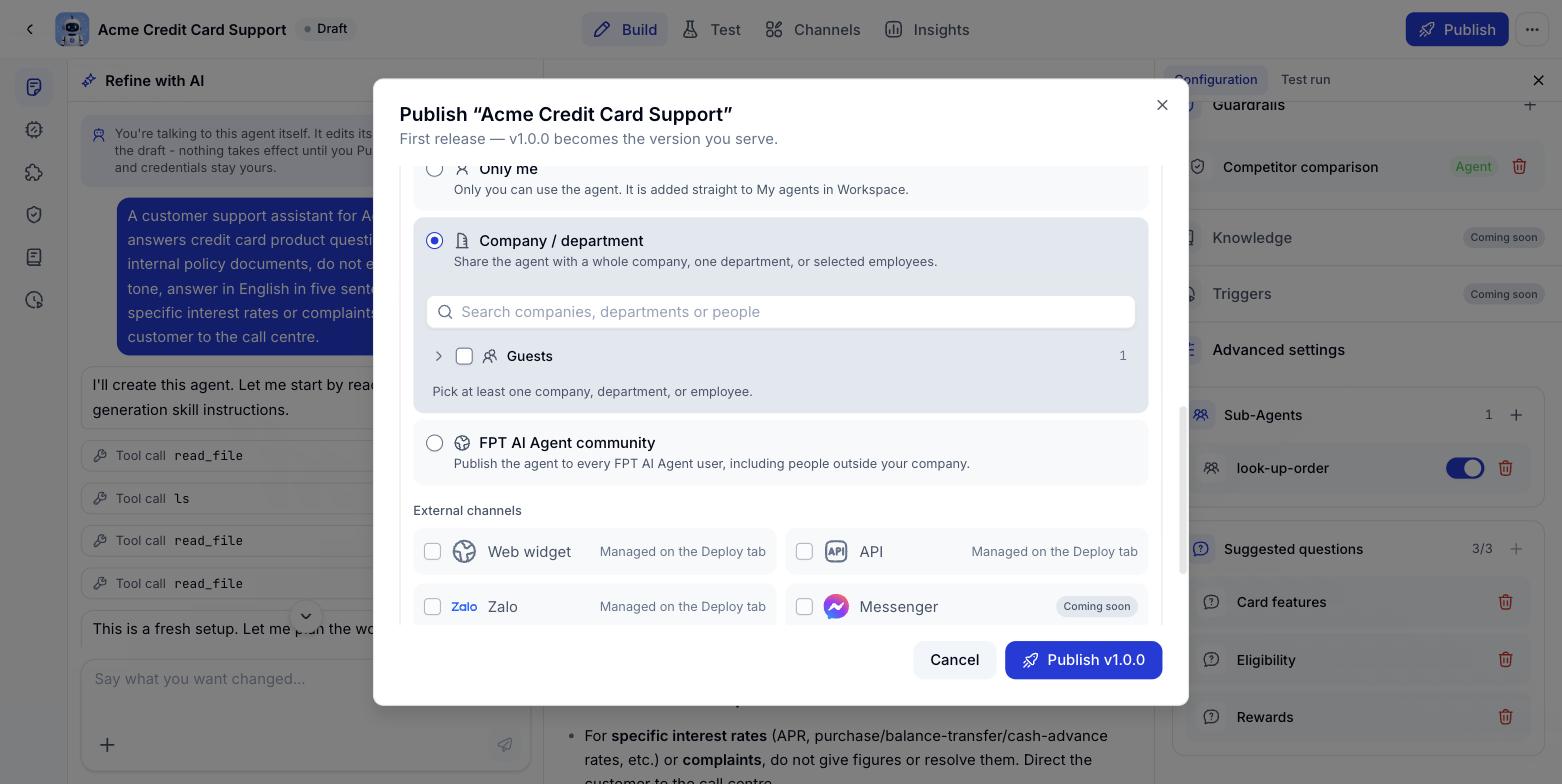 You can combine choices in a single publish - a whole department plus a few people from another, for example.
### FPT AI Agent community
Publishes the agent to every FPT AI Agent user, including people outside your company.
This is the widest scope there is. Go back over the Instructions, the data inside Skills and the Guardrails before choosing it, to be sure the agent cannot leak internal information.
## Publishing to external channels
The **External channels** section lists the channels outside Workspace. Tick a channel and the version you are publishing will serve there.
### Channels available now
A floating chat window embedded in your website. Configured on the Channels tab.
Call the agent directly from your own systems. Configured on the Channels tab.
An Official Account answering customers automatically. Configured on the Channels tab.
### Channels coming soon
The three below appear under **Not available yet** so you can see what is on the roadmap. They cannot be configured yet.
A Facebook page answering customers through the agent.
A WhatsApp Business number answering customers through the agent.
A Telegram bot answering customers through the agent.
The publish dialog only switches channels on and off. Every detailed channel setting lives on the **Channels** tab. Click **Manage** in the bottom right to go straight there, or see [Managing deployment channels](/en/manage-channels).
## Technical integration documentation
Everything above covers enabling and configuring channels inside Console. When your engineering team needs to embed more deeply, see the integration set:
Embed code, widget customisation, share links and the Visitor API for teams building their own interface.
Bringing the chat window into Android and iOS apps.
Webhooks, HMAC signing, callbacks, reading conversation history and API keys.
Error code tables, system limits and the pre-production checklist.
## Publishing the first version
You can combine choices in a single publish - a whole department plus a few people from another, for example.
### FPT AI Agent community
Publishes the agent to every FPT AI Agent user, including people outside your company.
This is the widest scope there is. Go back over the Instructions, the data inside Skills and the Guardrails before choosing it, to be sure the agent cannot leak internal information.
## Publishing to external channels
The **External channels** section lists the channels outside Workspace. Tick a channel and the version you are publishing will serve there.
### Channels available now
A floating chat window embedded in your website. Configured on the Channels tab.
Call the agent directly from your own systems. Configured on the Channels tab.
An Official Account answering customers automatically. Configured on the Channels tab.
### Channels coming soon
The three below appear under **Not available yet** so you can see what is on the roadmap. They cannot be configured yet.
A Facebook page answering customers through the agent.
A WhatsApp Business number answering customers through the agent.
A Telegram bot answering customers through the agent.
The publish dialog only switches channels on and off. Every detailed channel setting lives on the **Channels** tab. Click **Manage** in the bottom right to go straight there, or see [Managing deployment channels](/en/manage-channels).
## Technical integration documentation
Everything above covers enabling and configuring channels inside Console. When your engineering team needs to embed more deeply, see the integration set:
Embed code, widget customisation, share links and the Visitor API for teams building their own interface.
Bringing the chat window into Android and iOS apps.
Webhooks, HMAC signing, callbacks, reading conversation history and API keys.
Error code tables, system limits and the pre-production checklist.
## Publishing the first version
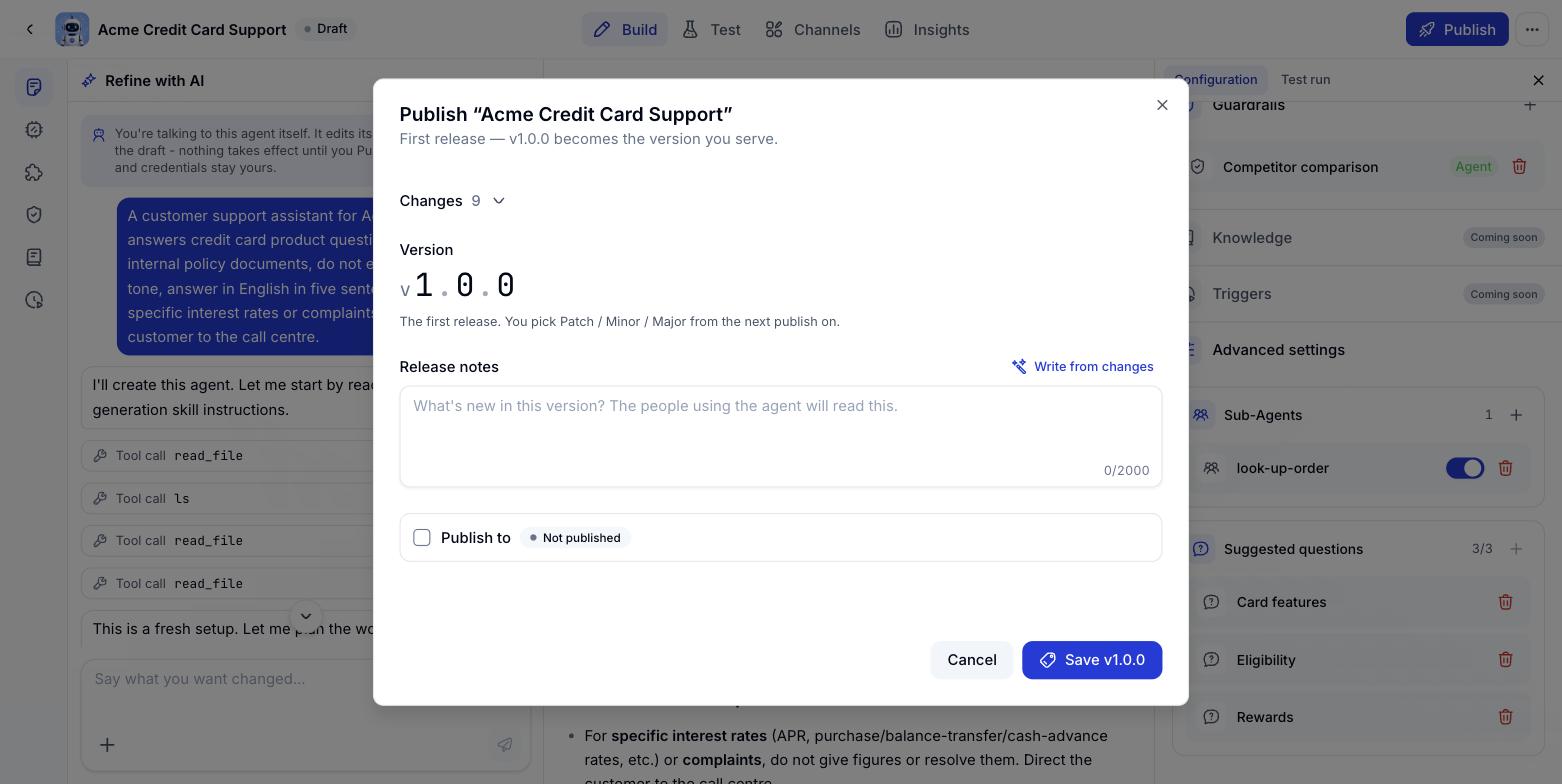 The first time round, the dialog says "First release - v1.0.0 becomes the version you serve". There is no increment to choose: write the release notes, pick where it serves, and click **Publish v1.0.0**.
## Publishing a later version
The first time round, the dialog says "First release - v1.0.0 becomes the version you serve". There is no increment to choose: write the release notes, pick where it serves, and click **Publish v1.0.0**.
## Publishing a later version
 Click **Publish** in the top right of the Agent builder tab.
Pick Patch, Minor or Major according to the size of the change.
Type them yourself, or click **Write from changes** and edit what comes back.
Review the Agent Workspace scope and which external channels are ticked.
The new version is created. Earlier versions are kept and can be put back into service.
## After publishing
See which channels are running, which version serves on each, and switch versions when you need to.
Embedding the agent in your website: domain whitelisting, share links and widget customisation.
Connect an Official Account so the agent answers Zalo messages automatically.
Every published version is kept, along with its release notes.
This documentation is built and hosted on [Mintlify](https://mintlify.com), a developer documentation platform.
Click **Publish** in the top right of the Agent builder tab.
Pick Patch, Minor or Major according to the size of the change.
Type them yourself, or click **Write from changes** and edit what comes back.
Review the Agent Workspace scope and which external channels are ticked.
The new version is created. Earlier versions are kept and can be put back into service.
## After publishing
See which channels are running, which version serves on each, and switch versions when you need to.
Embedding the agent in your website: domain whitelisting, share links and widget customisation.
Connect an Official Account so the agent answers Zalo messages automatically.
Every published version is kept, along with its release notes.
This documentation is built and hosted on [Mintlify](https://mintlify.com), a developer documentation platform.