> ## Documentation Index
> Fetch the complete documentation index at: https://docs-agents.fpt.ai/llms.txt
> Use this file to discover all available pages before exploring further.
# Zalo channel
> Connect an Official Account so the agent answers customer messages on Zalo automatically
The Zalo channel links an Official Account to the agent. Once connected, every message a customer sends to the Official Account is answered by the agent automatically.
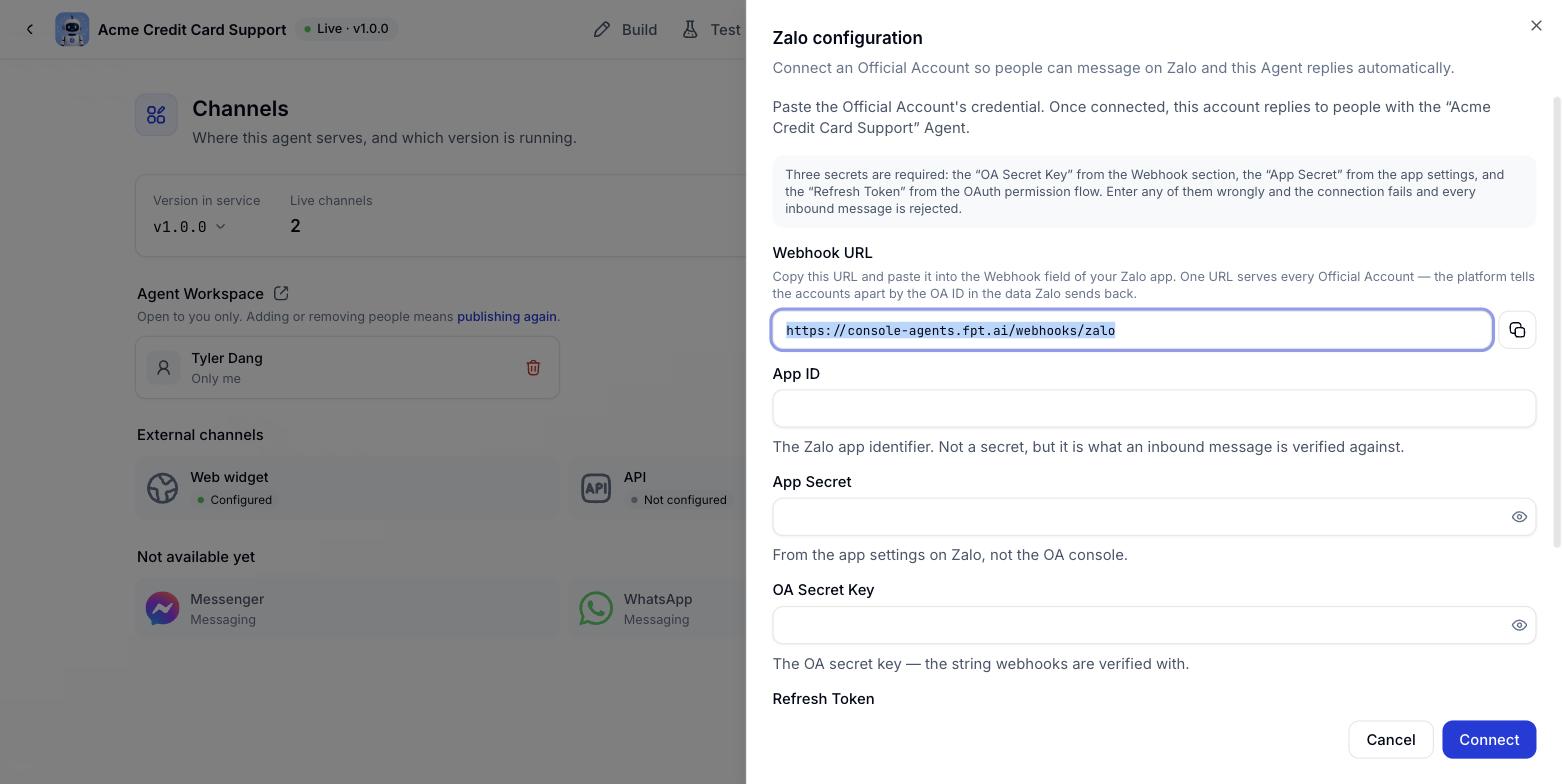
The configuration panel opens from the **Channels** tab - click the **Zalo** channel. The panel is titled "Zalo configuration".
 ## Before you connect
You need admin rights on the Zalo Official Account and its matching Zalo application, plus three secrets:
| Secret | Where to get it |
| - | - |
| **OA Secret Key** | The Official Account's Webhook section |
| **App Secret** | The Zalo application settings, not the OA admin page |
| **Refresh Token** | The application's OAuth authorisation flow |
Get any one of these three wrong and the connection fails, with every incoming message rejected. Copy them exactly, with no leading or trailing spaces.
## Declaring the webhook on Zalo
The **Webhook URL** box at the top of the panel is read-only, with a copy button:
```text theme={null}
https://console-agents.fpt.ai/webhooks/zalo
```
Click the copy button beside the box.
Open your Zalo application and paste it into the Webhook field.
Save the webhook settings before returning to Console.
One webhook address serves every Official Account. The system tells accounts apart by the OA ID inside the data Zalo sends, so you do not need a separate address per OA.
## The fields
| Field | Required | Description |
| - | - | - |
| **Webhook URL** | Read-only | The address that receives data from Zalo; copy it into the Zalo application |
| **App ID** | Yes | The Zalo application identifier. Not a secret, but it is what incoming messages are authenticated against |
| **App Secret** | Yes | From the Zalo application settings, not the OA admin page. Shown masked |
| **OA Secret Key** | Yes | The Official Account's secret key, used to authenticate the webhook. Shown masked |
| **Refresh Token** | Yes | From the OAuth flow. Zalo issues a new token after each use and the system always keeps the latest. Shown masked |
| **Display name** | No | The channel's display name. Leave it empty and the system uses the Official Account name Zalo returns |
## Connecting the Official Account
Go to the **Channels** tab and click the **Zalo** channel, which starts as Not configured.
Copy the Webhook URL and paste it into the Zalo application as described above.
Paste each value exactly into its matching box.
Enter a **Display name**, or leave it empty to use the Official Account name.
The system checks the details with Zalo. On success the channel moves out of Not configured.
## Editing the connection
Reopen the Zalo channel from the Channels tab. Secret fields are masked; type a new value to replace one, or leave it alone to keep it. Click **Connect** to save, or **Cancel** to close without saving.
Zalo issues a fresh Refresh Token after each use. If the channel suddenly stops answering, get a new Refresh Token from the OAuth flow and update it here.
## Disconnecting
There are two ways to stop serving on Zalo:
Open the **Publish** dialog, untick **Zalo** under External channels and publish. The connection details are kept.
Open the Zalo configuration panel and disconnect. The secrets are wiped, so you would have to enter them again to come back.
Once disconnected, customers writing to the Official Account no longer get an answer from the agent. Have a plan for handling messages manually before you disconnect.
## Common problems
| Symptom | Usual cause | What to do |
| - | - | - |
| Connect returns an error | Wrong App Secret, OA Secret Key or Refresh Token | Fetch the correct values from Zalo and paste them again |
| Connected, but no messages arrive | The Webhook URL was never declared in the Zalo application | Copy the Webhook URL again and save it on Zalo |
| Customers see "This conversation is unavailable" | The agent is not published, or Zalo was not ticked at publish time | See [Publishing](/en/publishing) |
| A running channel suddenly stops answering | The Refresh Token has expired | Update it with a new Refresh Token |
See the overall state of every channel and switch the serving version on [Managing deployment channels](/en/manage-channels).
This documentation is built and hosted on [Mintlify](https://mintlify.com), a developer documentation platform.
## Before you connect
You need admin rights on the Zalo Official Account and its matching Zalo application, plus three secrets:
| Secret | Where to get it |
| - | - |
| **OA Secret Key** | The Official Account's Webhook section |
| **App Secret** | The Zalo application settings, not the OA admin page |
| **Refresh Token** | The application's OAuth authorisation flow |
Get any one of these three wrong and the connection fails, with every incoming message rejected. Copy them exactly, with no leading or trailing spaces.
## Declaring the webhook on Zalo
The **Webhook URL** box at the top of the panel is read-only, with a copy button:
```text theme={null}
https://console-agents.fpt.ai/webhooks/zalo
```
Click the copy button beside the box.
Open your Zalo application and paste it into the Webhook field.
Save the webhook settings before returning to Console.
One webhook address serves every Official Account. The system tells accounts apart by the OA ID inside the data Zalo sends, so you do not need a separate address per OA.
## The fields
| Field | Required | Description |
| - | - | - |
| **Webhook URL** | Read-only | The address that receives data from Zalo; copy it into the Zalo application |
| **App ID** | Yes | The Zalo application identifier. Not a secret, but it is what incoming messages are authenticated against |
| **App Secret** | Yes | From the Zalo application settings, not the OA admin page. Shown masked |
| **OA Secret Key** | Yes | The Official Account's secret key, used to authenticate the webhook. Shown masked |
| **Refresh Token** | Yes | From the OAuth flow. Zalo issues a new token after each use and the system always keeps the latest. Shown masked |
| **Display name** | No | The channel's display name. Leave it empty and the system uses the Official Account name Zalo returns |
## Connecting the Official Account
Go to the **Channels** tab and click the **Zalo** channel, which starts as Not configured.
Copy the Webhook URL and paste it into the Zalo application as described above.
Paste each value exactly into its matching box.
Enter a **Display name**, or leave it empty to use the Official Account name.
The system checks the details with Zalo. On success the channel moves out of Not configured.
## Editing the connection
Reopen the Zalo channel from the Channels tab. Secret fields are masked; type a new value to replace one, or leave it alone to keep it. Click **Connect** to save, or **Cancel** to close without saving.
Zalo issues a fresh Refresh Token after each use. If the channel suddenly stops answering, get a new Refresh Token from the OAuth flow and update it here.
## Disconnecting
There are two ways to stop serving on Zalo:
Open the **Publish** dialog, untick **Zalo** under External channels and publish. The connection details are kept.
Open the Zalo configuration panel and disconnect. The secrets are wiped, so you would have to enter them again to come back.
Once disconnected, customers writing to the Official Account no longer get an answer from the agent. Have a plan for handling messages manually before you disconnect.
## Common problems
| Symptom | Usual cause | What to do |
| - | - | - |
| Connect returns an error | Wrong App Secret, OA Secret Key or Refresh Token | Fetch the correct values from Zalo and paste them again |
| Connected, but no messages arrive | The Webhook URL was never declared in the Zalo application | Copy the Webhook URL again and save it on Zalo |
| Customers see "This conversation is unavailable" | The agent is not published, or Zalo was not ticked at publish time | See [Publishing](/en/publishing) |
| A running channel suddenly stops answering | The Refresh Token has expired | Update it with a new Refresh Token |
See the overall state of every channel and switch the serving version on [Managing deployment channels](/en/manage-channels).
This documentation is built and hosted on [Mintlify](https://mintlify.com), a developer documentation platform.