
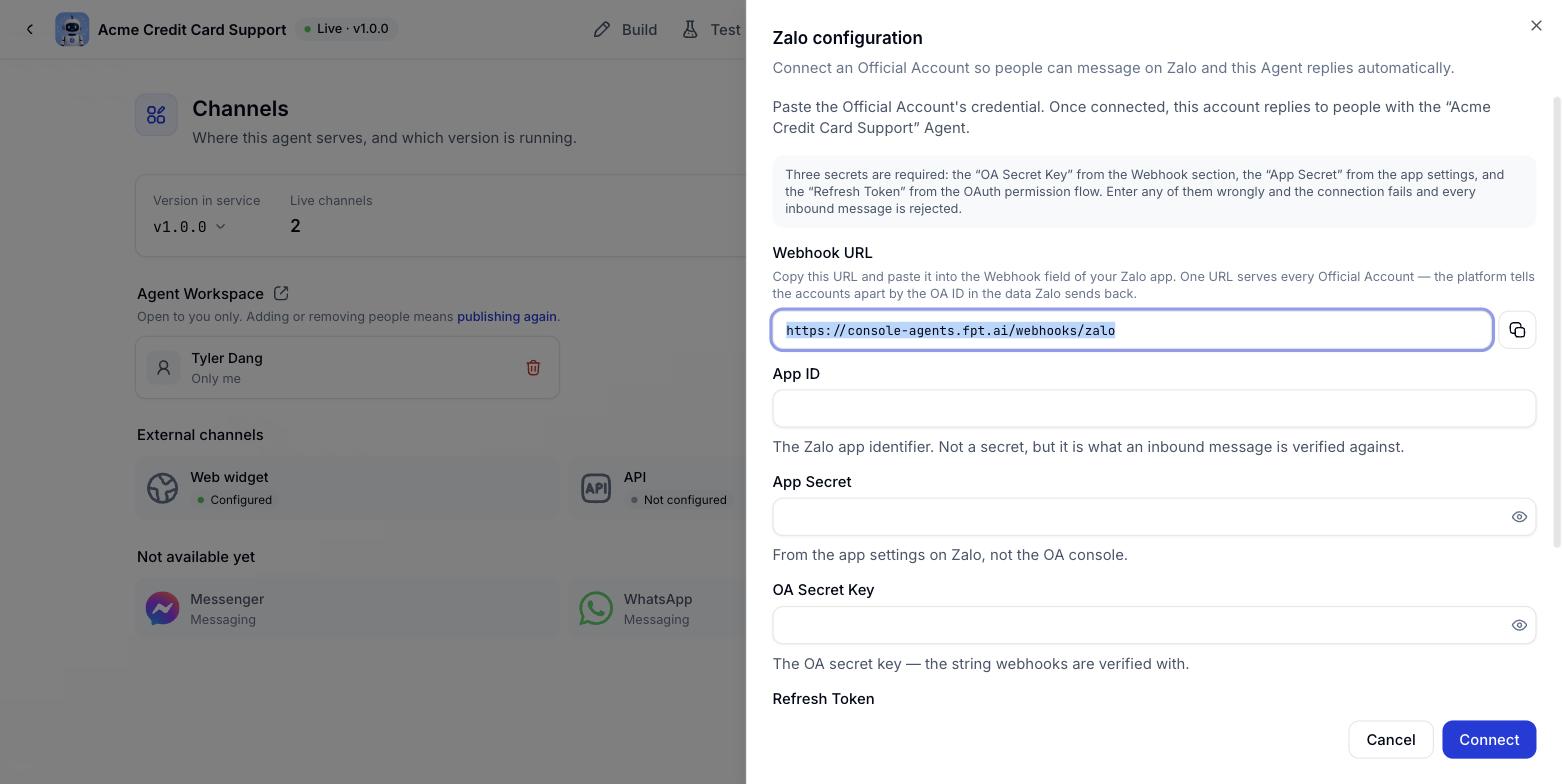
The configuration panel opens from the Channels tab - click the Zalo channel. The panel is titled “Zalo configuration”.
Before you connect
You need admin rights on the Zalo Official Account and its matching Zalo application, plus three secrets:Declaring the webhook on Zalo
The Webhook URL box at the top of the panel is read-only, with a copy button:1
Copy the Webhook URL
Click the copy button beside the box.
2
Paste it into your Zalo application
Open your Zalo application and paste it into the Webhook field.
3
Save it on Zalo
Save the webhook settings before returning to Console.
One webhook address serves every Official Account. The system tells accounts apart by the OA ID inside the data Zalo sends, so you do not need a separate address per OA.
The fields
Connecting the Official Account
1
Open the Zalo channel
Go to the Channels tab and click the Zalo channel, which starts as Not configured.
2
Declare the webhook on Zalo
Copy the Webhook URL and paste it into the Zalo application as described above.
3
Enter App ID, App Secret, OA Secret Key and Refresh Token
Paste each value exactly into its matching box.
4
Set a display name if you want one
Enter a Display name, or leave it empty to use the Official Account name.
5
Click Connect
The system checks the details with Zalo. On success the channel moves out of Not configured.
Editing the connection
Reopen the Zalo channel from the Channels tab. Secret fields are masked; type a new value to replace one, or leave it alone to keep it. Click Connect to save, or Cancel to close without saving.Disconnecting
There are two ways to stop serving on Zalo:Switch it off at publish time
Open the Publish dialog, untick Zalo under External channels and publish. The connection details are kept.
Disconnect it entirely
Open the Zalo configuration panel and disconnect. The secrets are wiped, so you would have to enter them again to come back.
Common problems
See the overall state of every channel and switch the serving version on Managing deployment channels.