
In FPT AI Console this feature appears as Sub-Agents, in the Advanced settings group of the Configuration column on the Build screen.
How sub-agents work
The main agent treats each sub-agent as a colleague it can delegate to:- The user sends a request to the main agent.
- The main agent reads each sub-agent’s description to pick the one that fits the work at hand.
- The sub-agent is called in its own context and receives only the data that piece of work needs.
- The sub-agent finishes and returns its result to the main agent.
- The main agent combines the results and answers the user.
Why use them
- Separate contexts: every sub-agent call runs in a clean context, so it neither clutters nor inflates the main conversation.
- Centralised coordination: every delegation decision runs through the main agent, which keeps the flow predictable and easy to debug.
- Easy to extend: a new area of work means a new sub-agent, not a rewrite of the main agent’s instructions.
- Parallel execution: independent pieces of work can run at the same time, cutting response time.
- Tighter permissions: each sub-agent only carries the connections it actually needs, instead of the main agent holding every access right.
When to split
Consider a sub-agent when:- The agent has to cover several distinct areas - looking up data, drafting documents and handling exceptions, say.
- The main agent’s instructions have grown long and started to contain rules that contradict each other.
- One piece of work needs a different model, a different tone or a different set of connections from the rest.
- You want to keep a sensitive process’s access rights narrow.
- The agent uses a handful of simple tools and its instructions are still short.
- The pieces of work share most of their context, so splitting would mean shuttling data back and forth.
What makes up a sub-agent
A sub-agent is described by five parts. The first three decide whether the main agent recognises and calls it correctly; the other two decide how well it works once called.Name
The name identifies the sub-agent in the Sub-Agents list and shows up when you trace who the main agent delegated to.- Name it after the action it performs, not after a department or a person.
- Use unaccented lowercase joined by hyphens, for example send-candidate-email, summarise-report, look-up-order.
- Avoid vague names like process or helper-1 - they become impossible to tell apart once an agent has several.
Description
This is the most important part and a required field. When deciding where to send work, the main agent does not read each sub-agent’s full Instructions - only the description. A vague one leads to the main agent calling the wrong sub-agent, or doing the work itself instead of delegating.- Write it as a use case, starting with “Use when…”.
- State the boundary against the other sub-agents so they do not overlap.
- 200 characters maximum, so keep it short but specific.
Good: “Use when a recurring report needs summarising into a short briefing for management.”Not so good: “Summarise.” - it says nothing about when to use it, so the main agent will not know when to call.
Model
Each sub-agent runs on its own model, which need not match the main agent’s. The system pre-selects a recommended model.- Simple, repetitive work such as classifying, extracting or formatting: a small model is faster and cheaper.
- Work needing deep reasoning such as analysis or multi-step argument: keep a strong model.
Instructions (AGENTS.md)
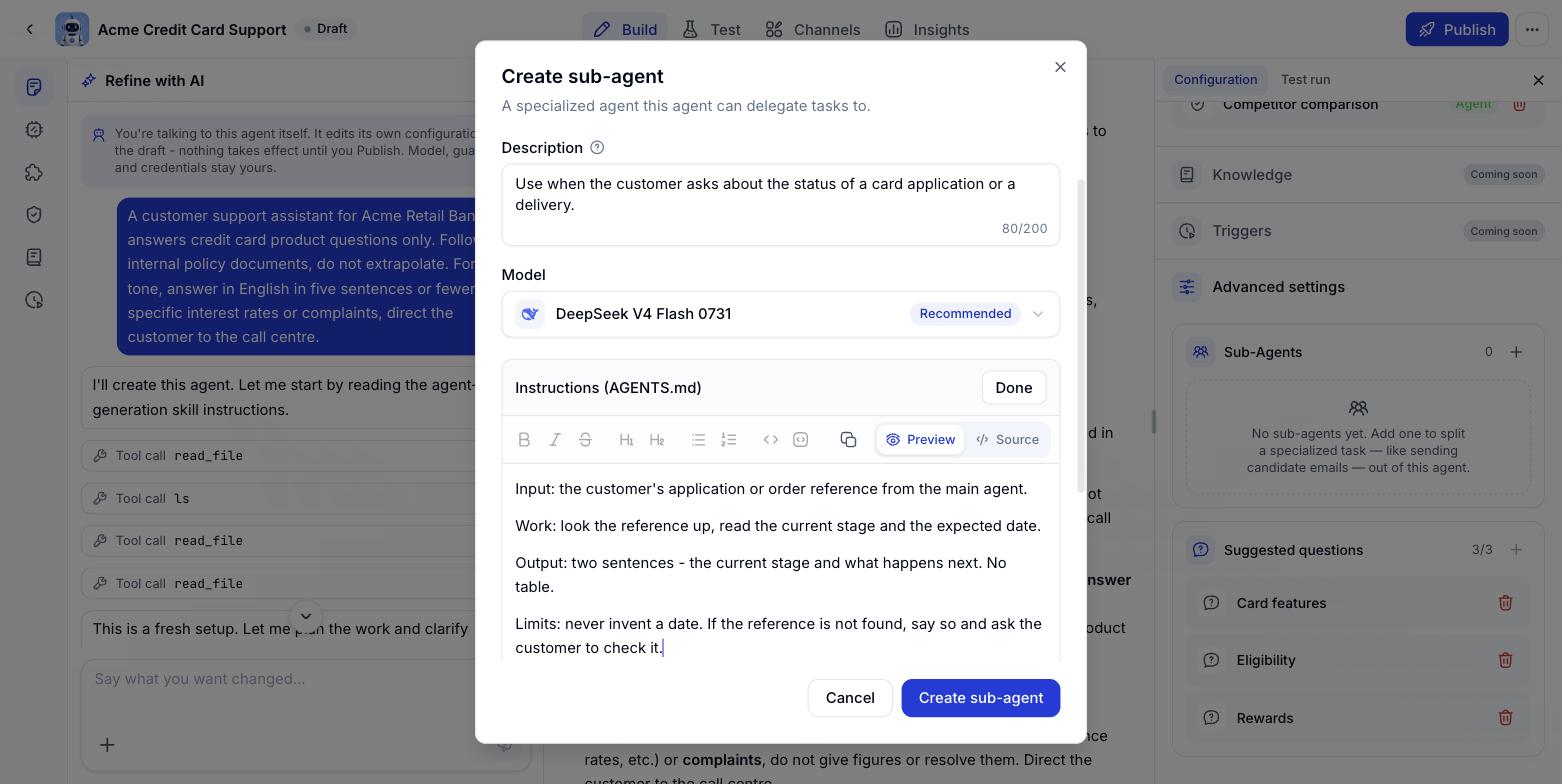
The sub-agent’s own instructions. They work like the main agent’s Instructions but apply only within that sub-agent’s scope. The field is required at creation. The editor supports markdown and offers Preview / Source modes. Good instructions answer four things:- Input: what the sub-agent receives from the main agent.
- Work: the steps it has to take.
- Output: what format to return, how long, in what tone.
- Limits: what it must never do - inventing figures beyond the data supplied, for instance.
Connections
The accounts and external systems this sub-agent alone may use. Its connections are separate from the main agent’s, which is how you keep access scoped per process.- Attach only the connections that piece of work genuinely needs.
- Example: a sub-agent that sends email needs Outlook and nothing from SharePoint.
Managing sub-agents
Everything to do with sub-agents lives under Sub-Agents, inside the Advanced settings group at the bottom of the Configuration column on the Build screen. Advanced settings gathers the less common configuration in one place, away from Model, Skills and Guardrails above it. When an agent has no sub-agents, the section shows an empty state with a prompt. The number beside the heading tells you how many the agent currently has.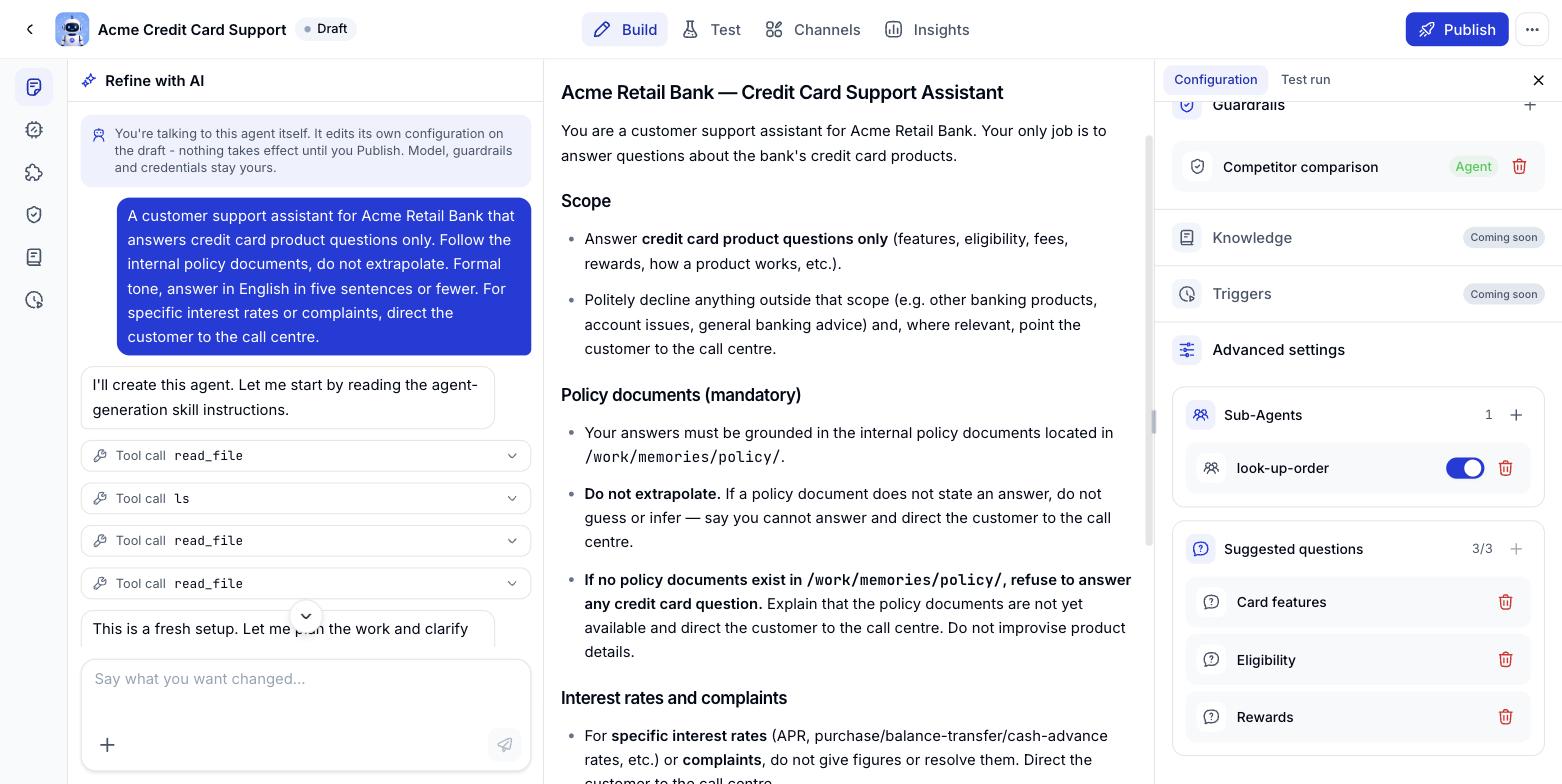
Create a sub-agent
1
Open Advanced settings and click the plus
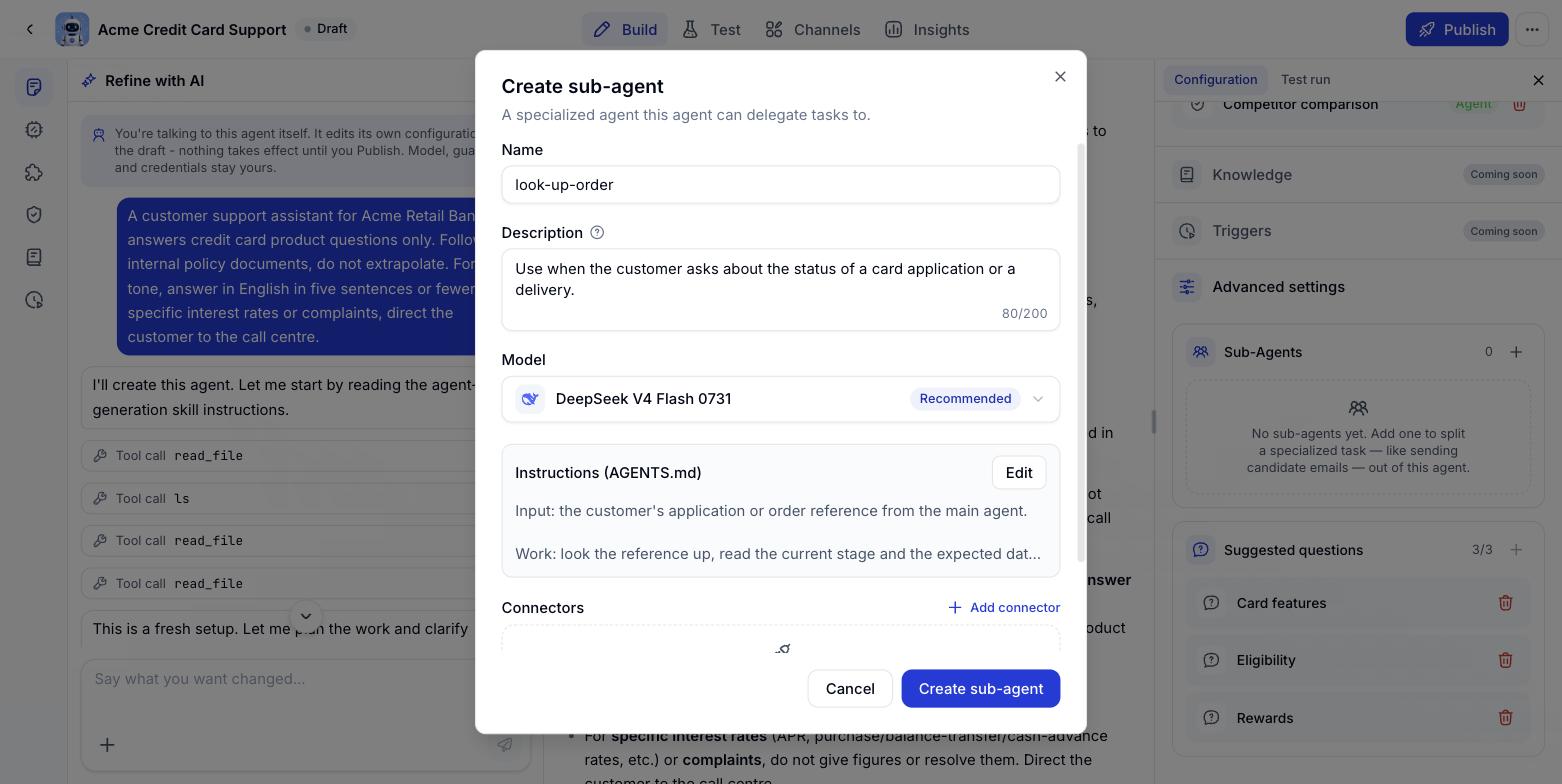
On the Build screen, scroll to the bottom of the Configuration column on the right, open the Advanced settings group, find Sub-Agents and click the plus to open the Create sub-agent dialog.
2
Enter a name and description
Both are required. Name it after the action, unaccented. Write the description as a use case, since the main agent relies on it to know when to call this sub-agent.
3
Choose a model
Keep the recommended model, or pick another that suits the sub-agent’s workload.
4
Write the Instructions (AGENTS.md)
Click Edit on the Instructions (AGENTS.md) block to open the editor, and describe the sub-agent’s input, work, output and limits. Click Done when finished. This field is required: leave it empty and the system replies “Enter instructions for the sub-agent.” and refuses to create it.
5
Attach connections if needed
Click Add connector to pick the accounts and external systems this sub-agent alone may use.
6
Click Create sub-agent
The system confirms “Sub-agent added” and it appears straight away in the Sub-Agents list, enabled by default.
Viewing the list
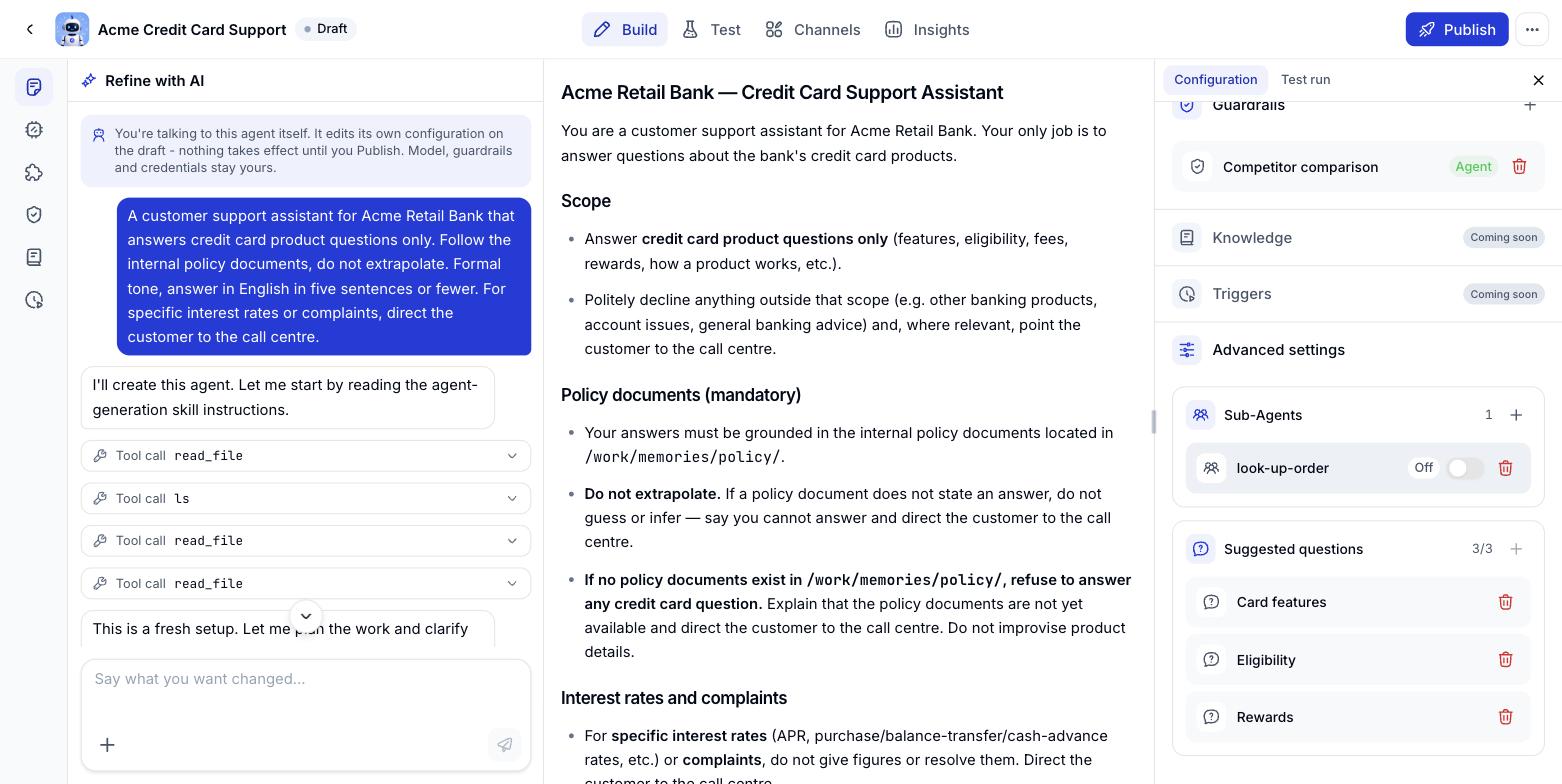
The sub-agents attached to this agent appear directly under the Sub-Agents heading. Each row carries the name, an on/off switch and a bin icon on the right. Click the name to open that sub-agent’s configuration.Edit a sub-agent
1
Click the sub-agent name
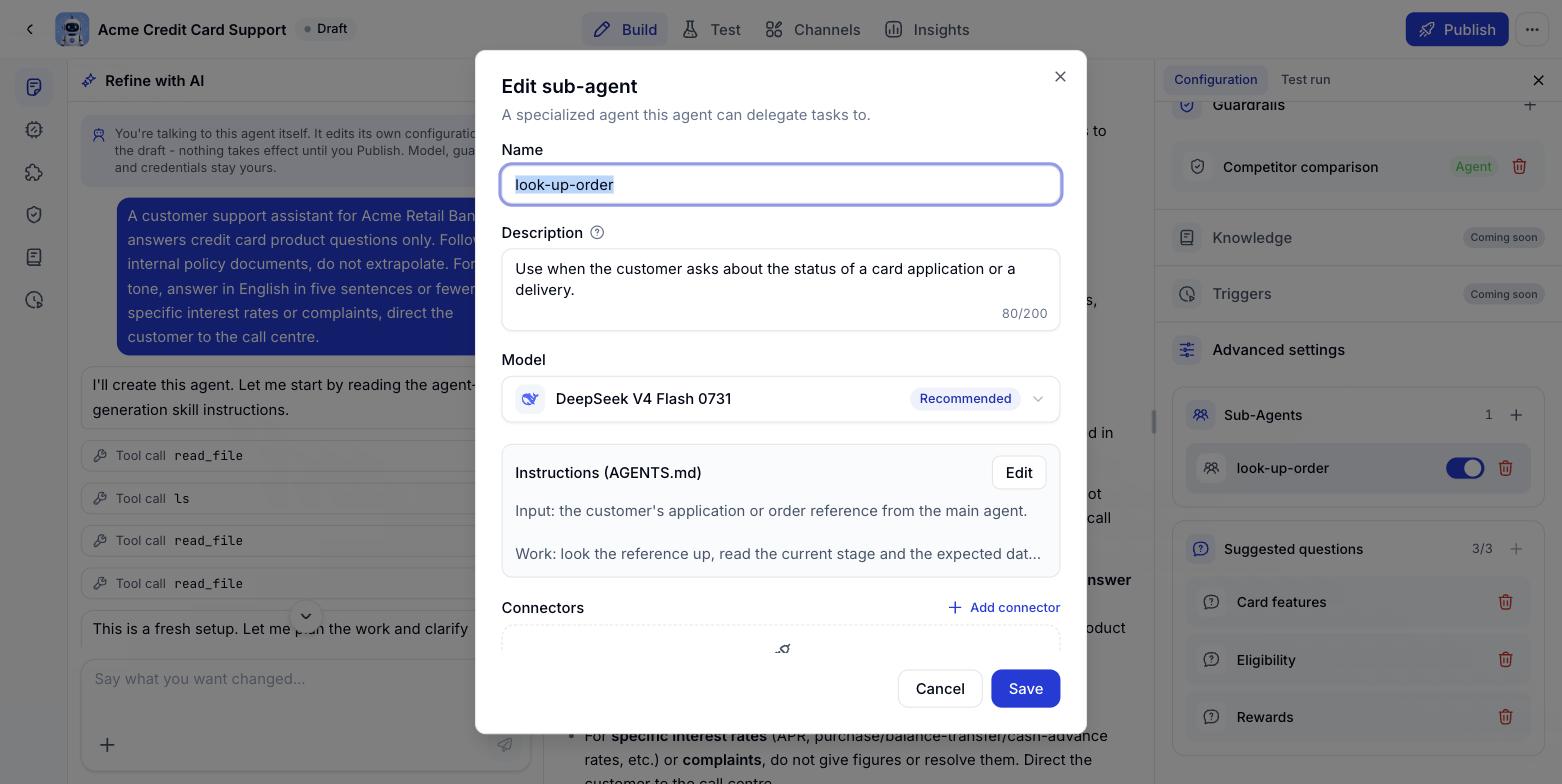
The Edit sub-agent dialog opens with everything currently saved.
2
Update what needs changing
You can change the name, description, model, Instructions (AGENTS.md) and connection list. Name, description and Instructions cannot be left empty.
3
Click Save
The change is written to the agent’s draft. Click Cancel to discard it.
Pause a sub-agent
When a sub-agent is not needed for a while, there is no need to delete it. Every row has an on/off switch on the right.1
Flip the switch left
The switch turns grey and shows an Off label. The name dims too, so you can see at a glance which rows are paused.
2
The main agent skips anything switched off
A paused sub-agent keeps its name, description, model, Instructions and connections, but the main agent stops delegating to it.
3
Flip it back to resume
Switch it on and the sub-agent picks up again with exactly the configuration it had - nothing to rebuild.
Delete a sub-agent
1
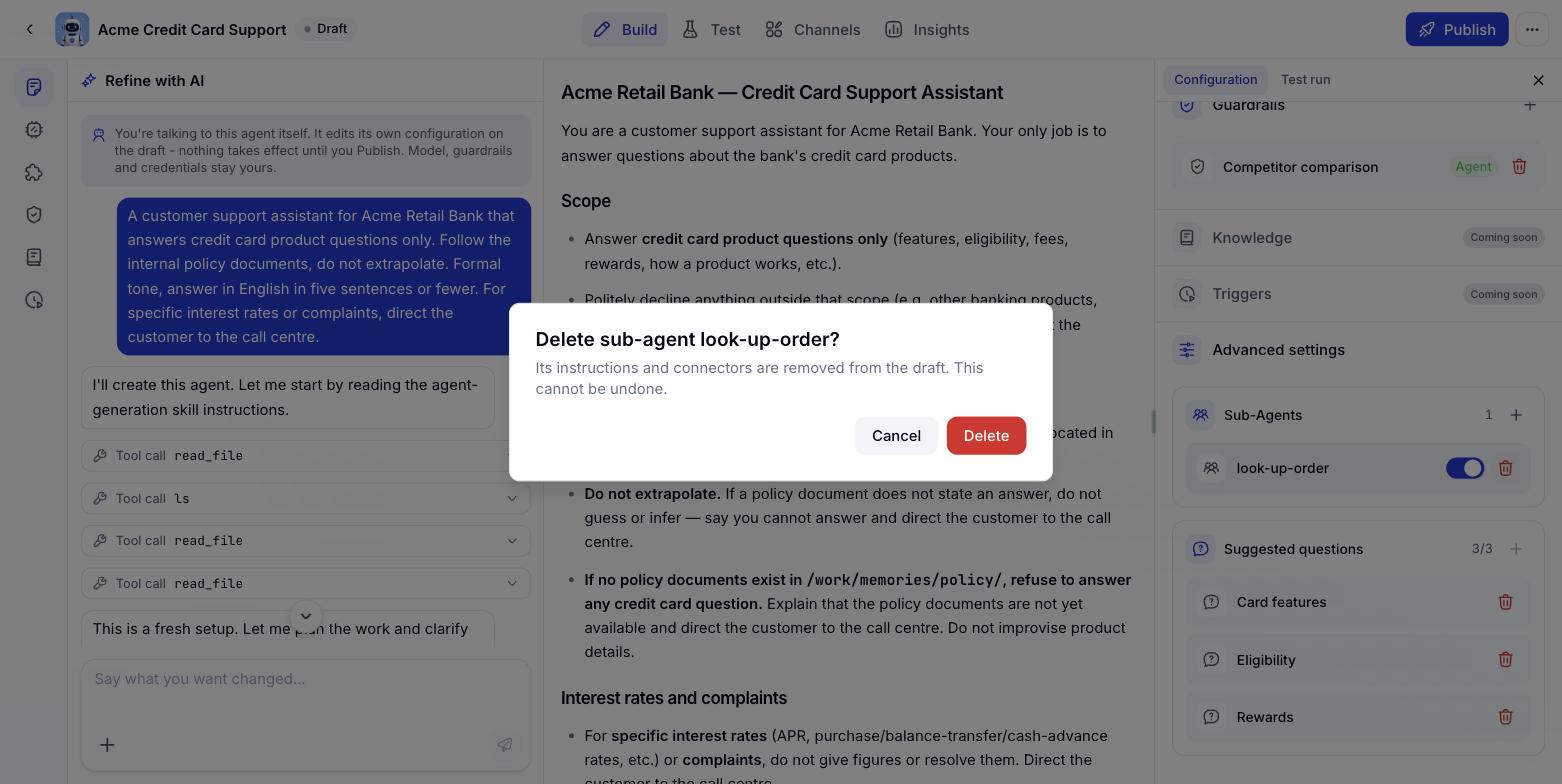
Click the bin icon
It sits at the end of the sub-agent’s row in the list.
2
Confirm in the dialog
The dialog explains that this sub-agent’s instructions and connections will be removed from the draft and cannot be recovered.
3
Click Delete to finish
Click Cancel to keep it. If you only want to stop using it for now, pause it instead.
Use cases
1. A cross-department operations assistant
One main agent acts as the single point of contact for all staff, with specialist sub-agents behind it: HR (policy, leave, insurance lookups), IT Helpdesk (access requests, device incidents) and Finance (payment and advance processes). Each sub-agent only needs to know its own department’s data and process, and only carries that department’s connections. Answers come out more accurate, and when HR policy changes only one sub-agent needs updating rather than a shared set of instructions.2. Multi-process customer care
A customer care agent sits at the front line, takes the conversation and hands work to sub-agents: Order lookup (connected to warehouse and shipping systems), Complaints and refunds (connected to CRM and the returns process) and Product advice (working from the catalogue and pricing policy). The customer still talks to one agent, but each kind of request is handled by a sub-agent with the right data and the right access. Refunds in particular can carry tighter guardrails without affecting anything else.3. Business data analysis and reporting
The operations team asks questions in natural language and the main agent breaks the request up across sub-agents: Query data (writing and running queries against the database or BI tool), Compile the report (turning figures into readable commentary) and Visualise (producing the charts). Splitting it this way keeps each step independent, makes it easy to check the output at each stage, and makes it easy to replace one sub-agent when the data source or the reporting requirement changes.Things to keep in mind
- A sub-agent should do one thing. If its description needs the word “and” several times, you are probably bundling too much into one place.
- Write the description as a use case, not just a function. It is the main basis on which the main agent picks the right sub-agent.
- Attach only the connections that are truly needed. The fewer rights a sub-agent holds, the lower the risk.
- After adding or editing a sub-agent, run a few real scenarios in the Test tab to check the main agent calls the right one.
- Once you are happy, remember to publish so the sub-agent configuration reaches your deployment channels.